- FOR BEST RESULTS FOLLOW THESE SIMPLE RULES:
- 1. Never use force if parts seem to jam. Proceed carefully and find cause for obstruction.
- 2. Have camera in shade when loading. See that shutter is closed first.
- 3. Attach paper leader of new film to empty spool firmly and evenly. Fasten back of camera securely.
- 4. Wind film immediately after taking each picture.
- 5. Do not let the sun shine on lens.
- 6. Never make a time exposure while holding the camera in the hands.
- 7. Hold the camera level.
- 8. Hold the camera steady when taking a picture. The slightest movement will cause a blur.
- 9. Don't try to get too much in one picture. Have subject located in finder. Be careful that finder does not cut off portions of head or body of subjects.
- 10. Have film developed soon after it is exposed.
- 11. Smile—and your subject will smile with you.
- 12. Your camera costs money. Take care of it.
- 13. Wherever you go, take your camera along. And remember that there are wonderful pictures to be had at all times around the home. The snapshot of today is the treasure of 'tomorrow.
- 14. Use Agfa Plenachrome Film for best results. The size to fit this camera is B-2.
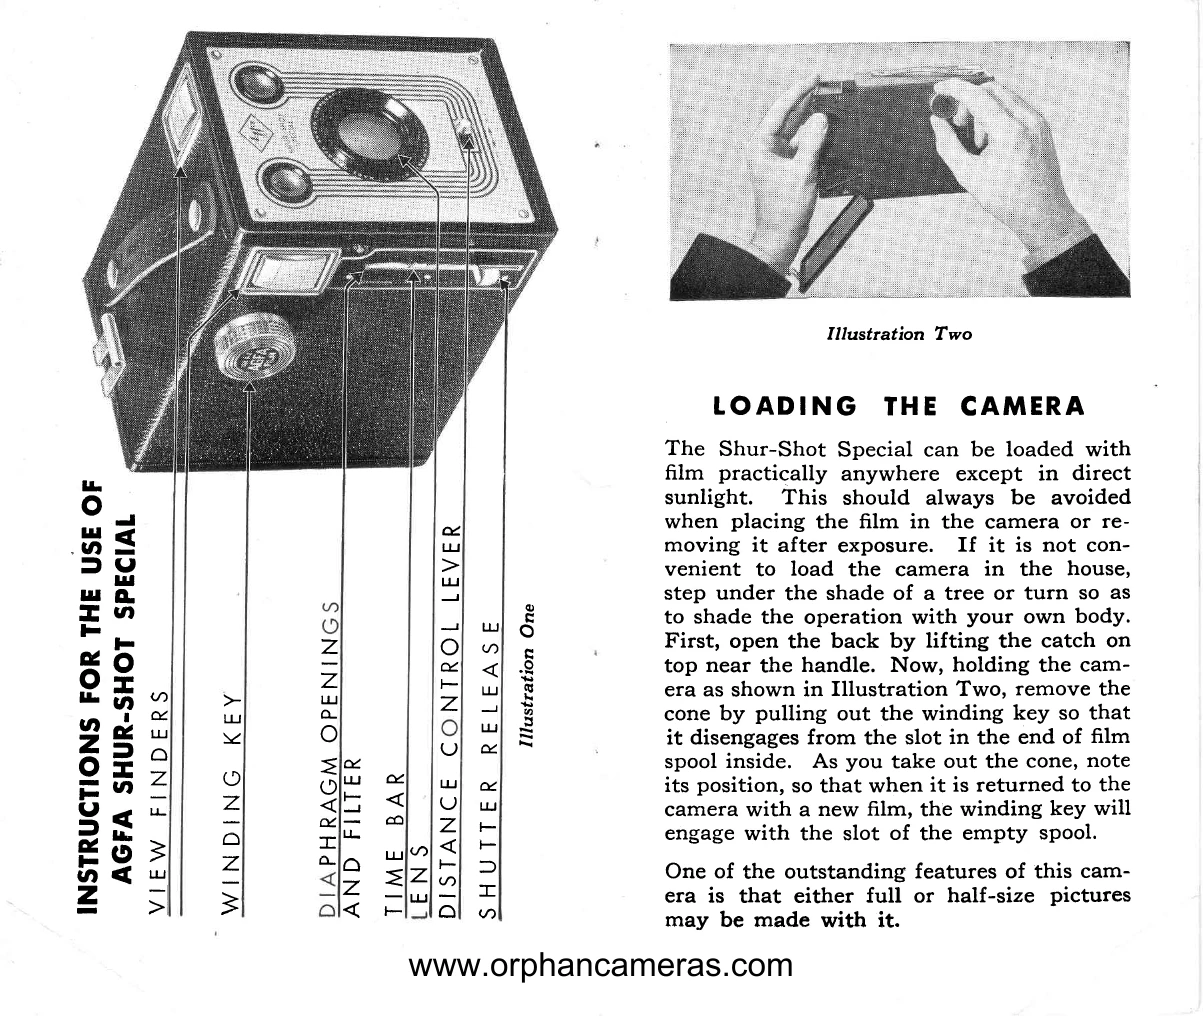
LOADING THE CAMERA
The Shur-Shot Special can be loaded with film practically anywhere except in direct sunlight. This should always be avoided when placing the film in the camera or removing it after exposure. If it is not convenient to load the camera in the house, step under the shade of a tree or turn so as to shade the operation with your own body. First, open the back by lifting the catch on top near the handle. Now, holding the camera as shown in Illustration Two, remove the cone by pulling out the winding key so that it disengages from the slot in the end of film spool inside. As you take out the cone, note its position, so that when it is returned to the camera with a new film, the winding key will engage with the slot of the empty spool.
One of the outstanding features of this camera is that either full or half-size pictures may be made with it.
FOR FULL-SIZE PICTURES
When the camera is used for full-size pictures (21/4 x 33/4), the wings of the cone must be in the position shown by Illustration Three. If the wings are at the back of the cone, merely swing both of them away from the back until they clip into position under and on top of the cone.
Since this camera may be used to take either full or half-size pictures, two windows for viewing exposure numbers are provided. Use only the lower window when full-size pictures are to be made. Disregard the upper one entirely. For pictures this size, also disregard the two lines on the finders. Everything visible in the finders will be in the picture.
FOR HALF-SIZE PICTURES
The camera may be converted to one which takes pictures 27/4 x 15/8 inches. However this can be done only when new film is to be inserted.
Remove the cone from the camera. Swing the wings from the position as shown in Illustration Three to that as shown in Illustration Four. A gentle pressure on each end of the wings will snap them into place so that they are held firmly. Be sure that both ends of the wings are down as far as they can go.
Since two pictures will be taken on one full-size section of film, each exposure number which appears through the red windows must be used twice. Wind the film until the figure 1 appears in the lower window (Illustration Five). For the second exposure wind the film until figure 1 appears in the upper window (Illustration Six). Continue this procedure—that is, taking one picture with the exposure number in the lower window and another with the same number appearing in the upper, until the figure 8 shows in the upper window. THIS WILL BE THE 16th AND LAST EXPOSURE. THIS CAMERA TAKES 8 FULL-SIZE OR 16 HALF-SIZE PICTURES.
The two black lines on each finder have already been mentioned. When taking half-size pictures, only that portion of the image which is between the two lines will be in the picture. Disregard anything outside. See Illustrations Seven and Eight.
HOW TO INSERT THE FILM
Agfa Plenachrome Film—B-2 size—is especially recommended for best results. However, any reputable make of film may be used in this camera. Agfa Plenachrome, because of its speed, will give you clear pictures even under adverse light conditions. Its exceptional latitude enables you to take pictures early in the day, in the strong light of midday, or in the late afternoon. Finally, Plenachrome is a highly color-sensitive film, which means greater delicacy in the rendering of flesh tones in portraiture and in all the colors of nature. When Plenachrome is used in conjunction with the special, built-in yellow filter—explained later—very beautiful cloud effects may be obtained.
Insert a fresh roll of film, being careful to place it so that the paper will roll with the red side out. Draw paper across back of cone as in Illustration Nine, and thread paper into slot in empty spool. See that the spool has the slotted end towards the hole in cone which receives winding key. With winding key pulled out so that it will not interfere, replace cone in camera as shown in Illustration Ten, noting that the side of cone which bears simplified instructions is on the key side of camera. With cone inserted, depress key and turn gently to the right until it slips into slot in end of empty spool. Close and clasp back of camera and continue winding until figure 1 appears in lower window.
TAKING SNAPSHOTS
Hold camera firmly with lens pointed toward subject, which should not be closer to the camera than eight feet. Locate subject in the view finder and then take snapshot by pushing the trigger down. Do not move camera during exposure, or you will blur the picture. To avoid this, hold camera close to your body and, as you push the trigger, hold your breath until shutter clicks.
TIME EXPOSURES
When the light is very dull, or when it is desired to take pictures indoors, time exposures will be necessary. Proceed as follows: First, put your camera on a firm support such as a table or chair, to prevent movement. Next, pull out the time bar. See Illustration Eleven.
Press the shutter release in the same manner as used when making snapshots. The length of the exposure depends upon how long the shutter release lever is held down, since the shutter remains open as long as the lever is held down and closes when the lever is released.
For outdoor pictures, time exposures of more than one second, even when taking pictures in the woods, are seldom required if you use Agfa Plenachrome Film. Expose longer on indoor scenes. The subject should remain still throughout the exposure. Do not hesitate to make time exposures, which produce beautiful negatives when light conditions are too poor for snapshots. Excellent interiors of your home can be made with Agfa Plenachrome Film and this camera.
DIAPHRAGM BAR
One of the outstanding features of this camera is controlled by the Diaphragm Bar. (See Illustration Eleven). This bar, between the time bar and the shutter trigger, has three uses. In order to understand clearly pull out the time bar and open shutter before putting in film. This permits you to see the use of the Diaphragm control. When the Diaphragm Bar is all the way in you have the regular opening.
Now pull out the Diaphragm Bar gently until it catches at the line indicated by the word "Filter." You now have an opening of the same size, but with a built-in yellow filter, a real forward step to better pictures. The yellow filter absorbs excess blue light and gives better color rendering of portraits, landscapes, flower studies and similar subjects. Use this filter for bright scenic pictures, near water, on the beach, and on extremely bright days. With it you can get beautiful registration of the light fleecy clouds that float in a clear summer sky.
Now pull the Diaphragm Bar all the way out. This will bring into position a smaller opening (without filter) for time exposures and also for snapshots taken under very brilliant light conditions. This smaller opening increases the depth of focus somewhat, as well as decreasing the exposure.
REMOVING THE FILM
When the last picture has been taken, wind film onto key spool before opening back of camera. The exposed roll can now be removed and its end fastened with the sticker which you will find at the end of each roll of Agfa Film. Before inserting cone and closing camera again, transfer the empty spool to the other chamber so that it will be ready for a new roll of film.
DISTANCE-CONTROL LEVER
With the Shur-Shot Special, in addition to taking pictures at a distance of 10 feet to infinity, you can take clear, sharp portraits of subjects 5 to 10 feet from the camera without the aid of a portrait attachment.
For pictures of a subject to or more feet away, allow the Distance-Control Lever to remain in the normal position as shown by Illustration Twelve. For pictures of a subject between 5 and 10 feet from the camera, swing the movable front lens to the side marked "5 to 10 ft." Hold the lever in this position throughout the exposure, being sure that in doing so you do not block the lens with your finger. When pressure is released the movable front lens will swing back into place and the camera will again be in focus for pictures of a subject to or more feet away.