What is a digital camera?
A digital camera stores images on a memory card, so you can record and delete images a countless number of times.
You can use the images you record in a variety of different ways.
Store images on your computer.
Print images.
Attach images to e-mail.
What you can do with your CASIO camera
Your CASIO camera is packed with a powerful selection of features and functions to make recording of digital images easier, including the following three main functions.
Dynamic Photo
Extract a moving subject out of a series of Continuous Shutter images you have shot and insert them into another image to create a Dynamic Photo image that features the moving subject.
See page 110 for more information.
Make-up Mode
This feature smoothes the skin texture of the subject and softens facial shadows caused by harsh sunlight for better looking portraits.
See page 48 for more information.
BEST SHOT
Simply select the sample scene you want and the camera sets up automatically. Then all you need do is press the shutter button for perfect images.
An AUTO BEST SHOT mode automatically selects the appropriate BEST SHOT sample scene based on current shooting conditions.
See page 54 for more information.
First, charge the battery prior to use.
Note that the battery of a newly purchased camera is not charged. Perform the steps under "To charge the battery” to bring the battery to a full charge.
• Your camera requires a special CASIO rechargeable lithium ion battery (NP-40) for power. Never try to use any other type of battery.
To charge the battery
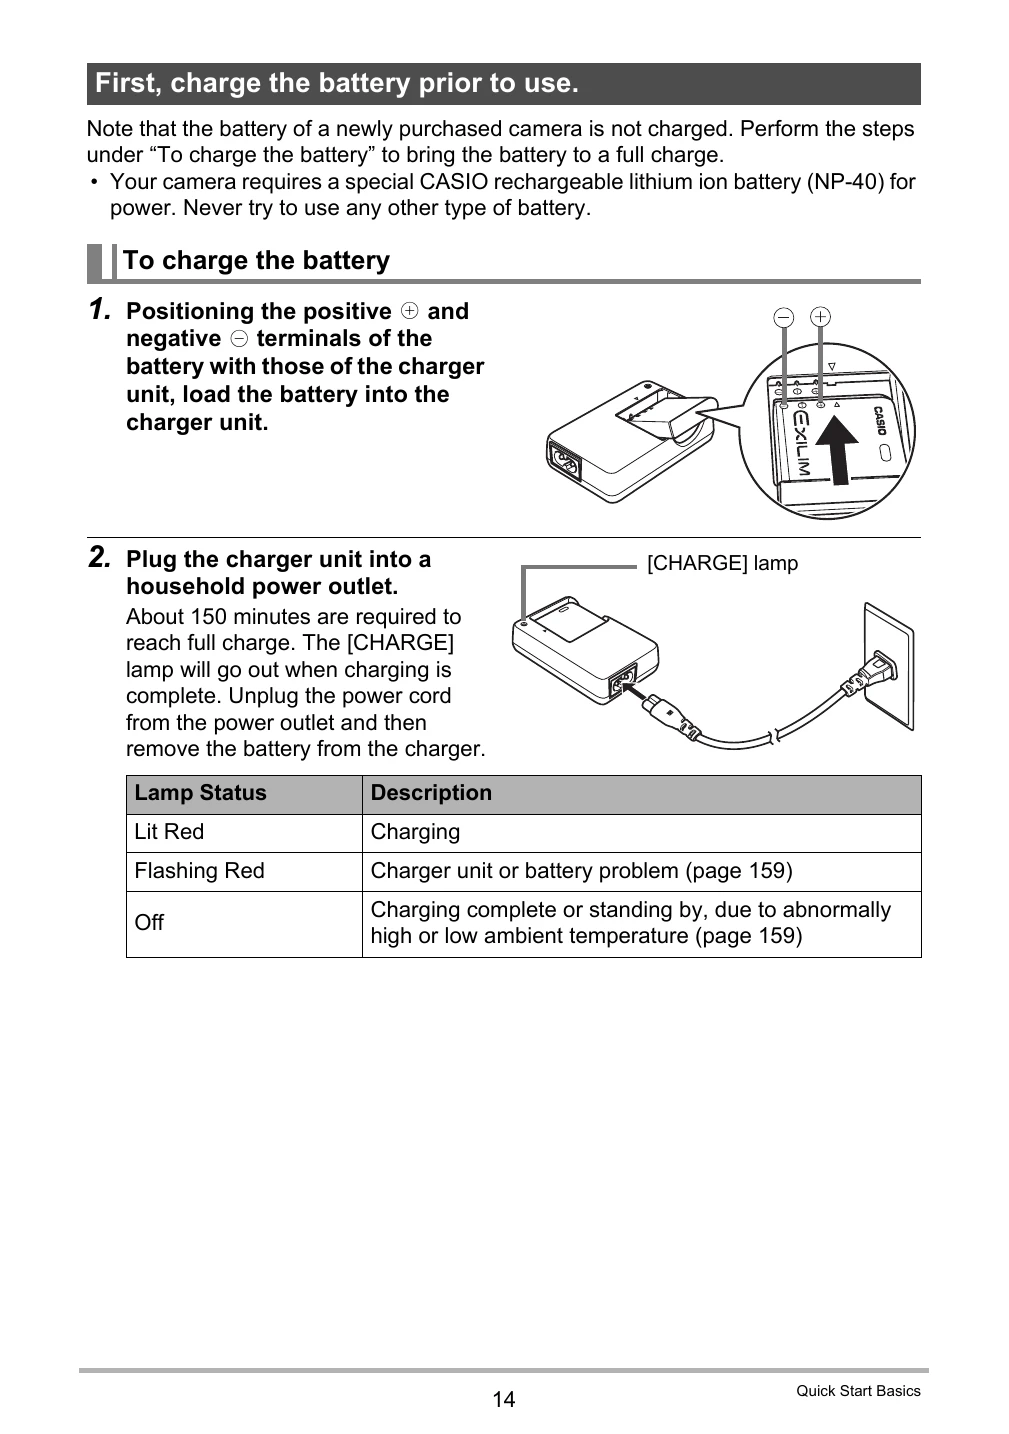
1. Positioning the positive and negative terminals of the battery with those of the charger unit, load the battery into the charger unit.
2. Plug the charger unit into a household power outlet. About 150 minutes are required to reach full charge. The [CHARGE] lamp will go out when charging is complete. Unplug the power cord from the power outlet and then remove the battery from the charger.
Lamp Status | Description
---|---
Lit Red | Charging
Flashing Red | Charger unit or battery problem (page 159)
Off | Charging complete or standing by, due to abnormally high or low ambient temperature (page 159)
Other Charging Precautions
• Use the special charger (BC-31L) to charge the special lithium ion battery (NP-40).
• A battery that is still warm due to normal use may not charge fully.
• A battery discharges slightly even when it is not loaded in the camera.
• Charging the camera's battery may cause interference with TV and radio reception.
To load the battery
1. Open the battery cover.
2. Load the battery.
3. Close the battery cover.
Checking Remaining Battery Power
As battery power is consumed, a battery indicator on the monitor screen indicates remaining power as shown below.
Remaining Power | High | Low
---|---
Battery Indicator | Cyan → Amber → Red → Red
• indicates battery power is low. Charge the battery as soon as possible.
• Recording is not possible when is indicated.
• The level shown by the battery indicator may change when you switch between the REC mode and PLAY mode.
• Leaving the camera for about two days with no power supplied while the battery is dead will cause its date and time settings to be cleared.
• See page 178 for information about battery life and memory capacity.
Battery Power Conservation Tips
• When you do not need to use the flash, select (flash off) for the flash setting (page 34).
• Enable the Auto Power Off and the Sleep features to protect against wasting battery power when you forget to turn off the camera (pages 145, 146).
Configuring Basic Settings the First Time You Turn On the Camera
The first time you load a battery into the camera, a screen appears for configuring the display language, date, and time settings. Failure to set the date and time correctly will cause the wrong date and time data to be recorded with images.
1. Press [ON/OFF] to turn on the camera.
2. Use [▲], [▼], [◀], and [] to select the language you want and then press [SET].
3. Use [▲] and [▼] to select a date style and then press [SET].
4. Set the date and the time.
5. After setting the date and time, use [◀] and [] to select "Apply" and then press [SET].
Preparing a Memory Card
Though the camera has built-in memory that can be used to store images and movies, you probably will want to purchase a commercially available memory card for greater capacity. The camera does not come with a memory card.
• For information about memory card capacities, see page 174.
Supported Memory Cards
SD Memory Card
SDHC Memory Card
Use one of the above types of memory card.
To load a memory card
1. Press [ON/OFF] to turn off the camera and then open the battery cover.
2. Load a memory card.
3. Close the battery cover.
To format (initialize) a new memory card
You need to format a new memory card before using it for the first time.
1. Turn on the camera and press [MENU].
2. Select the “Set Up” tab, select “Format” and then press [▶].
3. Use [▲] and [▼] to select "Format” and then press [SET].
Turning the Camera On and Off
To turn power on
To enter the REC Mode, press [ON/OFF] (Power) or [] (REC). To enter the PLAY mode, press [] (PLAY).
• Take care to ensure that nothing is restricting or coming into contact with the lens as it extends.
• Pressing [] (PLAY) while in the REC mode switches to the PLAY mode.
• The Sleep function or Auto Power Off (pages 145, 146) will turn off power automatically.
To turn off the camera
Press [ON/OFF] (Power).
To shoot a snapshot
1. Press [O] (REC) to turn on the camera.
Make sure is on the display. If it isn't, see page 54.
2. Point the camera at the subject.
You can zoom the image, if you want.