Brand: CASIO
Category: Digital Camera
Document Type:
Language: EN
Brand: CASIO
Category: Digital Camera
Document Type:
Language: EN
Uploaded: Aug. 9, 2025, 11:39 p.m.
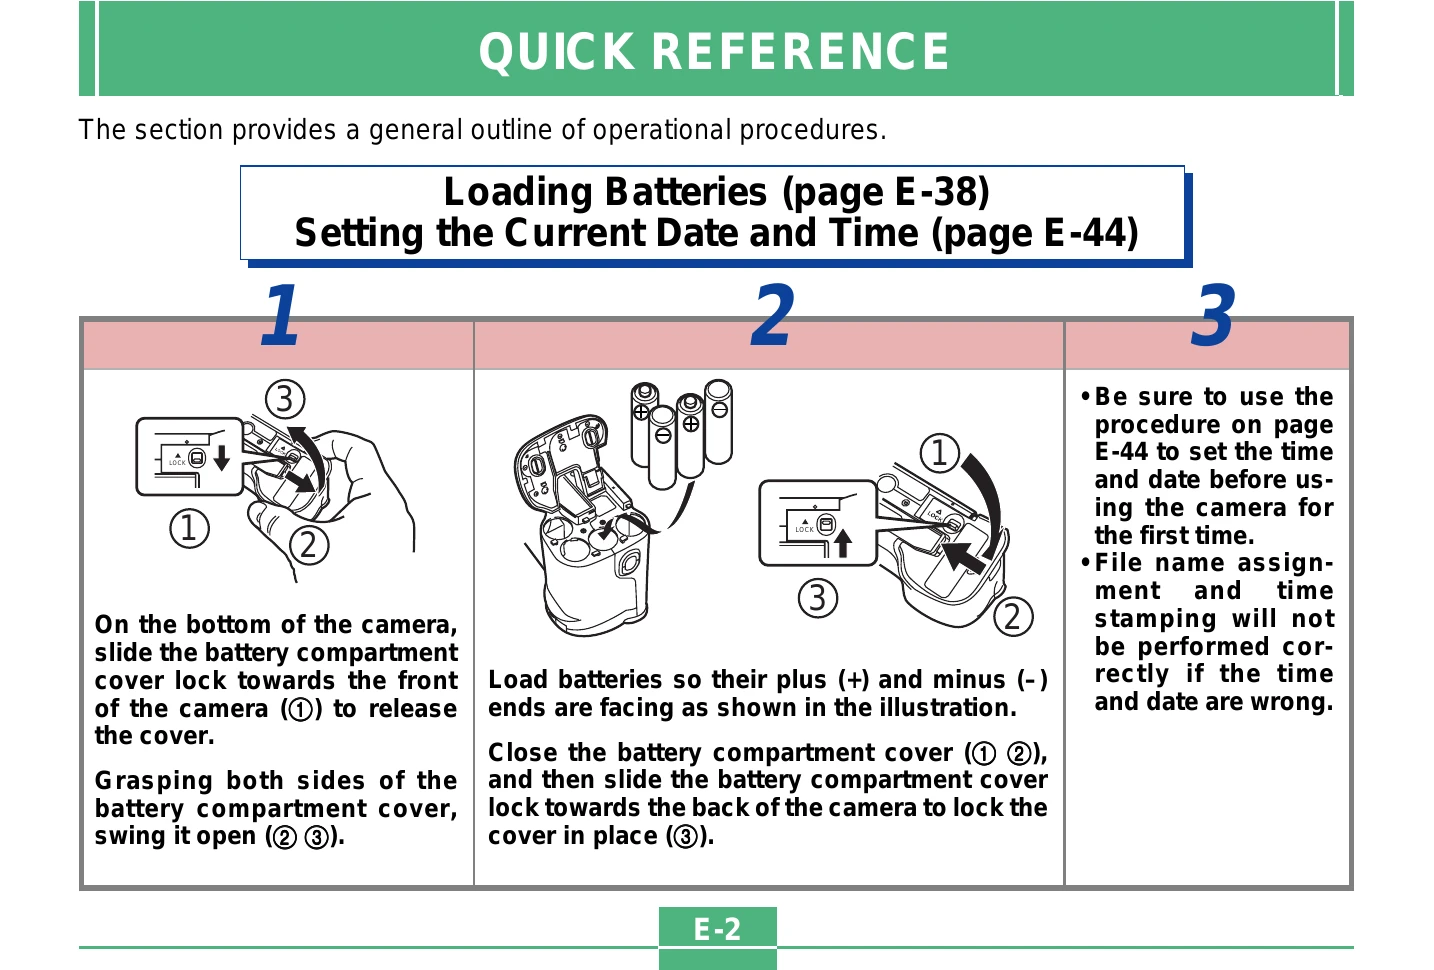
To load batteries, slide the compartment cover lock, open the cover, insert batteries with correct polarity, and close and lock the cover. Set the date and time before first use to ensure correct file naming and time stamping.
Avoid using the camera while operating a vehicle or walking. Do not attempt self-repairs. Never fire the flash directly at the eyes of people or animals. Keep the camera away from water and extreme temperatures. Protect the camera from dust and impact.
| Symptom | Probable Cause | Action |
|---|---|---|
| No power | 1. Batteries not loaded correctly. 2. Dead batteries 3. Wrong AC adaptor |
1. Correctly load batteries (page E-38). 2. Replace all four batteries with a set of new ones (page E-38). 3. Use only recommended AC adaptor. |
| Sudden power failure | 1. Auto Power Off 2. Low battery power 3. Use of manganese batteries. |
1. Turn power back on. 2. Replace all four batteries with a set of new ones (page E-38). 3. Replace manganese batteries with alkaline, lithium or Ni-MH batteries. |
| ◀ indicator on LCD | Batteries are about to go dead. | Replace all four batteries with a set of new ones (page E-38). |
| No recording when shutter button is pressed | 1. Function Switch set to PLAY. 2. Flash unit is charging. 3. The message “MEMORY FULL” is on the monitor screen. 4. Insufficient memory card capacity or no memory card loaded in camera. |
1. Set Function Switch to REC. 2. Wait until flash unit charging is finished. 3. Delete images you no longer need from camera memory. 4. Load a memory card. |
| Auto Focus cannot focus the image. | 1. Lens is dirty. 2. The object you want to focus is not in the focus frame. 3. Conditions make it impossible to obtain proper focus. 4. Camera is unsteady or shaking. |
1. Clean off the lens. 2. Aim the camera so the object you want to focus is in inside the focus frame. 3. Switch to the Manual Mode and focus manually. 4. Use a tripod to steady the camera. |
| The recorded image is out of focus. | The focus setting is not correct. | Make sure the subject you want to focus is within the Auto Focus Frame when you record the image. |
| Power failure during self-timer operation | Low battery power | Replace all four batteries with a set of new ones (page E-38). |
| Monitor screen image is out of focus. | 1. Failure to focus the image while the camera is in the Manual Mode. 2. Camera is in the Macro Mode. 3. Camera is in the Auto Focus Mode while the subject is too close. |
1. Focus the image before recording it. 2. Use the Auto Focus Mode for scenery and group shots. 3. Use the Macro Mode when the subject is too close for Auto Focus. |
| Poor color and brightness when indoors | Indoor fluorescent lighting | Shoot under incandescent or other non-fluorescent lighting (page E-48). |
| Cannot perform movie recording. | 1. Movie Record Mode is not selected. 2. Insufficient camera memory capacity. |
1. Select the Movie Record Mode (page E-61). 2. Delete images you no longer need from camera memory. |
| Recorded image is not saved. | 1. Loss of power before image is stored in memory 2. Memory card cover was opened before the image was fully saved. |
1. Replace all four batteries with a set of new ones (page E-38). 2. Never open the memory card cover until the image is fully saved. |
| Colors of recorded image are different from those on the display when image was composed. | 1. Reflection from sunlight or light from another source 2. Image quality setting |
1. Reorient the camera so that light is not shining directly into lens. 2. Use the Recording Menu to change to a higher image quality for recording. |
| No +/- button operation during nine-page display | Button operation during page change | Wait until an image is on the monitor screen before performing a button operation. |
| Cannot find an image. | 1. Memory card images recording using a camera that does not support DCF. 2. Management files required to display images cannot be created. |
1. The file management systems of cameras that do not support DCF are different from the one used by this camera. This camera cannot read cards recorded with such cameras. 2. Make more room available on the memory card by deleting some of its images or other data. |
| Camera is connected to a TV, but LCD monitor contents do not appear on TV screen. | 1. Incorrect camera-TV connection 2. Wrong TV set up 3. Wrong video mode is selected. |
1. Connect correctly using the video cable (page E-98). 2. Set up the TV correctly. 3. Change the video mode. |
| Images cannot be displayed when downloaded back the camera from a computer. | The images were on a memory card when they were opened on the computer for editing and then resaved back to the memory card. | Use the Photo Loader application to download edited images back to the camera. |
| Delete operation does not operate. | All images are protected. | Unprotect the images you want to delete (page E-90). |
| Cannot select items in the Playback Menu. | Some functions are not available for playback of certain types of images. | Select a different function or change to the Record Mode. |
| No buttons or switches operate. | • Malfunction due to static electrical charge or strong impact. • Camera is connected to a computer. |
Remove batteries and disconnect the AC adaptor if you are using one. Restore power and turn the camera on. If this does not work, contact your dealer or an authorized CASIO service provider. |
| Slide Show starts even though it is not selected. | Activation of the screen saver. | Turn off screen saver (page E-85). |
| Nothing appears on the monitor screen. | 1. The camera is in the Sleep state. 2. Communication over the USB cable is in progress. |
1. Exit the Sleep state. 2. After the communication operation over the USB cable is complete unplug the USB cable from the camera. |