Brand: EPSON
Category: Printer
Document Type: Parts/Service
Language: EN
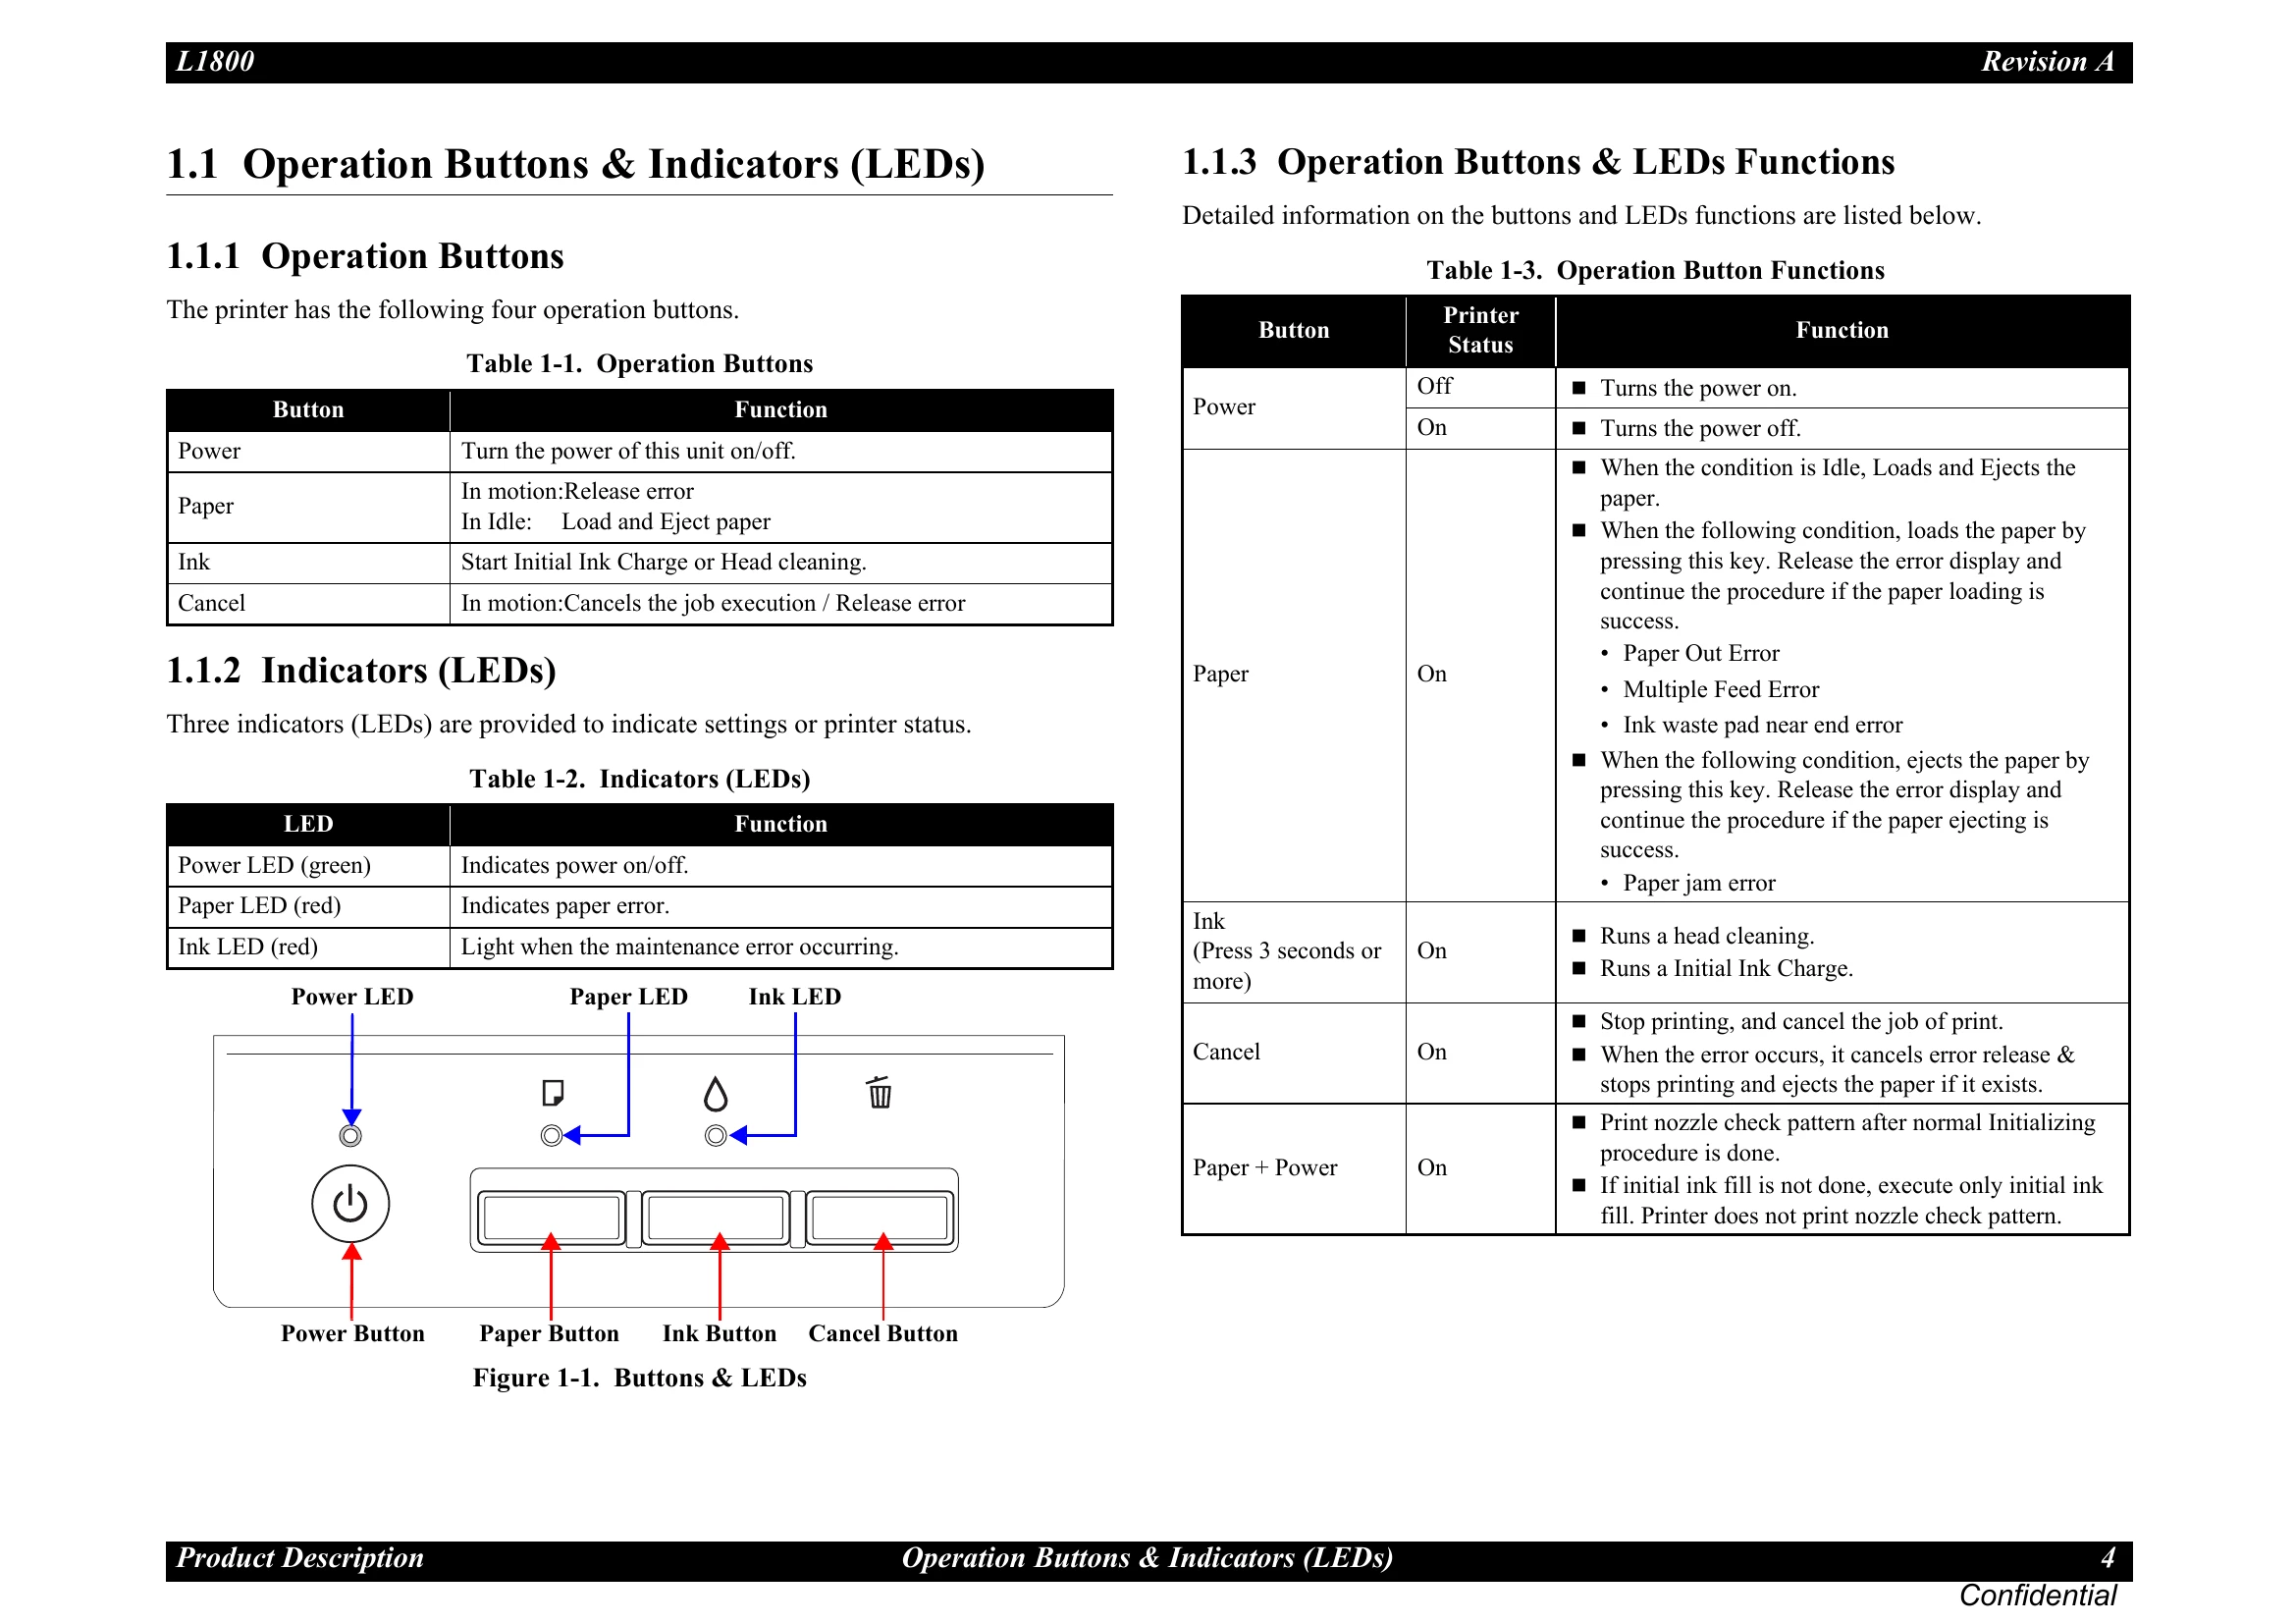
Brand: EPSON
Category: Printer
Document Type: Parts/Service
Language: EN
Uploaded: Nov. 21, 2025, 7:06 p.m.
Manual Publish Date: 2014-02-10
No warranty information is available in the provided document sections.
| Occurrence Timing | Phenomenon Detail | Faulty Part/Part Name | Check Point | Remedy |
|---|---|---|---|---|
| At power-on | The printer does not operate at all. | Panel FFC | 1. Check that the Panel FFC is connected to the Panel Board connector and Main Board connector CN4. | 1. Connect the Panel FFC to the Panel Board and Main Board connectors. |
| 2. Check the Panel FFC for damages. | 2. Replace the Panel FFC with a new one. | |||
| Panel Board | 1. Check the Panel Board for damages. | 1. Replace the Panel Board with a new one. | ||
| Power Supply Board | 1. Check that the connector cable of the Power Supply Board is connected to the Main Board connector CN60. | 1. Connect the connector cable of the Power Supply Board to the Main Board connector CN60. | ||
| At power-on | The printer does not operate at all. | Power Supply Board | 2. Check that the Fuse F1 on the Power Supply Board has not blown. | 2. Replace the Power Supply Board with a new one. |
| At operation | Operation at power-on is normal, but the error appears when the print job is sent to the printer. | Interface cable | 1. Check that the Interface cable is connected between the PC and printer. | 1. Connect the Interface cable to the PC and printer. |
| 2. Check the Interface cable for breaking. | 2. Replace the Interface cable with a new one. | |||
| USB | 1. Check that the PC and printer are connected via the USB hub. | 1. Configure the USB ID setting. Refer to Chapter 4 "Adjustment". | ||
| Printer Driver | 1. Check that the printer driver for L1800 has already been installed. | 1. Install the printer driver for L1800. | ||
| 2. Check that the connected printer is L1800. | 2. Connect the L1800 printer. | |||
| Main Board | 1. Check that a wrong model name has not been input to the EEPROM on the Main Board. | 1. Make the initial setting using the Adjustment Program. Refer to Chapter 4 "Adjustment”. | ||
| At operation | When the Paper Switch is pressed, the LD Roller attempt to feed paper but the paper is not fed. | ASF Assy. | 1. Check the LD Roller or Retard Roller of the ASF Assy for paper dust and foreign matter. | 1. Using a cleaning sheet, clean the LD Roller and Retard Roller. The procedure is as follows. (1) Place the cleaning sheet upside down and put it into the ASF Assy. (2) Press the Paper Switch to start paper feed. (3) Repeat the above steps several times. * To remove persistent contamination, staple an alcohol-dampened cloth to a postcard and clean the rollers in the following method. |
| At operation | Paper Mismatch Error is indicated. | PE Sensor | 1. Check that the connector cable of the PE Sensor is securely connected to the PE Sensor and Relay Board connector CN2. | 1. Connect the connector cable of the PE Sensor to the PE Sensor and connector CN2 on the Relay Board correctly. |
| 2. Check that the Sensor Holder is mounted to the Mechanical frame correctly. | 2. Install the Sensor Holder correctly. | |||
| 3. Move the Detection Lever manually as when the paper passes, and check that the Detection Lever returns to the original position automatically by the Torsion Spring when released. Refer to the above photo. | 3. Replace the PE Sensor Holder Unit with a new one. | |||
| 4. Using a tester, check that the PE Sensor is normal. Paper absent : 2.4V or more Paper present : 0.4V or less | 4. Replace the PE Sensor Holder Unit with a new one. | |||
| At operation | At the time of paper ejection, the PF Roller advances the paper but cannot eject it completely. Paper is not ejected completely and causes a jam near the Paper Eject Frame. | ASF Assy. | 1. Check that the size of the fed paper is not larger than that of the paper specified by the driver. | 1. Tell the user that the paper size specified by the driver is not available for the printer. |
| Paper EJ Frame Assy. | 1. Check that the paper is fed along the Right Edge Guide. | 1. Feed the paper along the Right Edge Guide. | ||
| 1. Check that the Star Wheel Units have not come off the Paper EJ Frame Assy. | 1. Securely install the Star Wheel Units to the Paper EJ Frame Assy. | |||
| Spur Gear 68 / Spur Gear 16; B Paper EJ Roller Assy.(front/rear) | 1. Check the Spur Gear 68 or Spur Gear 16; B for damages. | 1. Replace the Front (or Rear) Paper EJ Roller Assy with a new one. | ||
| Any time | During manual double-sided printing, multiple sheets are fed at a time. | ASF Assy | 1. Check that the Retard Roller Assy is moving properly during the feeding operation. | 1. Attach the Extension Spring on the back side of the Retard Roller Assy correctly. Refer to Chapter 3 Retard Roller Assy (P.76). |
| 2. Check that the position of the ASF Guide Roller LDs has been adjusted correctly. | 2. Adjust the position of the ASF Guide Roller LDs. Refer to Chapter 3 ASF Assy (P.71). | |||
| At power-on | At power-on, the printer does not operate at all. | Waste Ink Pads | 1. Using the Adjustment Program, check if the values of the Protection Counter A and B have exceeded the threshold value. | 1. Replace the Waste Ink Pads and reset the Protection Counter A and B value with the Adjustment Program. |
| At power-on | At power-on, the CR Motor does not operate at all. | CR Motor | 1. Check the CR Motor connector cable for damages. | 1. Replace the CR Motor with a new one. |
| 2. Check if the CR Motor operates normally. | 2. Replace the CR Motor with a new one. | |||
| 3. Check that the CR Motor connector cable is connected to the Main Board connector CN115. | 3. Connect the CR Motor connector cable to the Main Board connector CN115. | |||
| At power-on | The power-on sequence is executed but Fatal error is displayed. | CR drive mechanism | 1. Check that the Carriage Shaft is lubricated with grease. | 1. Wipe the surface of the Carriage Shaft with a dry, soft cloth, and lubricate the Carriage Shaft with grease G-71. Refer to Chapter 5 “Maintenance”. |
| At power-on | At power-on, the PF Motor does not operate at all. | PF Motor | 1. Check that the connector cable of the PF Motor is connected to the Main Board connector CN116. | 1. Connect the PF Motor connector cable to the Main Board connector CN116. |
| 2. Check the PF Motor connector cable for damages. | 2. Replace the PF Motor with a new one. | |||
| 3. Check if the PF Motor operates normally. | 3. Replace the PF Motor with a new one. | |||
| At power-on | At power-on, the APG Motor does not operate at all. | APG Motor | 1. Check that the connector cable of the APG Motor is connected to the Main Board connector CN118. | 1. Connect the APG Motor connector cable to the Main Board connector CN118. |
| 2. Check the APG Motor connector cable for damage. | 2. Replace the APG Assy with a new one. | |||
| 3. Check if the APG Motor operates normally. | 3. Replace the APG Assy with a new one. | |||
| At power-on | At power-on, the Pump Motor does not operate at all. | Pump Motor | 1. Using a tester, check the resistance value of the Pump Motor. Value of resistance: 10.3 Ω ± 10% | 1. If the resistance value is abnormal, replace the Ink System with a new one. |
| 2. Check the Pump Motor connector cable for damages. | 2. Replace the Ink System with a new one. | |||
| 3. Check that the Pump Motor connector cable is connected to the Main Board connector CN117. | 3. Connect the Pump Motor connector cable to the Main Board connector CN117. | |||
| 4. Check the Pump Motor connector cable for damages. | 4. Replace the Ink System with a new one. |