Your HERO
Welcome to your new HERO. To capture video and photos, you need a microSD™ card (sold separately).
MicroSD Cards
Use brand name memory cards that meet these requirements:
- microSD, microSDHC™, or microSDXC™
- Class 10 or UHS-I rating
- Capacity up to 128GB
For a list of recommended cards, visit gopro.com/workswithgopro.
Reformatting Your MicroSD Card
To keep your microSD card in good condition, reformat it regularly. Reformatting erases all content, so back up your photos and videos first.
To reformat, swipe down, then tap Preferences > Format SD Card > Delete.
Charging the Battery
For the best experience, fully charge the battery before first use.
- Hold the Latch Release button on the battery door and slide it open.
- Insert a microSD card (label facing battery, not required for charging).
- Insert the battery and close the door.
- Hold the Latch Release button on the side door and slide it open.
- Connect the camera to a computer or charger using the USB-C cable.
- Power off the camera. The status light indicates charging.
The battery charges in about 3 hours. For fastest charging, use GoPro's Supercharger.
Updating Your Camera Software
Keep your GoPro updated for the latest features and performance.
- Download the GoPro app or Quik for desktop.
- Connect your camera to your smartphone/tablet or computer. The app will notify you of updates.
You can also update manually using a microSD card and card reader.
Powering On + Off
To Power On: Press the Mode button. The camera beeps and status lights flash.
To Power Off: Press and hold the Mode button for two seconds. The camera beeps and status lights flash.
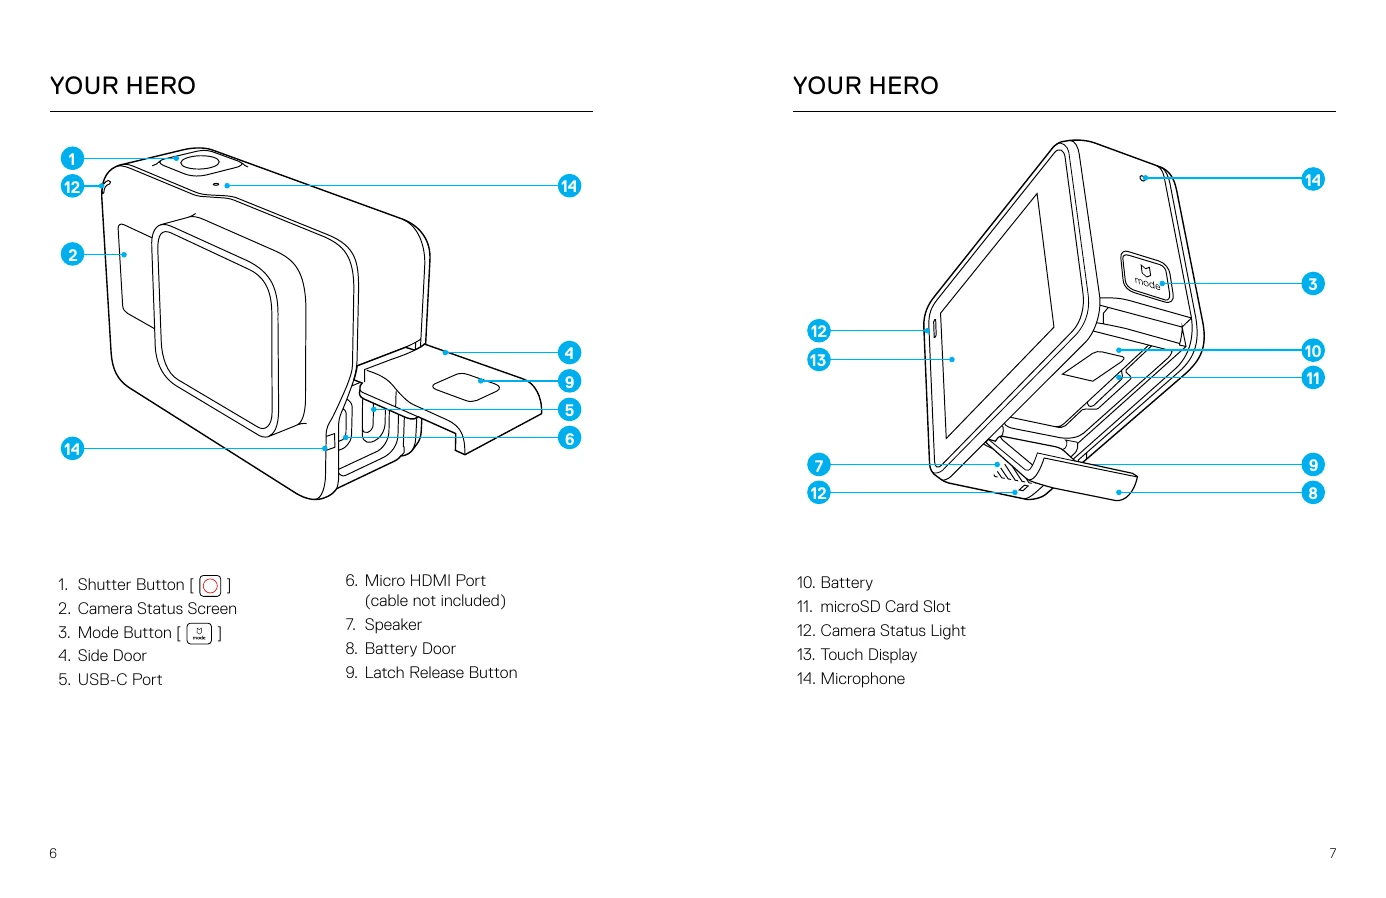
Camera Status Screen
Displays information about modes and settings:
- Camera Mode
- Settings
- Number of Files Captured
- Remaining microSD Card Storage
- Battery Status
Touch Display
Shows modes and settings. Swipe gestures navigate:
- Tap: Select item, turn setting on/off.
- Press and Hold: Access Exposure Control.
- Swipe Left: Access advanced settings.
- Swipe Right: Display media.
- Swipe Down: Open Connect and Preferences menus.
To lock the touch display: Swipe down, tap [A], then tap the icon again to unlock.
Navigating Your GoPro
Modes
Video, Photo, Burst, Time Lapse Video, Time Lapse Photo.
Navigating with the Touch Display
- Tap the mode icon in the lower left.
- Tap the desired capture mode. Swipe up for the full list.
- Tap a setting to change it.
- Tap an option to select it.
- Swipe left for advanced settings (if available).
Changing Modes with the Mode Button
Press the Mode button to cycle through capture modes.
QuikCapture
Power up and start shooting with one button press. Conserves battery.
Capturing Video with QuikCapture
- With camera off, press Shutter button.
- Camera powers on, beeps, and starts capturing video.
- Press Shutter button again to stop recording. Camera powers off.
Capturing Time Lapse Photos with QuikCapture
- With camera off, press and hold Shutter button until capture begins.
- Camera powers on, beeps, and captures time lapse photos.
- Press Shutter button again to stop capturing. Camera powers off.
Turning QuikCapture Off
- Swipe down, tap Preferences > QuikCapture.
- Tap Off.
Capturing Video and Photos
Use the touch display to preview shots and change modes/settings.
- Select a mode by tapping the mode icon (lower left).
- Tap the desired capture mode.
- Select different settings as needed.
- Press the Shutter button to capture.
- To stop video or time lapse, press the Shutter button.
HiLight Tags: Press Mode button while recording/playback to mark moments.
Controlling Your GoPro with Your Voice
Use voice commands to control your HERO.
- Voice Control works best nearby.
- To turn on: Swipe down, tap [»], then select language.
- Say a command: See List of Voice Commands.
- To turn off: Swipe down, tap [x].
List of Voice Commands
Action Commands: Start recording, HiLight, stop recording, take photo, shoot burst, start time lapse, stop time lapse, turn off.
Mode Commands: Video mode, Photo mode, Burst mode, Time Lapse mode.
Playing Back Your Content
View on camera, computer, TV, or smartphone/tablet.
Viewing Videos and Photos on Your HERO
- Swipe right to open gallery.
- Scroll through thumbnails.
- Tap to view in full-screen.
- Add HiLight Tag by tapping [ ].
- Return to thumbnails by tapping [ ].
- Exit gallery by swiping down.
Saving a Video Frame as a Still Photo
- Open gallery, tap video.
- Tap [ ] to play.
- When desired frame is reached, tap [ ||], then tap [ ].
- Adjust frame using the slider.
- Tap [ ] to save.
Viewing Videos and Photos on a Computer
Transfer files to computer first. See Offloading Your Content (page 34).
Viewing Content on a Mobile Device
- Connect camera to GoPro app (see page 32).
- Use app controls to play back footage.
Add HiLight Tag via app: Tap [ ] while playing back video.
Using Your Camera with an HDTV
Viewing Videos and Photos on an HDTV
- Power on camera.
- Tap Preferences > HDMI Output > Media.
- Connect camera to HDTV with micro HDMI cable.
- Select HDMI input on TV.
- Use Mode and Shutter buttons to navigate and select files.
- Tap [ ] to open in full-screen.
Capturing Video and Photos while Connected to an HDTV
- Power on camera.
- Tap Preferences > HDMI Output > Live.
- Connect camera to HDTV with micro HDMI cable.
- Select HDMI input on TV.
- Use Shutter button to start/stop recording.
Connecting to the GoPro App
For the First Time
- Download GoPro app from app store.
- Follow app instructions to connect camera.
In the Future
- If wireless is off, swipe down, tap Connect > Wireless Connections.
- Follow app instructions to connect.
Creating a QuikStory
QuikStories automatically edits video and photos into a short video.
- Set up QuikStories: Connect camera to GoPro app.
- Capture video and photos.
- Open GoPro app, swipe down from home screen. Content transfers automatically.
- Open QuikStory, preview, and edit if needed.
- Save and share.
Offloading Your Content
To a Computer
- Download and install Quik for desktop.
- Connect camera to computer via USB-C.
- Power on camera and follow Quik instructions.
Using a card reader: Connect reader, insert microSD card, transfer/delete files.
To the Cloud
With GoPro Plus subscription, upload content to the cloud for backup.
- Subscribe to GoPro Plus via the GoPro app.
- Connect camera to power outlet for automatic cloud upload.
Access Cloud Content: Connect to GoPro app, tap [ ] next to camera image, download content.
Turning Off Auto Upload: Swipe down, tap Connect > Auto Upload > Upload, tap Off.
Connecting to a Different Wireless Network
For Auto Upload, change network via camera settings.
- Swipe down, tap Connect > Auto Upload > Networks.
- Tap network name.
- Enter password if needed.
- Tap [ ] to save.
Uploading to the Cloud From Anywhere
Use phone and GoPro Plus to back up content on the go.
Video Mode
Default settings: 1080p60 Wide, Video Stabilization and Auto Low Light on.
Settings:
- Video Resolutions (page 40)
- Video Stabilization (page 41)
- Auto Low Light (page 51)
Video Resolution
Number of horizontal lines. Higher resolution means more detail.
- 1440p: Recommended for body-mounted shots, larger viewing area, high frame rate for action.
- 1080p: Great for all shots, high resolution and frame rate.
Frames per Second (FPS)
Number of video frames per second. Higher FPS is better for motion.
Aspect Ratio
16:9 at 1080p, 4:3 at 1440p. TV/editing uses 16:9.
Advanced Settings
Video Stabilization
Adjusts footage for motion. For Wide FOV, image is cropped 10% for smoother footage.
Options: On (default) and Off.
Auto Low Light
Helps in low-light environments. Adjusts frame rate automatically.
Options: On (default) and Off.
Photo Mode
Captures single or continuous photos at 10MP. Hold Shutter for 4 photos/sec, up to 30.
Settings
- FOV (Field of View): Wide, Medium, Narrow.
Advanced Settings
Wide Dynamic Range (WDR)
Retains detail in dark and bright areas. Useful for backlit scenes.
Options: Off (default) and On.
Burst Mode
Captures 10 photos at 10MP in 1 second. Ideal for fast-moving activities.
Settings
- FOV (Field of View): Wide, Medium, Narrow.
Time Lapse Modes
Time Lapse Video
Creates video from frames captured every .5 seconds. View or share as video.
Time Lapse Photo
Captures photos at .5 second intervals. Choose best ones later or convert to video.
Settings
- FOV (Field of View): Wide, Medium, Narrow.
Advanced Controls
Exposure Control
Lets you select an area to prioritize for exposure. Useful for over/underexposed regions.
Using Exposure Control with Auto Exposure:
Camera bases exposure on selected touch display area.
- Press touch display until square outline appears.
- Drag square to desired exposure area.
- Tap [] to confirm.
Using Exposure Control with Locked Exposure:
Locks exposure level until canceled. Useful for consistent lighting.
- Press touch display until square outline appears.
- Drag square to desired exposure area.
- Tap Auto Exposure to change to Locked Exposure.
- Tap [✓] to lock exposure.
Canceling Exposure Control
Automatically canceled when mode changes or camera restarts. Manually cancel:
- Press touch display until square outline appears.
- Tap [X] in lower left corner.
Customizing Your GoPro
Changing Preferences
- Swipe down, tap Preferences.
- Tap a setting, then a new option.
- To exit, swipe down.
- Date and Time: Auto-updated when connected to app. Can be changed manually.
- Beep Volume: High, Med, Low, Off.
- LED: All On, All Off, Front Off.
- Default Mode: Sets default capture mode on power-up (Video, Time Lapse Video, Photo, Burst, Time Lapse Photo).
- Auto Off: Powers off after inactivity (5, 15, 30 min, Never).
- Screensaver: Turns off touch display after inactivity (1, 2, 3 min, Never).
- Brightness: Adjusts touch display brightness (10%-100%).
- Auto-Rotation: Auto, Up, Down. Determines video/photo orientation.
- Video Format: NTSC or PAL for regional frame rates.
- Language: Sets camera display language.
Important Messages
- Temperature Icon: Camera too hot. Let it cool down.
- File Repair Icon: Video file may be corrupted. Camera attempts repair.
- MicroSD Card Messages:
- NO SD: No card present. Insert card.
- FULL: Card is full. Delete files or insert new card.
- SD ERR: Camera cannot read card formatting. Reformat card.
Resetting Your Camera
Resetting the Connections:
Clears connections list and password. Reconnect devices.
- Swipe down, tap Connect > Reset Connections, tap Reset.
Resetting All Settings to Defaults:
Resets most settings, except Date, Time, username, password.
- Swipe down, tap Preferences > Camera Defaults, tap Reset.
Restarting Your GoPro:
If unresponsive, press and hold Mode button for 8 seconds.
Restoring Factory Settings:
Resets all settings, password, and unregisters from GoPro Plus.
- Swipe down, tap Preferences > Factory Reset, tap Reset.
Mounting
Attaching Your Camera to Mounts:
- Secure camera in The Frame.
- Attach The Frame to mounting buckle.
- Attach mounting buckle to mount.
Mounting Guidelines:
- Attach adhesive mounts at least 24 hours before use.
- Mount on smooth, clean, dry surfaces only.
- Apply in room temperature.
- Check local regulations for camera attachment.
- Use camera tether and Floaty during water activities.
Removing the Side Door
Remove only when using camera in dry, dust-free environment. Camera is not waterproof when open/removed.
- Hold Latch Release button, slide door open.
- Pull door off camera.
Reattaching the Side Door
- Hold Latch Release button, extend tab.
- Press tab onto silver bar.
Maintenance
- Camera is waterproof to 33' (10m) with doors closed.
- Ensure seals are debris-free before closing doors.
- Rinse camera with fresh water if needed.
- Dry touch display with soft cloth in wet environments.
- Shake/blow on mic to remove debris. Do not use compressed air.
- Rinse camera in salt water with fresh water, dry with soft cloth.
- Clean lens with soft, lint-free cloth. Flush debris with water/air.
Battery Information
Maximizing Battery Life:
- Turn off Wireless Connections.
- Use lower frame rates and resolutions.
- Turn off Protune.
- Use QuikCapture, Screensaver, adjust Brightness.
Recording While Charging:
Use USB-C cable to capture video/photos while plugged in. Battery does not charge during recording, but camera is powered.
Battery Storage and Handling:
- Avoid extreme temperatures.
- Do not dry with external heat sources.
- Do not store battery with metal objects.
- Do not make unauthorized alterations.
Battery Disposal:
Dispose of batteries according to local laws. Many localities require battery recycling.
Troubleshooting
My GoPro Won't Power On:
Ensure GoPro is charged. Use included USB-C cable, computer, or compatible charger (5V 1A output).
My GoPro Won't Respond When I Press a Button:
See Restarting Your GoPro (page 55).
Playback on My Computer is Choppy:
- Use compatible video player (H.264 codec). Download Quik for desktop.
- Ensure computer meets minimum requirements for HD playback.
- If issues persist, record at 1080p60 with Protune off, or try 720p30.
I Forgot My Camera's Username or Password:
Swipe down, tap Connect > Name & Password.
I Don't Know What Software Version I Have:
Swipe down, tap Preferences > About This GoPro. Version Number is displayed.
I Can't Find My Camera's Serial Number:
Check Preferences > About This GoPro, inside battery bay, or on microSD card (version.txt file).
Customer Support
Visit gopro.com/help for support.
Trademarks
GoPro and HERO are trademarks of GoPro, Inc.
Regulatory Information
Refer to Important Product + Safety Instructions or gopro.com/help for certifications.