Brand: HITACHI
Category: Camcorder
Document Type: Manual
Language: EN
Brand: HITACHI
Category: Camcorder
Document Type: Manual
Language: EN
Uploaded: Nov. 21, 2025, 9:02 p.m.
Manual Publish Date: 2007
None
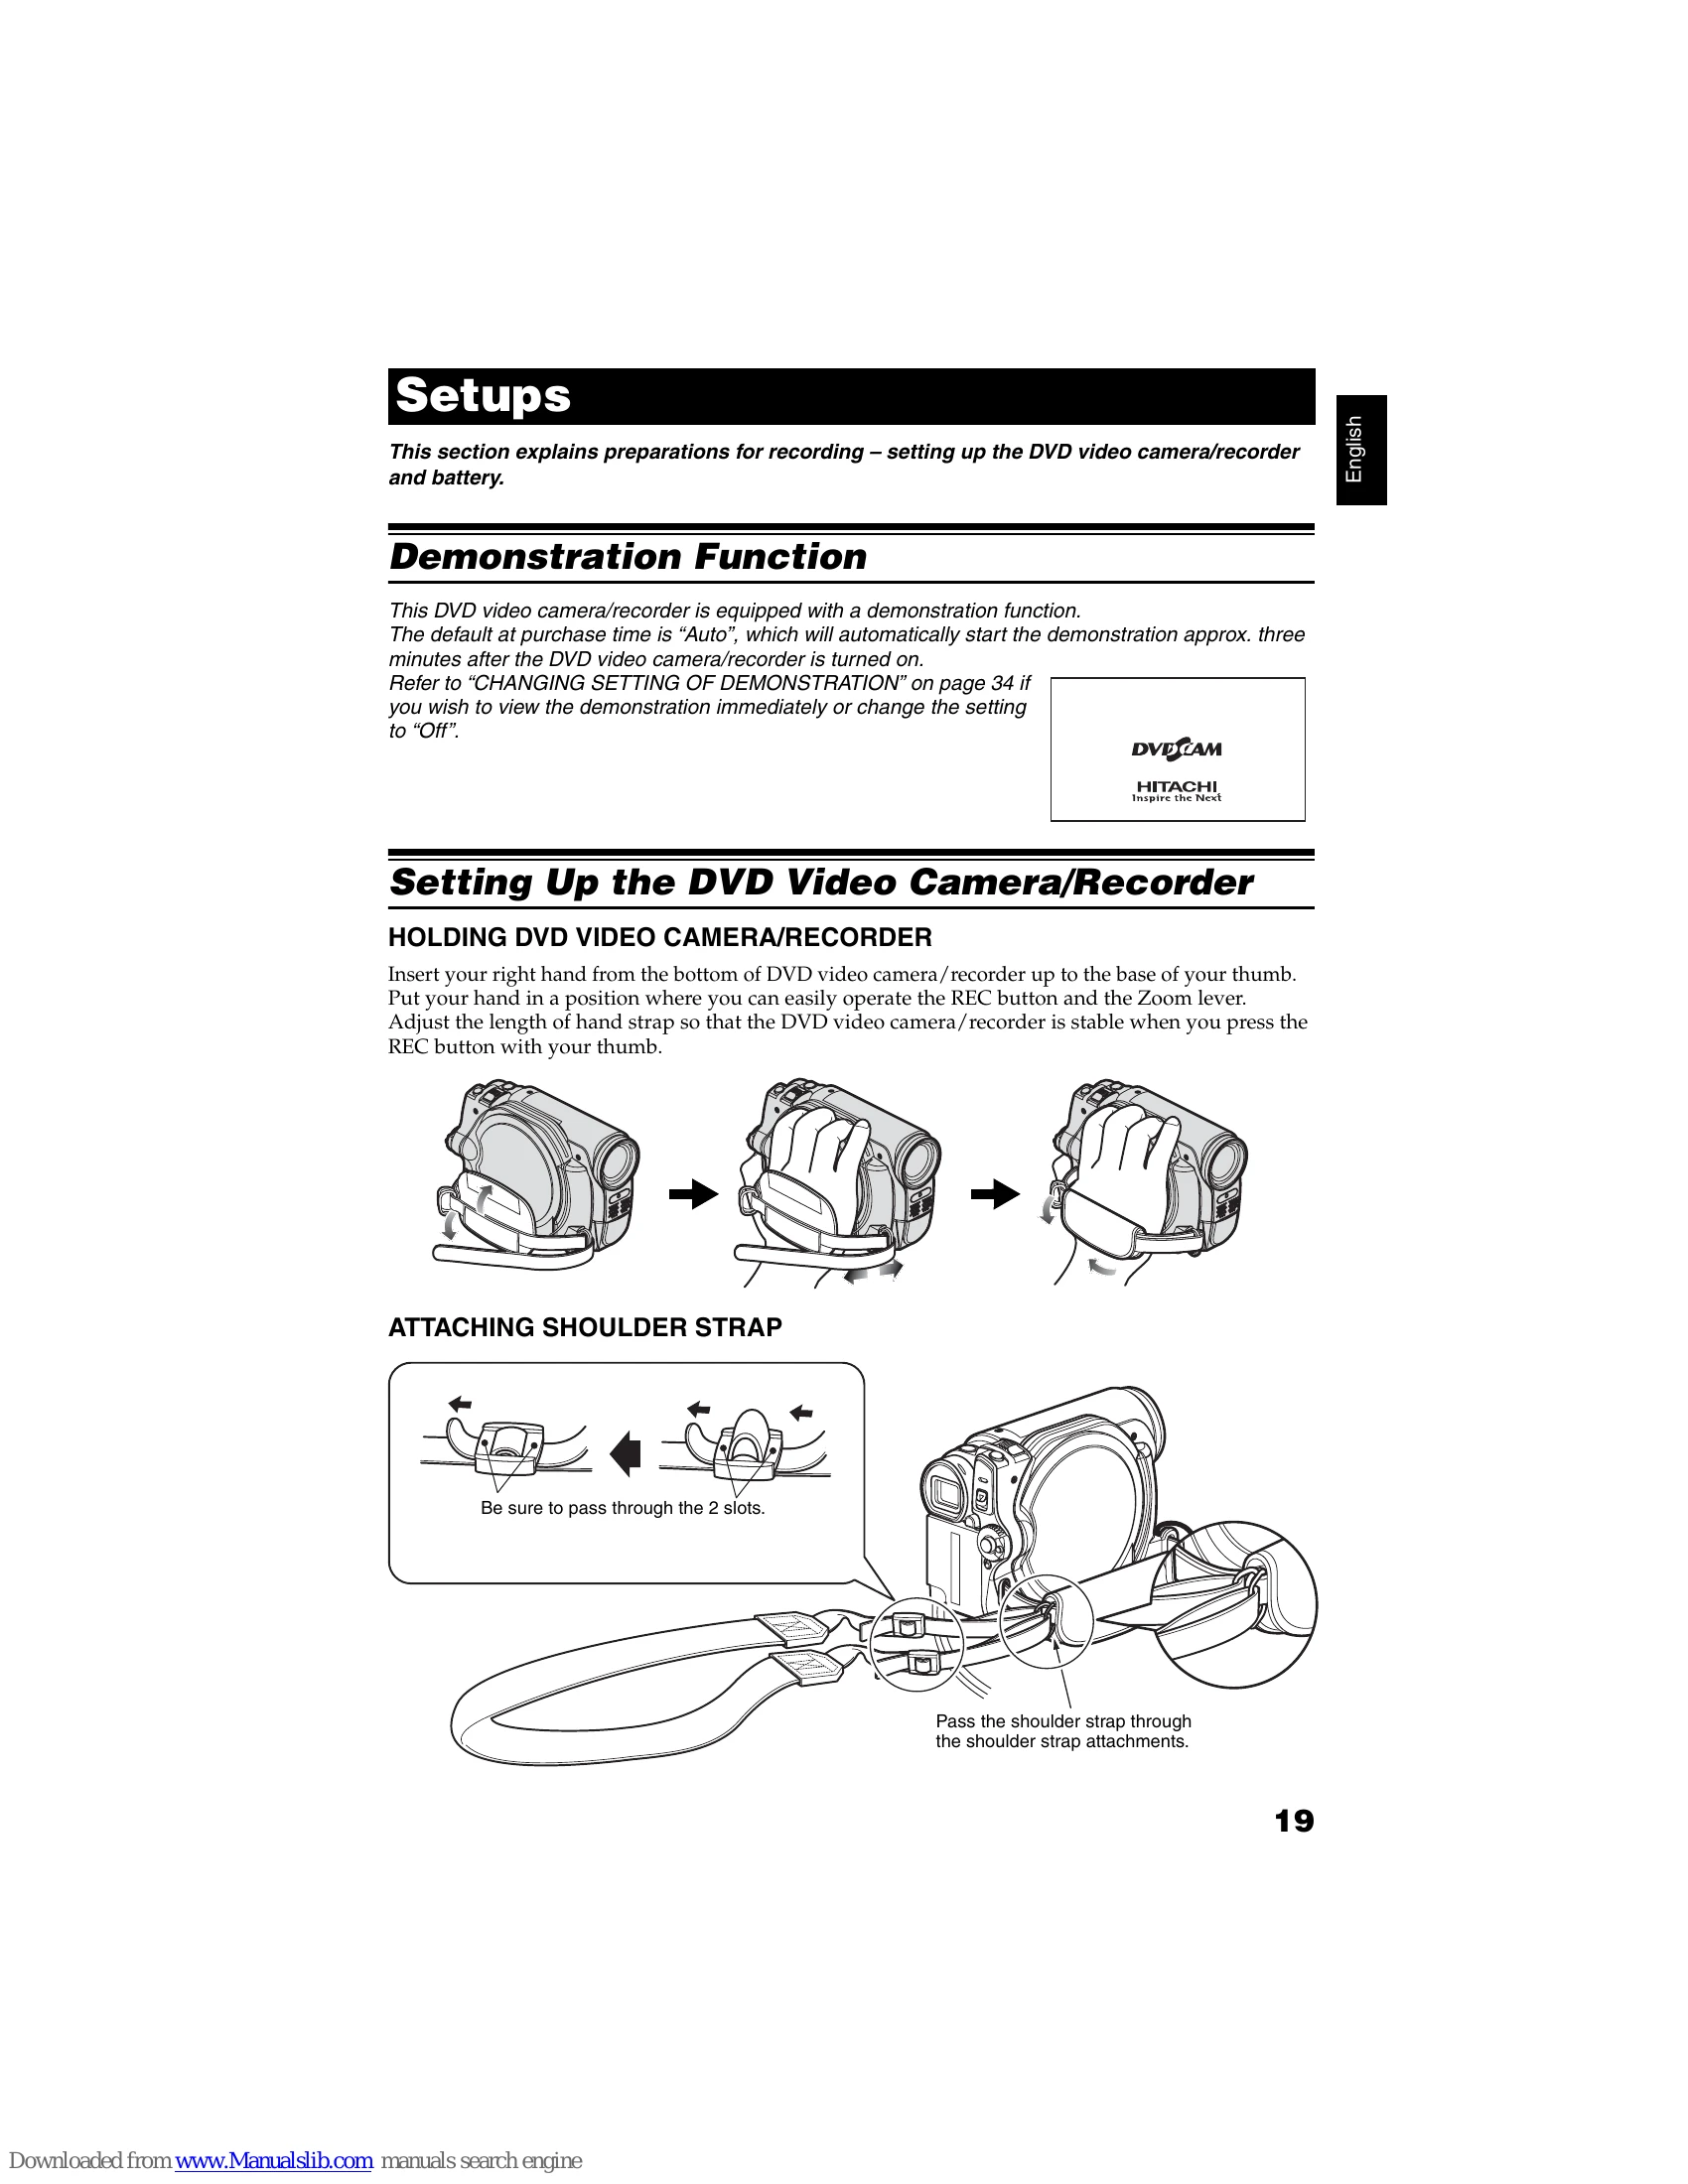
The camera has a demonstration function that starts automatically after about three minutes of being turned on. You can change this setting or view it immediately.
Insert your right hand into the strap from the bottom. Adjust the strap length for stability. Ensure you can easily operate the REC button and Zoom lever.
Pass the strap through the two provided slots and then through the attachment points.
Note: Keep the lens cap on when not in use. It can be attached to the hand strap while recording for convenience.
Note: Battery life is about one year. Replace with a compatible Hitachi, Sony, Panasonic, Sanyo, Toshiba, or Duracell battery.
| Symptom | Cause and Correction | Reference page |
| Photos on card cannot be played back. | This DVD video camera/recorder can play back image data recorded on SD memory card in other digital cameras conforming to the DCF (Design rule for Camera File system) standard. The range of image data normally playable on this DVD video camera/recorder is that with pixels from 80 horizontal × 60 vertical to 4000 horizontal x 3000 vertical. If the pixel data is outside this range, blue thumbnails will appear (thumbnails* in the figure), meaning the image is unplayable. Even when the number of pixels is within the above range, playback may not be possible, depending on the recording status of the digital cameras used. DCF (Design rule for Camera File system) is an integrated image file format of digital cameras: Image files can be used on all digital devices conforming to DCF. | — |
| It will take some time to play back photos on card. | When playing back a still, "Playback." will appear: Stills with a large number of pixels will take some time to appear. | — |
| When the DVD video camera/recorder is connected to PC | ||
| No drive icon appears on PC. | The DVD video camera/recorder is not turned on. Check the power supply. Turn PC off and then disconnect the PC connection cable. Turn PC on again, and then use the PC connection cable to connect the DVD video camera/recorder to PC. Make sure the PC connection cable is completely plugged into this DVD video camera/recorder. | 30 |
| Error occurs in playback of DVD video camera/recorder on PC. | If error occurs with USB connection, the transfer rate is not sufficient. It is recommended that you use a USB terminal conforming to USB2.0 when connecting the DVD video camera/recorder. | 112 |
| Application is not normally run on PC. | Turn the PC and DVD video camera/recorder off, and try again. | — |
| Error occurs during writing to disc. | The temperature of DVD video camera/recorder is too high due to continuous operation. Disconnect the DVD video camera/recorder from PC once, remove the disc from the DVD video camera/recorder, and then turn it off. After a few moments, connect them again and write to a brand-new disc. | — |
| Transfer of images stops. | Connect the DVD video camera/recorder to another USB terminal of PC. If your PC is a desktop type, it is recommended that you use USB terminal on the back of PC. If you are using USB2.0 extended card, it is also recommended that you install the newest version driver provided by each USB2.0 card maker. | — |
| DVD drive built into PC cannot be used after the provided software has been installed. | Is disc scratched or does dirt or fingerprint adhere to it? Clean the disc. This problem may be solved if you update the DVD editing/ creating software of your PC. | 9 |
| Error appears when starting ImageMixer 3. | Make sure that your PC display adapter (video card) conforms to DirectX9.0c. | 112 |
| Movies are not recognised by application in PC. | Make sure the power switch of this DVD video camera/recorder is set to "" or "O". | 30 |
| The DISC EJECT button is not valid when the DVD video camera/ recorder is connected to PC. | While the DVD video camera/recorder is connected to PC, use Explorer to right-click the DVD video camera/recorder drive icon and execute "Eject". | 118 |
| No sound is heard when an MPEG file imported into Macintosh is played back on Quick Time with an MPEG 2 playback component adopted. | Since an MPEG file imported into Macintosh using ImageMixer 3 uses the audio format of AC3 audio, no audio will be played back even if the Quick Time MPEG-2 playback component is introduced: Only video will be played back. Use ImageMixer 3 for playback. | 124 |
| When the time stamp of file in DVD-RAM is viewed on PC, it is different from the actual recording time. | The file system of this DVD video camera/recorder is operated on Greenwich Mean Time (GMT), and time lag information has not been set. With Windows® as of January, 2007, the time stamp of file viewed on Explorer looks different from the actual recording time. The actual recording time will appear for date/time indication on playback screen. | — |
| It will take some time to save a video edited on the video editor of ImageMixer 3. | If you are editing a video file whose contents are different from those of project setting, it may take some time, since the entire video file must be re-encoded. Reconfirm the project setting. | — |
| "Hardware Removal" results in error. | Exit Windows® once, and then disconnect the DVD video camera/recorder. If your PC uses Windows® 2000 Professional, the problem may be solved if you install Windows® 2000 SP3 or later. | 119 |
| No USB HS (high speed) connection even when USB2.0 card is used. | Make sure that you have already installed the driver provided with the USB2.0 card. You will need to install the driver provided by USB2.0 card maker in order to operate the USB2.0 card at HS (high speed). | 142 |
| Operating sound is heard cyclically. | This sound is heard because the disc is cyclically operated and does not indicate a fault. | — |
| Some vibrations are felt or slight sound is heard from mechanism. | These vibrations or sound are caused by disc drive: This does not indicate a fault. | — |
| • No operation can be performed because the ACCESS/PC or CARD ACCESS indicator on this DVD video camera/ recorder remains lit or blinking. | In the following cases, it will take more time than usual until operation is possible: • Immediately after a disc or card is reinserted. • When a long time has elapsed since the DVD video camera/ recorder was turned off last. When the temperature is greatly different from the status of previous recording. When disc with scratches, dirt or fingerprints is inserted. When disc is subject to severe vibrations. When the battery or DC power cord was disconnected instead of following the correct procedure using power switch to turn the DVD video camera/recorder off. | 6, 39 |
| After disc or card is inserted, it takes some time until recording is possible. | ||
| No image in viewfinder. | • Is LCD monitor open? No image will appear in viewfinder unless the LCD monitor is closed and securely locked to DVD video camera/recorder. • Is the DVD video camera/recorder set to the sleep/restart status? Press the SLEEP/RESTART button to release the sleep/restart status. | 33, 44 |
| No image appears on the LCD screen or in the viewfinder. | • Is DVD video camera/recorder connected to PC using PC connection cable? Unplug the PC connection cable. Does DVD video camera/recorder stop at the end of the scene to which wipe-out was set and played back? Press the DISC NAVIGATION button. • Is the DVD video camera/recorder set to the sleep/restart status? Press the SLEEP/RESTART button to release the sleep/restart status. | 42, 81, 116 |
| Miscellaneous | ||
| No DVD video camera/ recorder operation. | Is a fully charged battery attached? Is the DVD video camera/recorder powered from AC outlet? | 25, 26 |
| Power does not come on, or no operation occurs by pressing button. | Execute system reset (press the RESET button). | 145 |
| The date and time are incorrect. | Has the DVD video camera/recorder been subjected to impact? The DVD video camera/recorder could be damaged. Consult your dealer. Has the DVD video camera/recorder been left unused for a long period of time? The internal backup memory battery may be discharged: Charge it. | — |
| Pressing the SLEEP/ RESTART button will not set to the sleep/ restart standby status. | Is the proper disc or card loaded? Does the disc or card have remaining free space? Is the DVD video camera/recorder now playing back? Is Disc Navigation screen displayed? | 32 |
| No scene can be deleted. | Is the cursor placed on the scene to be deleted? If the selected scene (framed in red) exists, that scene will be deleted even if you use yellow cursor to select any scene. Check the colours of cursors and bar graph on the thumbnail screen. | 42 |
| Disc cannot be removed. (Cover will not open.) | • Did you detach the battery or AC adapter/charger before setting the power switch to "OFF"? Is the battery charged? Connect a charged battery or the AC adapter/charger, and then press the DISC EJECT button to remove the disc. • Did the DVD video camera/recorder turn off because the battery remaining level ran out? Connect a charged battery or the AC adapter/charger, set the power switch to "OFF", and then press the DISC EJECT button to remove the disc. | 74, 78 |
| DVD video camera/ recorder cannot be operated from remote control. | Is the remote control pointed at the infrared receiver on DVD video camera/recorder? Point it at the infrared receiver to operate the DVD video camera/ recorder. Is the infrared receiver on DVD video camera/recorder exposed to direct sunlight or strong fluorescent light, etc.? The remote control cannot operate the DVD video camera/ recorder when strong light strikes the infrared receiver. Adjust the place or angle of the DVD video camera/recorder. | 25, 26, 30 |
| Disc cover cannot be closed. | Is there battery in the remote control? Also check the polarities of battery. The battery could be dead: Try replacing it. Is the DVD video camera/recorder powered? Turn it on. Is disc correctly inserted? Was disc inserted from wrong direction? Remove the disc and then reinsert it. Connect a fully charged battery or AC adapter/charger, and then turn the DVD video camera/recorder on. | 21 |