Brand: JVC
Category: Camcorder
Document Type: Manual
Language: EN
Brand: JVC
Category: Camcorder
Document Type: Manual
Language: EN
Uploaded: Aug. 10, 2025, 12:34 a.m.
Manual Publish Date: null
null
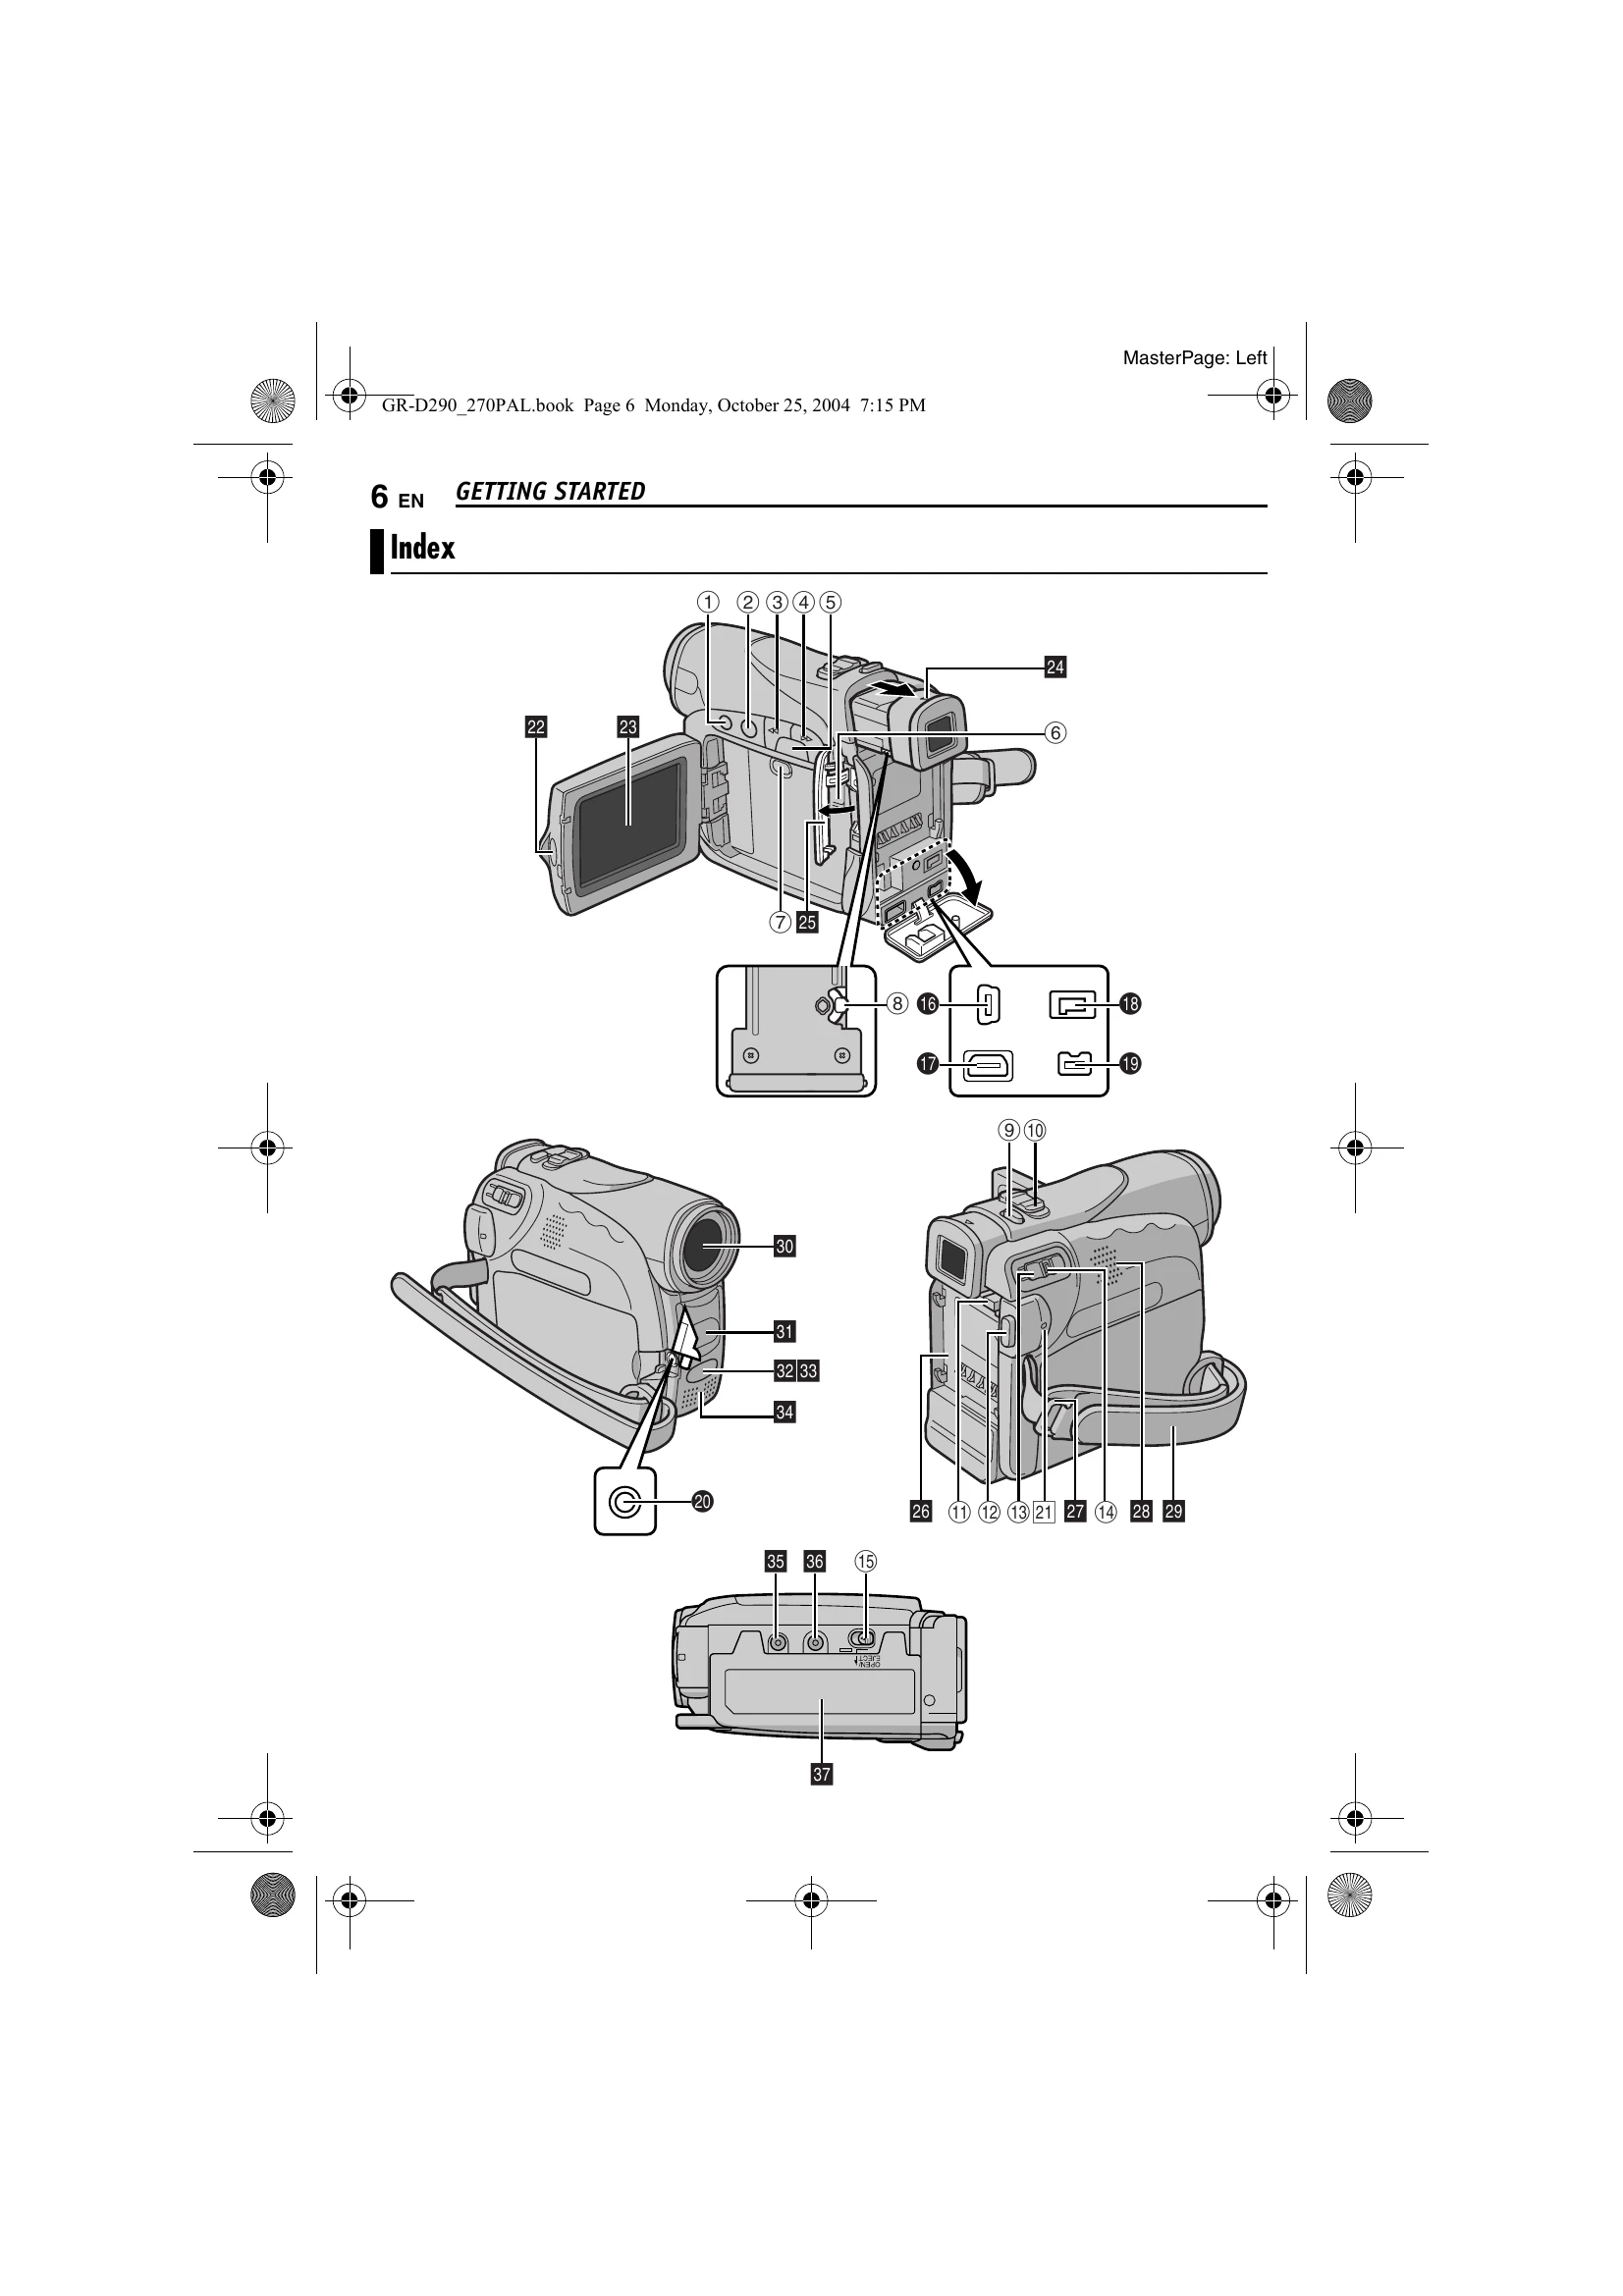
The manual provides a comprehensive index to guide users through the camcorder's features and operations. Key sections include:
\n| Problem | Possible Cause | Solution |
|---|---|---|
| No power is supplied. | The power is not connected properly. | Connect the AC Adapter securely. |
| The battery pack is not attached firmly. | Detach the battery pack and re-attach it firmly. | |
| The battery is dead. | Replace the dead battery with a fully charged one. | |
| Recording cannot be performed. | The tape's erase protection tab is set to “SAVE”. | Set the tape's erase protection tab to “REC”. |
| "TAPE END" appears. | Replace with new cassette. | |
| The cassette holder cover is open. | Close the cassette holder cover. | |
| When shooting a subject illuminated by bright light, vertical lines appear. | This is not a malfunction. | No action required. |
| When the screen is under direct sunlight during shooting, the screen becomes red or black for an instant. | This is not a malfunction. | No action required. |
| During recording, the date/ time does not appear. | "DATE/TIME" is set to "OFF". | Set “DATE/TIME” to “ON”. |
| The LCD monitor or viewfinder indications blink. | Certain Wipe/Fader effects, certain modes of Program AE with special effects, “DIS” and other functions that cannot be used together are selected at the same time. | Re-read the sections covering Wipe/Fader effects, Program AE with special effects and \"DIS”. |
| Digital Zoom does not work. | 25X optical zoom is selected. | Set "ZOOM” to “100X” or “800X”. |
| The VIDEO/MEMORY Switch is set to "MEMORY". | Set the VIDEO/MEMORY Switch to "VIDEO". | |
| The tape is moving, but there is no picture. | Your TV has AV input terminals, but is not set to its VIDEO mode. | Set the TV to the mode or channel appropriate for video playback. |
| The cassette holder cover is open. | Close the cassette holder cover. | |
| Blocks of noise appear during playback, or there is no playback picture and the screen becomes blue. | Dirt on video heads. | Clean the video heads with an optional cleaning cassette. |
| The focus does not adjust automatically. | Focus is set to the Manual mode. | Set Focus to the Auto mode. |
| The lens is dirty or covered with condensation. | Clean the lens and check the focus again. | |
| In the 5-Second mode, recording ends before 5 seconds have elapsed. | The 5-Second mode is set to \"Anim.\" in MANUAL Menu. | Set \"5S\" to \"5S\" in MANUAL Menu. |
| Snapshot mode cannot be used. | The Squeeze mode (SQUEEZE) is selected. | Disengage the Squeeze (SQUEEZE) mode. |
| The colour of Snapshot looks strange. | The light source or the subject does not include white. Or there are various different light sources behind the subject. | Find a white subject and compose your shot so that it also appears in the frame. |
| The image taken using Snapshot is too dark. | Shooting was performed under backlit conditions. | Press BACK LIGHT. |
| The image taken using Snapshot is too bright. | The subject is too bright. | Set \"SPOTLIGHT\". |
| White Balance cannot be activated. | The Sepia (SEPIA) or Monotone (MONOTONE) mode is activated. | Disengage the Sepia (SEPIA) or Monotone (MONOTONE) mode before setting White Balance. |
| The Black & White Fader does not work. | The Sepia (SEPIA) or Monotone (MONOTONE) mode is activated. | Disengage the Sepia (SEPIA) and Monotone (MONOTONE). |
| The image looks like the shutter speed is too slow. | When shooting in the dark, the unit becomes highly sensitive to light when “GAIN UP” is set to "AUTO". | If you want the lighting to look more natural, set “GAIN UP” to “AGC” or “OFF”. |
| The POWER/CHARGE lamp on the camcorder does not light during charging. | Charging is difficult in places subject to extremely high/low temperatures. | Charge it in places with a temperature of 10°C to 35°C. |
| The battery pack is not attached firmly. | Detach the battery pack once again and re-attach it firmly. | |
| “SET DATE/TIME!” appears. | The date/time is not set. | Set the date/time. |
| The built-in clock battery has run out and the previously set date/time has been erased. | Consult your nearest JVC dealer for replacement. | |
| Files stored in the memory card cannot be deleted. | Files stored in the memory card are protected. | Remove protection from the files stored in the memory card and delete them. |
| When the image is printed from the printer, a black bar appears at the bottom of the screen. | This is not a malfunction. | Recording with “DIS” activated can avoid this. |
| When the camcorder is connected via the DV connector, the camcorder does not operate. | The DV cable was plugged/unplugged with power turned on. | Turn the camcorder's power off and on again, then operate it. |
| Images on the LCD monitor appear dark or whitish. | In places subject to low temperature, images become dark due to the characteristics of the LCD monitor. This is not a malfunction. | Adjust the brightness and angle of the LCD monitor. |
| When the LCD monitor's fluorescent light reaches the end of its service life, images on the LCD monitor become dark. | Consult your nearest JVC dealer. | |
| Coloured bright spots appear all over the LCD monitor or the viewfinder. | The LCD monitor and the viewfinder are made with high-precision technology. However, black spots or bright spots of light (red, green or blue) may appear constantly on the LCD monitor or the viewfinder. These spots are not recorded on the tape. This is not due to any defect of the unit. | No action required. |
| The cassette will not load properly. | The battery's charge is low. | Install a fully charged battery. |
| The memory card cannot be removed from the camcorder. | Push in the memory card a few more times. | |
| Picture does not appear on the LCD monitor. | The viewfinder is pulled out and “PRIORITY” is set to "FINDER”. | Push the viewfinder back in or set "PRIORITY" to "LCD”. |
| The LCD monitor's brightness setting is too dark. | Adjust the brightness of the LCD monitor. | |
| If the monitor is tilted upward 180 degrees, open the monitor fully. | Open the monitor fully. | |
| An error indication (01 – 04 or 06) appears. | A malfunction of some kind has occurred. In this case the camcorder's functions become unusable. | Refer to page 51. |
| The remote control does not work. | "REMOTE" is set to "OFF". | Set "REMOTE” to “ON”. |
| The remote control does not point at the remote sensor. | Point at the remote sensor. | |
| The remote control batteries are exhausted. | Replace the batteries with fresh ones. |