Brand: JVC
Category: Camcorder
Document Type: Manual
Language: EN
Brand: JVC
Category: Camcorder
Document Type: Manual
Language: EN
Uploaded: Aug. 10, 2025, 12:36 a.m.
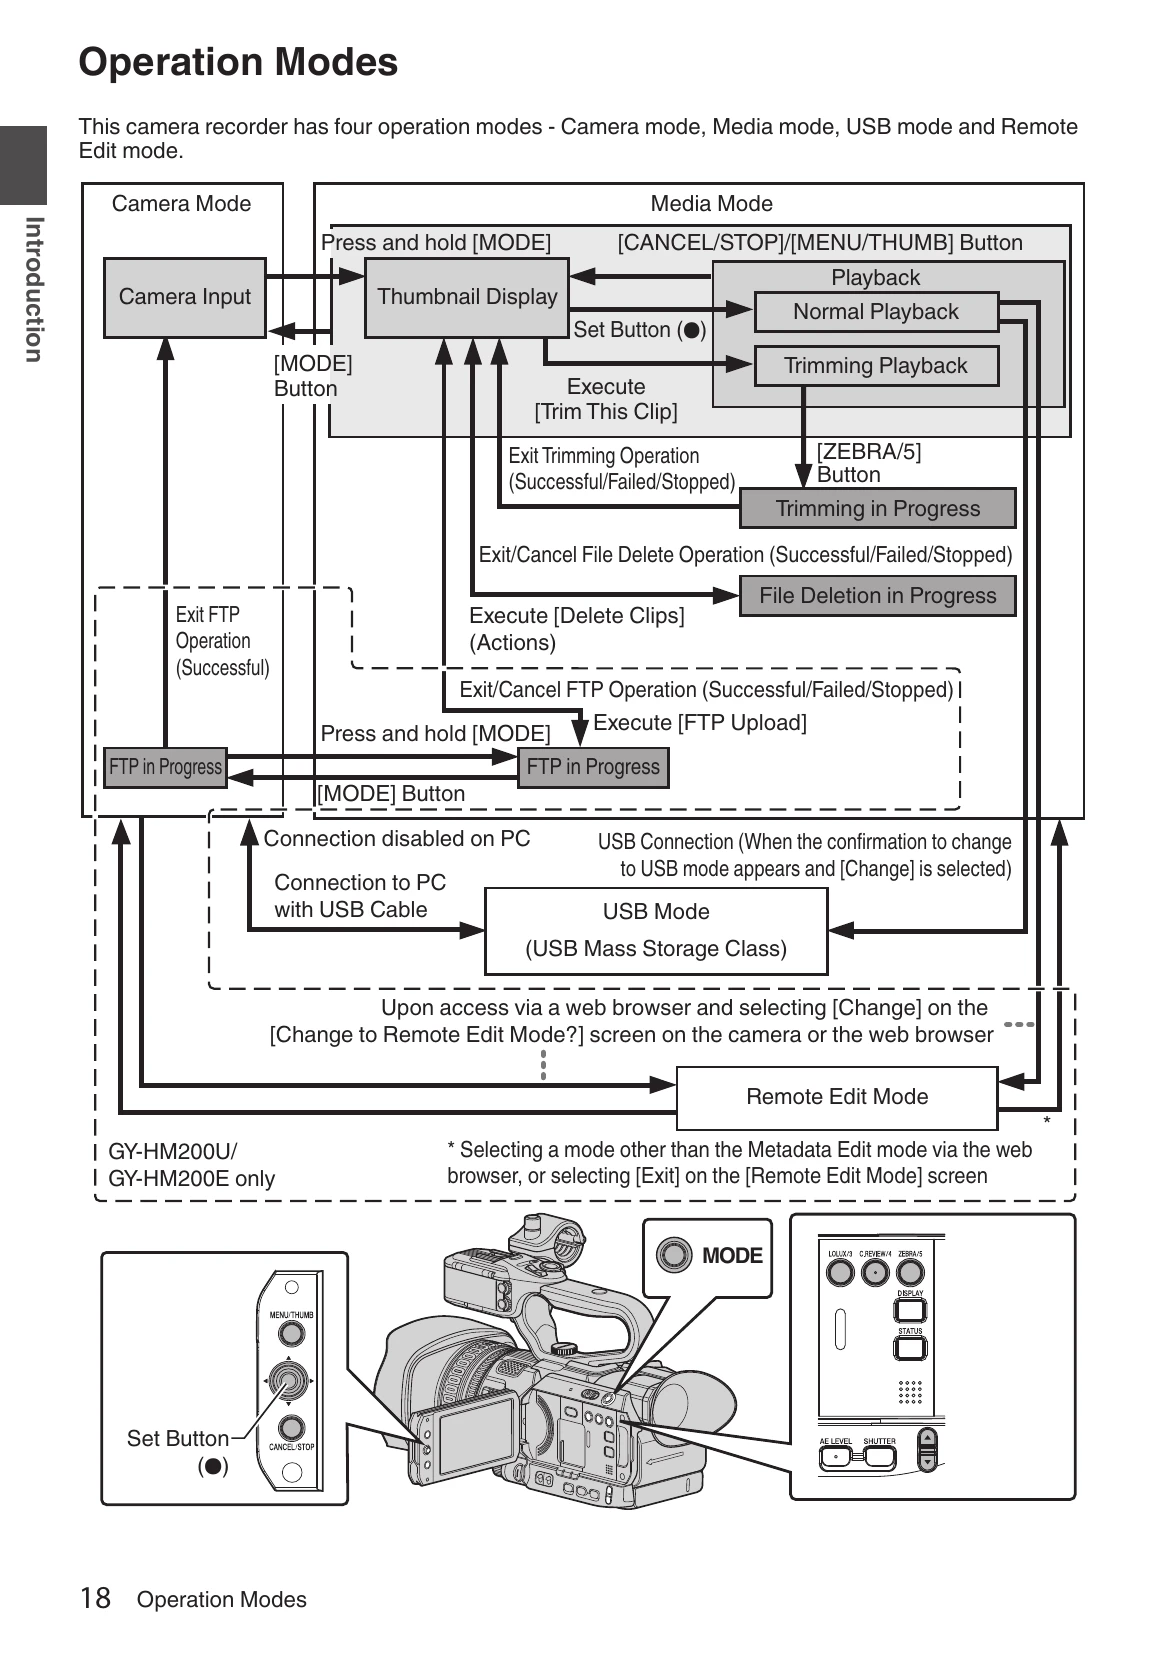
Camera Mode: This is the shooting mode. The camera outputs images to the viewfinder and LCD monitor and enters recording standby when an SD card is inserted. Press the [REC] trigger to start recording. Playback of the SD card is not possible, but the most recently recorded video clip can be reviewed.
Media Mode: Allows playback and deletion of recorded clips. Displays thumbnails or playback screen. Press and hold [MODE] to enter this mode.
USB Mode: Connect to a PC to transfer files. Recognized as a peripheral drive. Disable connection and remove the USB cable to return to Camera mode.
Remote Edit Mode: Enables clip list display and editing of recorded clip data via a web browser on a smartphone, tablet, or PC. Requires changing the camera mode.
| Symptom | Action |
|---|---|
| Power does not turn on. | Is the AC adapter properly connected? Is the battery charged? Is the power turned on immediately after it is turned off? Make sure to wait for an interval of at least 5 seconds before turning on the power again. |
| Unable to start recording. | Is the record trigger button/lock switch on the handle turned on? HDL Is the write-protect switch of the SD card turned on? Make sure that the write-protect switch is turned off. (P40 [Write-Protect Switch on the SD Card]) |
| Camera image is not output on the LCD monitor and viewfinder screen. | • Is the camera recorder set to the Camera mode? Use the [MODE] selection button to switch to the Camera mode. (P18 [Operation Modes]) • Is the SD card inserted compatible with the recording format? (P48 [Selecting a Video Format]) (☞ P117 [ 4GB File Spanning(SDXC)]) |
| Playback does not start after selecting a clip thumbnail and pressing the Set button (●). | • Is the selected clip a playable clip? Playback is not possible if the clip has a different video format setting. |
| Images on the LCD monitor and viewfinder screen appear dark or blurred. | Readjust the brightness of the LCD monitor and viewfinder. • Is the [ND FILTER] switch set to "1/16"? Is the iris closed? • Is the shutter speed setting too high? • Is the amount of peaking too little? Use the [LCD/VF Peaking] menu to adjust the contour for the LCD monitor image and viewfinder image by adjusting the contour of the viewfinder image. (The contour of the LCD monitor will also be adjusted at the same time.) Adjust using [Main Menu] → [LCD/VF] → [LCD/VF Peaking]. (P37 [Adjusting the LCD Monitor]) (P38 [Adjusting the Viewfinder]) |
| The [CH1/CH2] recording level adjustment knob does not work. HDL | Is the [CH1/CH2 AUTO/MANUAL] switch set to "AUTO"? • Is Full Auto enabled? Is [A/V Set] → [Audio Set] → [Audio On FULL AUTO] set to "Auto" in Full Auto mode? (P112 [Audio On FULL AUTO]) |
| SD card cannot be initialized (formatted). | • Is the write-protect switch of the SD card turned on? Make sure that the write-protect switch is turned off. (P40 [Write-Protect Switch on the SD Card]) |
| Battery alarm appears even after loading a charged battery. | • Is the battery too old? |
| The time code and user's bit are not displayed. | • Even in Camera mode or Media mode, the time code and user's bit may not be displayed depending to the type of display. • Is [LCD/VF] → [Display Settings] → [TC/UB] set to "Off"? To display the time code or user's bit, set it to "TC” or “UB”. (P107 [ TC/UB]) |
| The date and time are not displayed. | • The date and time are only displayed on the Display 1 and Display 2 screens in the Camera mode (during shooting). (P127 [Display Screen in Camera Mode]) • Is [System] → [Record Set] → [Time Stamp] set to “On”? To display the date and time, set it to "Off". (P117 [Time Stamp]) |
| Incorrect display on the viewfinder. | • Is [LCD/VF] → [VF SW] set to “Enable”, and is the viewfinder in use without being pulled out? To use the viewfinder in this setting, pull out the viewfinder. (P104 [VF SW]) |
| The actual recording time is shorter than the estimated time. | • The recordable time may be shorter depending on the shooting conditions or the subject. |
| Cannot connect to wireless LAN. 200 | • Check the mode of connection and method of setting ([SSID] and [Passphrase] in cases other than WPS). (P143 [Connecting via Wireless LAN]) • Even if the Passphrase is wrong, “Completed the Setup Wizard. Please Input the Passphrase into Your Device.” may appear at the browser setting depending on the type of encryption. Adjust [Passphrase] again. |
| The View Remote screen turns black. | • The network path is congested. Wait a while before refreshing (reloading) the web browser. |
| The screen flickers. The screen freezes. Cannot perform remote operation. 200 |
• Adjust the [Clip Server] settings. (P122 [ Clip Server]) • The maximum size of the recorded clip is 64 GB. If a file size limit is set in the FTP server settings, set the size limit to more than 64 GB. • Take necessary action as described in "[List of FTP Transfer Errors 200](P171)". |
| The wireless LAN is disconnected. 200 | • The wireless LAN may be disconnected depending on the environment. Change the usage environment. • Connect via wired LAN. (P145 [Connecting via Wired LAN]) |
| The images and audio sound during live streaming are choppy. 200 | • Depending on the type of network adapter used and the connection, streaming may not be possible with the encoding bit rate specified. Please reduce the encoding bit rate. |