Brand: JVC
Category: Camcorder
Document Type: Manual
Language: EN
Brand: JVC
Category: Camcorder
Document Type: Manual
Language: EN
Uploaded: Aug. 10, 2025, 12:33 a.m.
Manual Publish Date: null
null
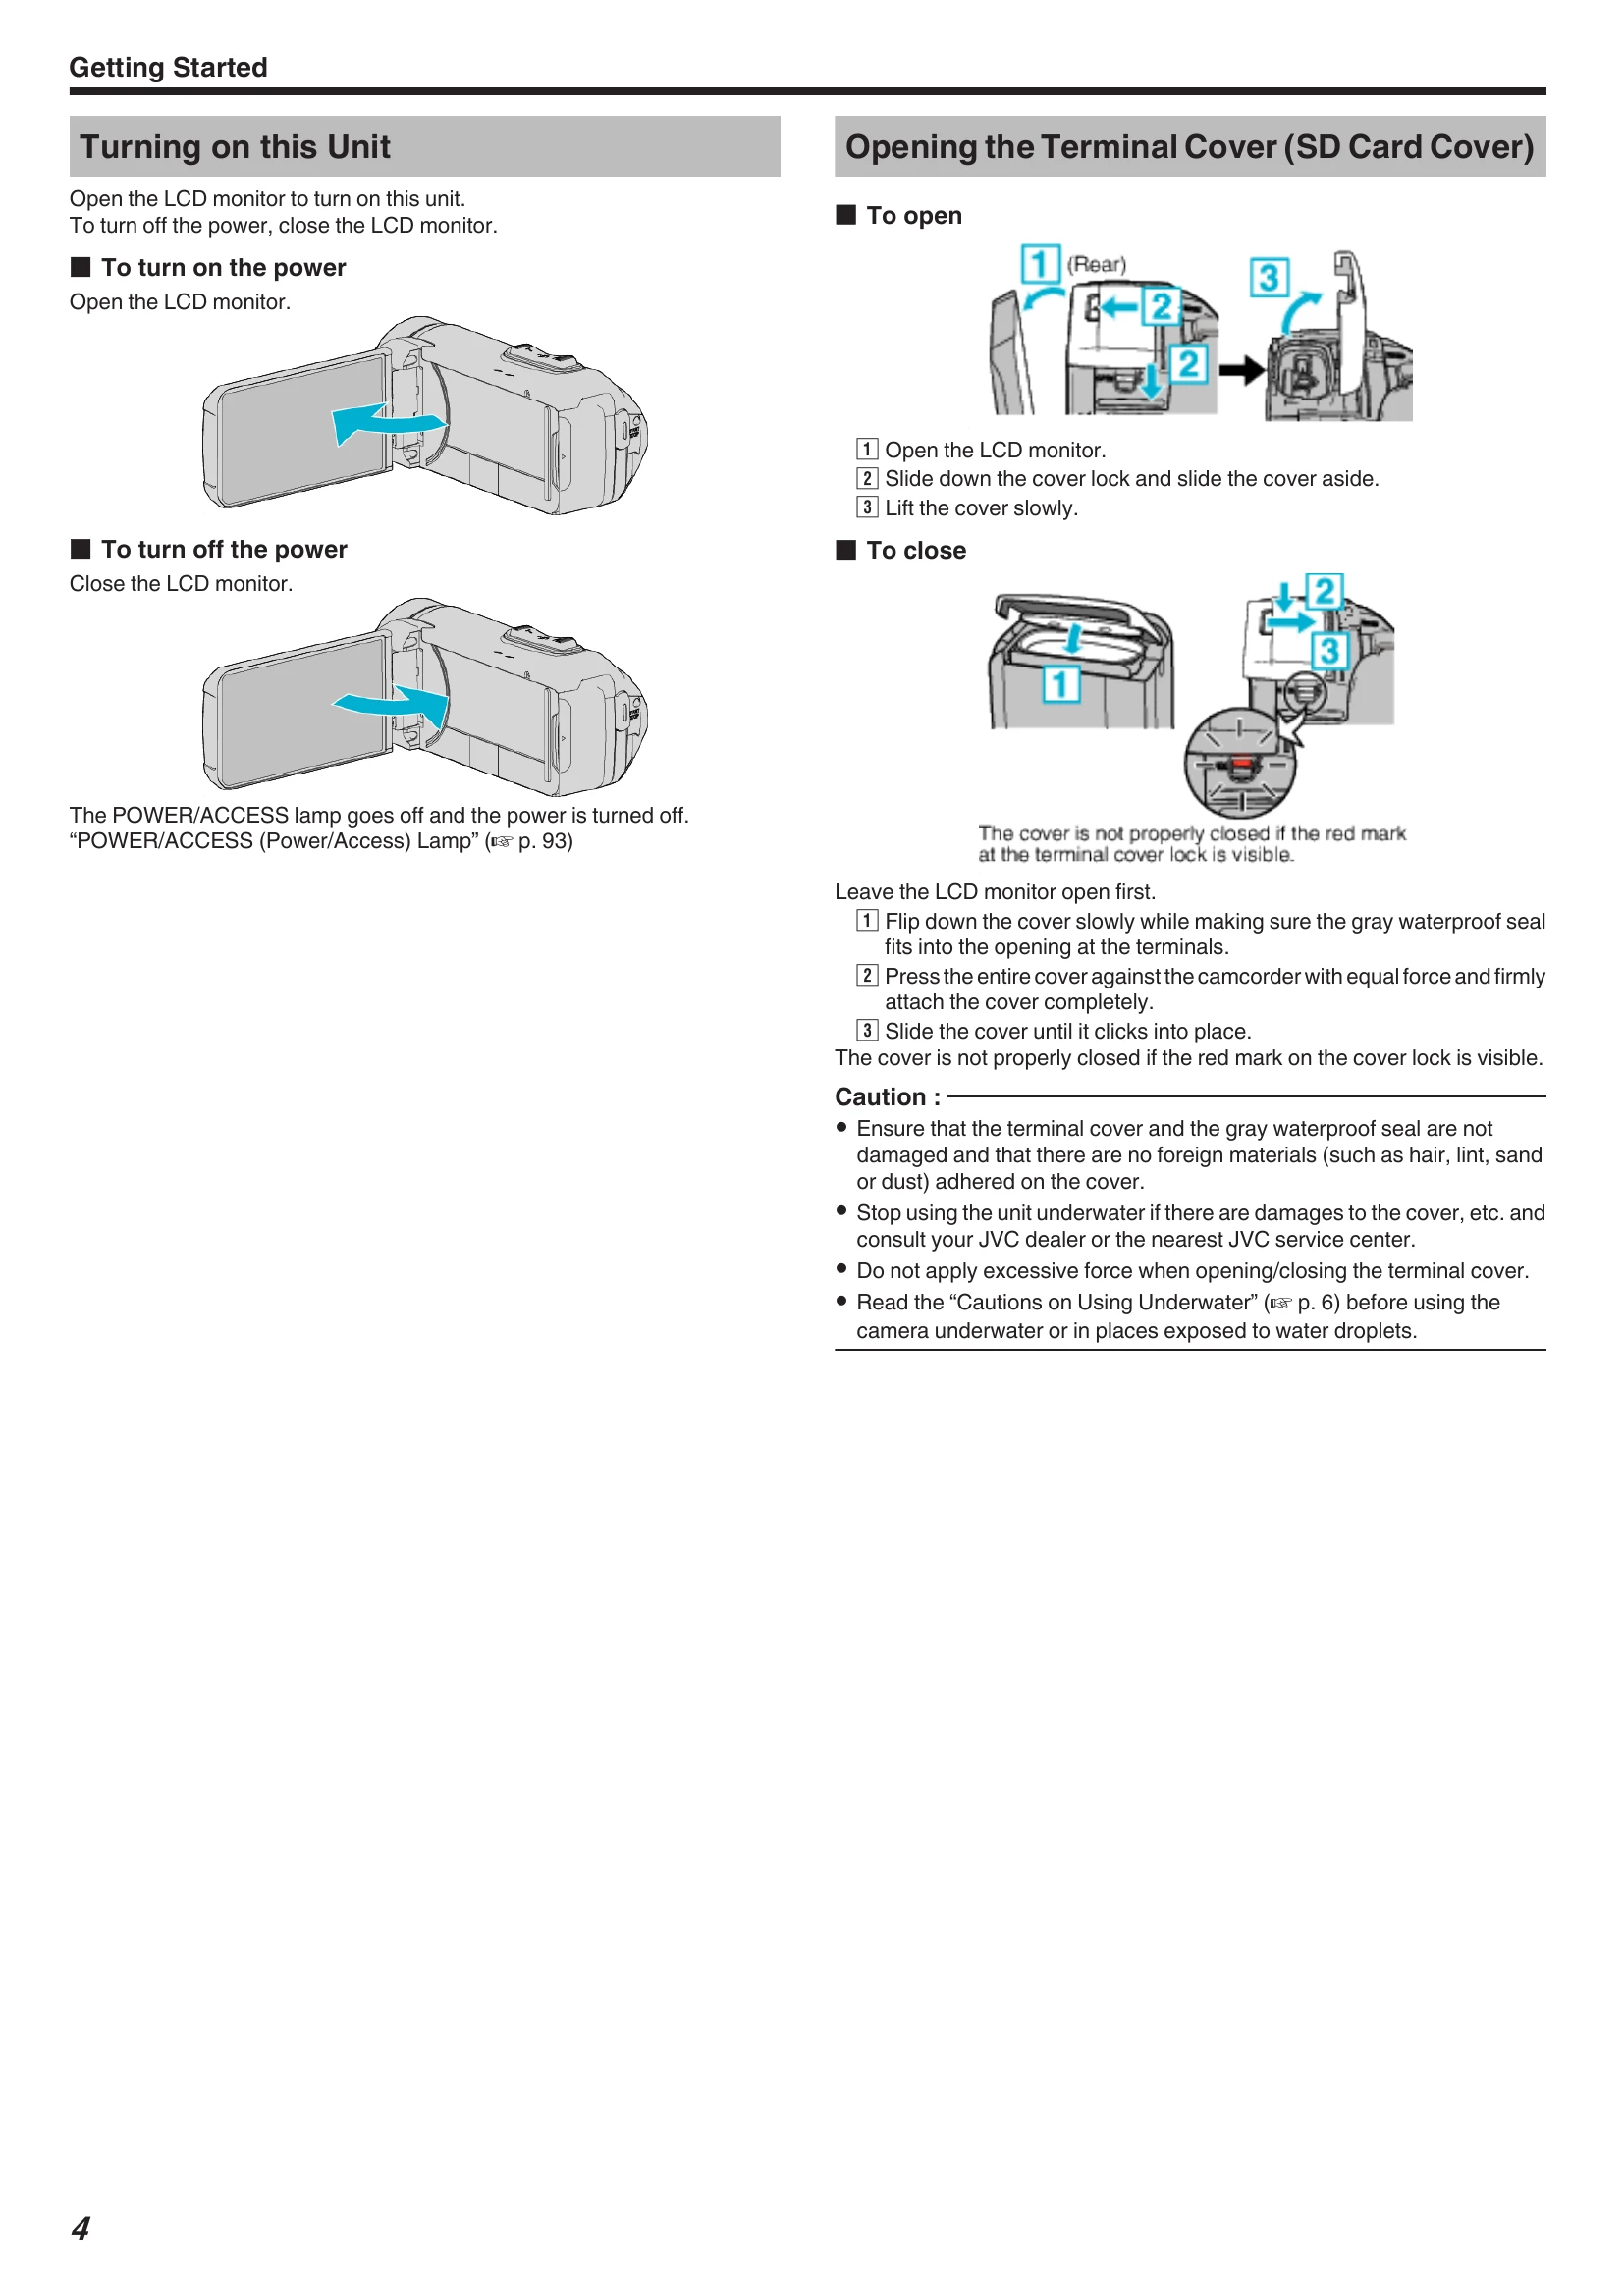
Turning on this Unit: Open the LCD monitor to turn on the unit. Close it to turn off.
\nOpening/Closing Terminal Cover: Open the LCD monitor, slide the cover lock, and lift the cover slowly. To close, ensure the waterproof seal is in place, press the cover firmly, and slide until it clicks.
\nCharging: Connect the AC adapter to the unit and an outlet. The CHARGE lamp indicates charging status.
\nResetting the Unit: Open the terminal cover, disconnect cables, close the LCD monitor, and press the reset button gently.
\nQuad Proof: The unit is Waterproof, Dust-proof, Drop-proof, and Freeze-proof.
\nUsing the Touch Screen: Tap or drag on the LCD monitor to operate. Adjust touch panel response if needed.
\nScreen Lock: Lock the screen underwater to prevent accidental operations.
\nClock Setting: Set the date and time via the MENU, SETUP, DATE & TIME options.
\nChanging Display Language: Navigate through MENU, SETUP, LANGUAGE to change the display language.
\nHolding the Unit: Keep elbows close to your sides for stability.
\nTripod Mounting: Mount on a tripod for stable recording.
\nUsing Overseas: Use converter plugs for charging. Set the clock to local time when traveling.
\nSetting Daylight Saving Time: Enable DST in the DATE & TIME settings.
\nAuto Mode: Use i.A. (Intelligent Auto) for automatic adjustments.
\nManual Mode: Select 'M' for manual control.
\nIndications: Various icons display video quality, time, recording media, battery status, etc.
\n| Problem | Solution |
|---|---|
| When the unit is not working properly | |
| Resetting this Unit | 1 Open the terminal cover. Remove the power cord and all connecting cables. 2 Close the LCD monitor to turn off this unit. 3 Press the Reset button gently using an object with pointed tip. |
| Charging | |
| Unable to charge the battery. | Be sure to charge using the supplied AC adapter. Check connection. Charge under room temperature range of 10°C to 35°C. Using a non-original AC adapter may cause damage. |
| The remaining battery display is not correct. | This can occur with prolonged use in extreme temperatures or repeated charging. |
| The battery runs out quickly even after charging. | Be sure to charge using the supplied AC adapter. Battery performance drops temporarily in cold temperatures (-10°C to 0°C). Battery may need replacement if recording time is extremely short even after full charge. |
| Power supply | |
| Unable to turn on the power. | Charge the battery for more than 40 minutes before turning on the power. |
| Recording | |
| Recording cannot be performed. | Check the button. Set to recording mode by tapping the REC button. |
| Recording stops automatically. | Unit stops automatically after 12 consecutive hours. Turn off, wait, then turn on. |
| The continuous shooting speed of still images is slow. | May drop with repeated use, depending on SD card or recording conditions. |
| The focus is not adjusted automatically. | Adjust focus manually. Wipe lens with a cleaning cloth. Cancel manual focus. |
| Zoom does not work. | Digital zoom not available in still image mode. Not available in time-lapse recording. Set "ZOOM" in menu. |
| Mosaic-type noise occurs when recording scenes with fast movements or extreme changes in brightness. | Set "VIDEO QUALITY" to "UXP" or "XP". |
| The inside of the lens is foggy. | Open terminal cover, close LCD monitor, and leave for a while to reduce temperature. |
| Preventing fogging inside the lens | Avoid direct sunlight, use tripod, leave terminal cover open (waterproof features disabled), turn off power when not recording. |
| During charging | Charge in low humidity environment. |
| SD Card | |
| Cannot insert the SD card. | Ensure correct direction. Do not use miniSD/microSD cards. |
| Unable to copy to SD card. | Format the SD card using "FORMAT SD CARD". Release write protection switch. |
| When "CHECK CARD'S WRITE PROTECTION SWITCH" appears, release the lock on the SD card. | |
| Playback | |
| Sound or video is interrupted. | Sometimes occurs at scene transitions; not a malfunction. |
| There is no sound. | Turn off Silent Mode. Set "OPERATION SOUND" to "ON". Audio not recorded in TIME-LAPSE RECORDING. |
| The same image is displayed for a long time. | Use high speed SD card. Clean terminals. Format SD card. Verify PC system requirements. |
| The motion is choppy. | Use high speed SD card. Clean terminals. Format SD card. Verify PC system requirements. |
| Cannot find a recorded file. | Select "PLAYBACK OTHER FILE". |
| Images do not appear on the TV properly. | Disconnect/reconnect cable. Reset unit. |
| Images are projected vertically on the TV. | Set "VIDEO OUTPUT" to "4:3". Adjust TV screen. |
| The image displayed on TV is too small. | Set "VIDEO OUTPUT" to "16:9". |
| When connected to the TV via the HDMI mini cable, proper images and sounds are not output. | Disconnect/reconnect HDMI cable. Turn unit off/on. |
| HDMI-CEC functions do not work properly, and the TV does not work in conjunction with this unit. | Set "HDMI CONTROL" to "OFF". |
| Editing/Copying | |
| Unable to delete file. | Release protection before deleting. |
| Computer | |
| Unable to copy files to the computer's HDD. | Install Everio MediaBrowser 4. Ensure sufficient free space. |
| Unable to copy files to DVD or Blu-ray disc with a PC. | Requires a recordable DVD or Blu-ray drive. |
| Cannot upload the file to YouTube. | Requires a YouTube account. Changing file formats not possible on unit. |
| I am using a Mac computer. | Refer to "Copying to Mac Computer" section. |
| The computer cannot recognize the SDXC card. | Confirm and update computer OS. |
| Screen/Image | |
| The LCD monitor is difficult to see. | May be difficult in bright areas. |
| Color and brightness of the screen changes and horizontal stripes and flickers appear on screen | Normal occurrence with fluorescent/mercury lamps. Set image stabilizer to "ON". |
| A band or a ball of bright light appears on the LCD monitor. | Change unit's direction to avoid light source. |
| The recorded subject is too dark. | Use backlight compensation, GAIN UP, or adjust BRIGHTNESS ADJUST to "+". |
| The recorded subject is too bright. | Turn off backlight compensation, or adjust BRIGHTNESS ADJUST to "-". |
| The color looks strange. (Too bluish, too reddish, etc.) | Wait for natural colors. Set WHITE BALANCE to MANUAL (FINE/CLOUD/HALOGEN) or MWB. |
| The color looks different. | Set WHITE BALANCE accordingly. |
| There are bright or dark spots on the screen. | Normal; these are dead pixels and will not be recorded. |
| Other Problems | |
| The buttons on the touch screen do not work. | Use fingers, not nails/gloves. Disable SCREEN LOCK. Save data before service. Connect to PC via USB, press and hold START/STOP for 2 sec. |
| The image is grainy. | Occurs with digital zoom. |
| This unit heats up. | Normal; stop use if too warm. |
| The language on the display changed. | May occur when connecting to TV via HDMI with different language settings. |
| Error Message? | |
| SET DATE/TIME! | Clock reset after battery depletion. Set clock again. |
| COMMUNICATION ERROR | Reconnect USB cable. Turn devices off/on. Reset unit. |
| FORMAT ERROR! | Reset unit. Check card support. Re-insert card. Format SD card. |
| MEMORY CARD ERROR! | Check card support. Reset unit. Re-insert card. Format SD card. |
| NOT FORMATTED | Select OK, then YES to format. |
| RECORDING FAILURE | Reset unit. |
| CANNOT TAKE MORE STILL IMAGES AT THIS TIME | Stop video recording before taking still images. |
| PLAYBACK FAILED | Remove/re-insert SD card. Clean terminals. Insert SD card before power on. Avoid impact/vibration. |
| UNSUPPORTED SCENE! | Use files recorded with this unit. |
| UNSUPPORTED FILE! | Use files recorded with this unit. |
| THIS FILE IS PROTECTED | |
| Switch off "PROTECT/CANCEL" in "EDIT" menu. | |
| CHECK CARD'S WRITE PROTECTION SWITCH | |
| Set the write protect switch of the SD card to off. | |
| INSUFFICIENT AVAILABLE SPACE | |
| Delete files, move files, or replace SD card. | |
| RECORDABLE MANAGEMENT CAPACITY LEVEL HAS BEEN REACHED | |
| Move files/folders to computer, back up, then format (FILE + MANAGEMENT NO). | |
| SCENE QUANTITY EXCEEDED LIMIT | |
| Move files/folders to computer, back up, then format (FILE + MANAGEMENT NO). | |
| NUMBER OF FOLDERS OVERFLOW | |
| Move files/folders to computer, back up, then format (FILE + MANAGEMENT NO). | |
| FILE QUANTITY LIMIT EXCEEDED | |
| Move files/folders to computer, back up, then format (FILE + MANAGEMENT NO). | |
| RECORDING CANCELLED | |
| Reset unit. Protect from vibration and shock. | |
| CAMERA TEMPERATURE IS HIGH PLEASE TURN CAMERA OFF TO ALLOW IT TO COOL DOWN PLEASE WAIT | |
| Turn off unit, let it cool down, then turn on power again. | |