Brand: JVC
Category: Camcorder
Document Type: Manual
Language: EN
Brand: JVC
Category: Camcorder
Document Type: Manual
Language: EN
Uploaded: Aug. 10, 2025, 12:36 a.m.
Manual Publish Date: null
null
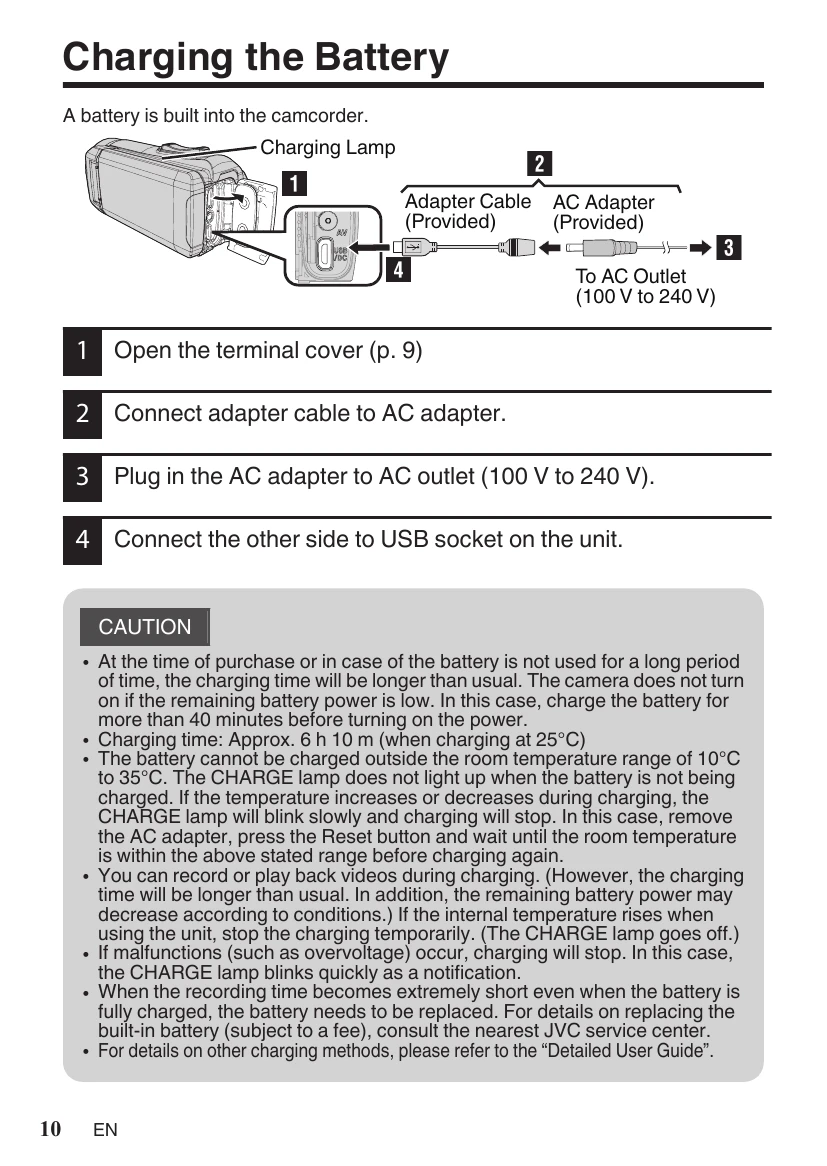
1. Open the terminal cover (p. 9)
\n2. Connect adapter cable to AC adapter.
\n3. Plug in the AC adapter to AC outlet (100 V to 240 V).
\n4. Connect the other side to USB socket on the unit.
\n\n1. Open the terminal cover.
\n2. Insert an SD card.
\n\n1. Check if the recording mode is video.
\n2. Check if the recording mode is i.A..
\n3. Start recording. Press again to stop.
\n\nTo change the setting:
\n1. Tap [MENU].
\n2. Tap [RECORD SETTING].
\n3. Tap [VIDEO QUALITY].
\n4. Tap the desired video quality.
\n\n1. Tap or to select the video or still image mode.
\n2. Tap ≪PLAY on the touch screen to select the playback mode.
\n3. Tap on the file to play back.
\nTo delete unwanted files:
\n1. Tap .
\n2. Tap on the files to delete.
\n3. Tap “SET”.
\n4. Tap \"EXECUTE” when the confirmation message appears.
\n5. Tap "OK".
\n| Troubleshooting | Built-in Battery |
|---|---|
| If you encounter problems with this unit, check the following before requesting service. 1. Refer to the “Troubleshooting\" section in the \"Detailed User Guide\". If you have difficulties operating the unit, refer to the detailed descriptions in the \"Detailed User Guide\". http://manual3.jvckenwood.com/index.html/ 2. This unit is a microcomputer-controlled device. Electrostatic discharge, external noise and interference (from a TV, a radio, etc.) might prevent it from functioning properly. In such a case, reset the unit. ① Remove all the cables from this unit. ② Press the \"Reset button\" located inside of the terminal cover. (Before pressing the reset button, close the LCD monitor to turn off this unit.) ③ Reattach the AC adapter, open the LCD monitor and this unit powers on automatically. 3. If the above do not solve the problem, consult your nearest JVC dealer or JVC service center. | This unit is equipped with a built-in lithium-ion battery. Before using this Unit, be sure to read the following cautions: • To avoid hazards ... do not burn. ... do not modify or disassemble. ... do not expose this Unit to temperatures exceeding 60 °C, as this may cause the built-in battery to overheat, explode or catch fire. • To prevent damage and prolong service life ... do not subject to unnecessary shock. ... charge within the temperature range of 10°C to 35°C. Cooler temperatures require longer charging time, or in some cases stop charging at all. Warmer temperatures prevent complete charging, or in some cases stop charging at all. ... store in a cool, dry place. Extended exposure to high temperatures will increase natural discharge and shorten service life. ... keep a 30% battery level ■) if the battery is not to be used for a long period of time. In addition, fully charge and then fully discharge the battery every 6 months, then continue to store it at a 30% battery level (). remove the AC adapter from the unit when not in use, as some machines use current even when switched off. ... do not drop intentionally or subject to strong impact. |