Brand: KENWOOD
Category: Audio
Document Type: Manual
Language: EN
Brand: KENWOOD
Category: Audio
Document Type: Manual
Language: EN
Uploaded: Nov. 21, 2025, 6:45 p.m.
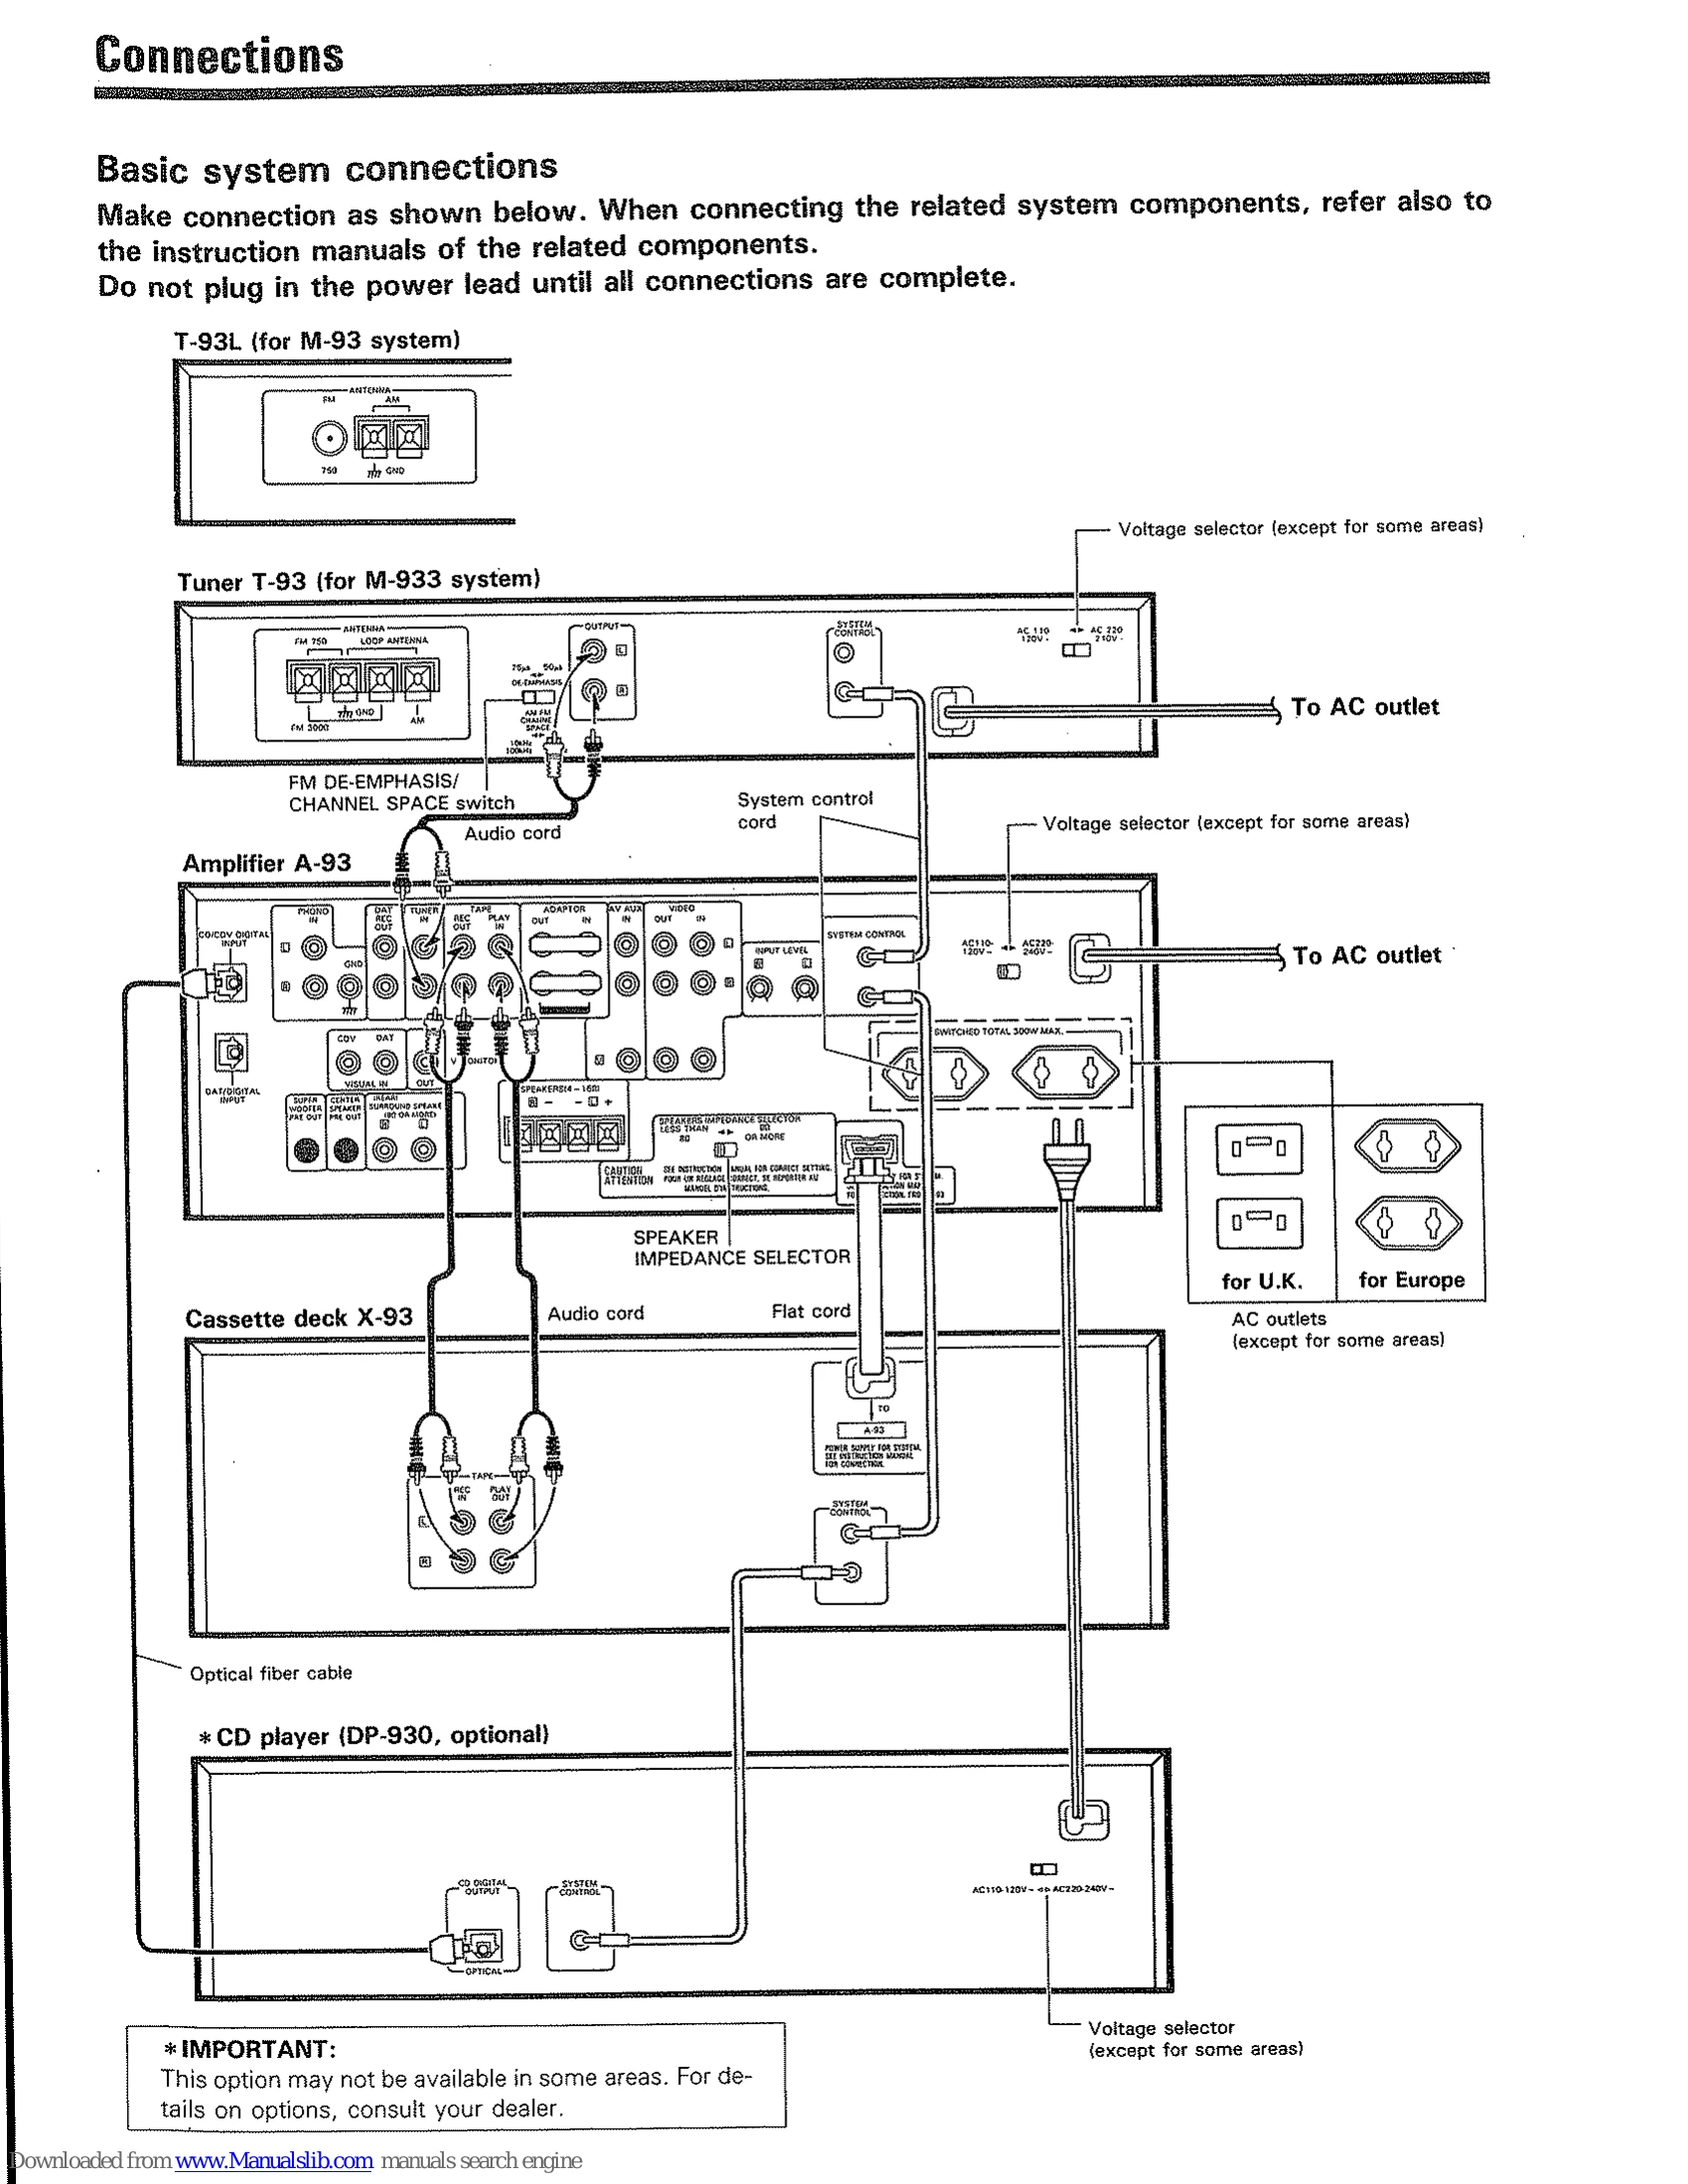
Refer to the warranty card for details regarding product warranty information.
| Symptom | Cause | Remedy |
|---|---|---|
| Connection related | ||
| Power does not turn on or is cut off immediately after it is turned on. | 1. The tuner's AC power cord is plugged into a switched outlet on the amplifier. 2. The system control cord is not plugged in securely. 3. The audio cord is not connected. |
1. Plug the tuner's AC power cord into a wall outlet. 2. Plug the system control cord securely into the system control jack. 3. Connect the audio cord. |
| Amplifier and speakers | ||
| No sound through speakers. | 1. Speaker cords are unplugged. 2. VOLUME is set at minimum. 3. Shorting pins are removed from ADAPTER jacks. 4. MUTING is ON. 5. The SPEAKERS switch is set to OFF. |
1. Check the connection between the amp and speakers. 2. Increase volume. 3. Insert the shorting pins. 4. Switch MUTING OFF. 5. Set the SPEAKERS switch to ON. |
| No sound through one speaker. | 1. Speaker cord is unplugged. 2. BALANCE control is turned to one side. |
1. Check the connection between the amp and speakers. 2. Adjust the BALANCE control. |
| No sound through center speaker. | The amplifier incorporated in (or connected to) the center speaker is not switched on. | Switch on the power of the center speaker amp. |
| No sound, or very low-level sound from rear speakers. | 1. Surround mode is set to OFF. 2. Input level control (the amplifier rear panel) is in the fully counterclockwise position. |
1. Set to the desired surround mode. 2. Adjust the input level (see "Adjustment for Dolby Surround mode"). |
| When the input selector is set to PHONO, a humming sound is heard but music is not heard. | 1. The turntable's output cable may be connected insecurely. 2. The turntable's grounding wire may not be connected. |
1. Connect the turntable's output cable securely into the PHONO terminal. 2. Connect the turntable's grounding wire to the GND terminal on the amplifier's rear panel. |
| Tuner | ||
| Timer indication stops and blinks. | 1. Power line was interrupted. 2. Power cord was unplugged and plugged in again. |
1. Set the current time correctly. 2. Set the current time correctly. |
| Timer operation does not function. | 1. Current time is not set. Power line was interrupted. 2. The ON time and OFF time for the program are not set. 3. Timer program is not set for execution. |
1. Set the current time correctly. 2. Set both ON time and OFF time as required. 3. Press the EXE. key according to the required program. |
| FM/AM (MW, LW) reception is impossible. | 1. Antenna is not connected. 2. Tuning band is not set correctly. 3. The required station is not tuned in. |
1. Connect the antenna to the tuner correctly. 2. Set the tuning band correctly. 3. Tune to the required station using the TUNING/CHARACTER keys. |
| Reception is impossible when a numeric key (1~10/0) is pressed after presetting. | 1. Frequency of the receivable station is not preset into the numeric key. 2. The stored contents have been erased due to longterm power interruption. |
1. Tune to the frequency of a station which can be received, and preset into any of the numeric keys. 2. Perform the presetting operation again. |
| Noise. | 1. Noise due to car ignition system in vicinity. 2. Influence of electrical appliances. 3. TV is too close. |
1. Set the antenna away from the street. 2. Cut the power to the appliances. 3. Place the TV further away. |
| Cassette deck | ||
| Recording is impossible by pressing the REC key. | 1. The erase protection tab on the cassette shell is broken. 2. Cassette holder is not closed completely. 3. Record input level knob is set to its minimum position. 4. The amp's input selector is set to TAPE A or TAPE B. 5. Tape is wound to one side. |
1. Use a cassette which has its protection tab intact. (When recording using a cassette with a broken tab, cover the hole with adhesive tape.) 2. Close the cassette holder completely. 3. Refer to the "How to record" section. 4. Set the amp's selector to the recording source you want. 5. Set the direction indicator to the right direction. |
| Sound is not heard even when the playback key is pressed. | 1. Audio cords are connected incorrectly. 2. Head is dirty. 3. Tape cannot be advanced due to uneven winding. 4. Unrecorded tape is used. |
1. Refer to the "Connections" section. 2. Refer to the "Cleaning the head section". 3. Replace the cassette. 4. Use a recorded tape. |
| Sound is husky or high frequency notes are not heard. | 1. Head is dirty. 2. Tape is damaged. |
1. Refer to the "Cleaning the head section". 2. Replace the cassette. |
| Sound is distorted. | 1. Recording level was too high when recording. 2. Recorded tape itself is distorted. |
1. Refer to the "How to record" section. 2. Use a different recorded tape. |
| Too noisy. | 1. Head is magnetized. 2. Noise is induced from external equipment. 3. Recording level is too low. 4. Dolby NR encoded tape is played back with Dolby NR switch OFF. |
1. Demagnetize the head using head eraser. 2. Keep the unit away from other electrical equipment. 3. Refer to the "How to record" section. 4. Set the Dolby NR switch to B or C. It is recommended to always perform recording with the Dolby NR switch set to B or C. |
| Sound contains wow or flutter. | 1. Capstan or pinch roller is dirty. 2. Tape is wound unevenly. |
1. Refer to the "Cleaning the head section". 2. Wind the tape again by fastforwarding or rewinding. |
| Playback or recording starts when the power is turned ON. | Timer switch is set to PLAY or REC. | Set the timer switch to OFF when the timer-playback or timer-recording function is not used. |
| Remote control | ||
| Remote control unit does not function. | 1. Batteries are exhausted. 2. System control cord is disconnected from the rear panel terminal. 3. Operating position is too distant from the unit (infared sensor). 4. Record, tape, or compact disc is not loaded in the component to be played. 5. Cassette deck to be played is in use for recording. |
1. Replace the batteries with new ones. 2. Connect it firmly. 3. Use the remote control unit (transmitter) within an operable area. 4. Set the desired program source on the component. 5. Wait until the recording is over. |