Manual for MultiSync EA224WMi

Manual for MultiSync EA224WMi

Brand: NEC

Category: Monitor

Document Type: Manual

Language: EN

Uploaded: Nov. 21, 2025, 7:39 p.m.

Quick Start

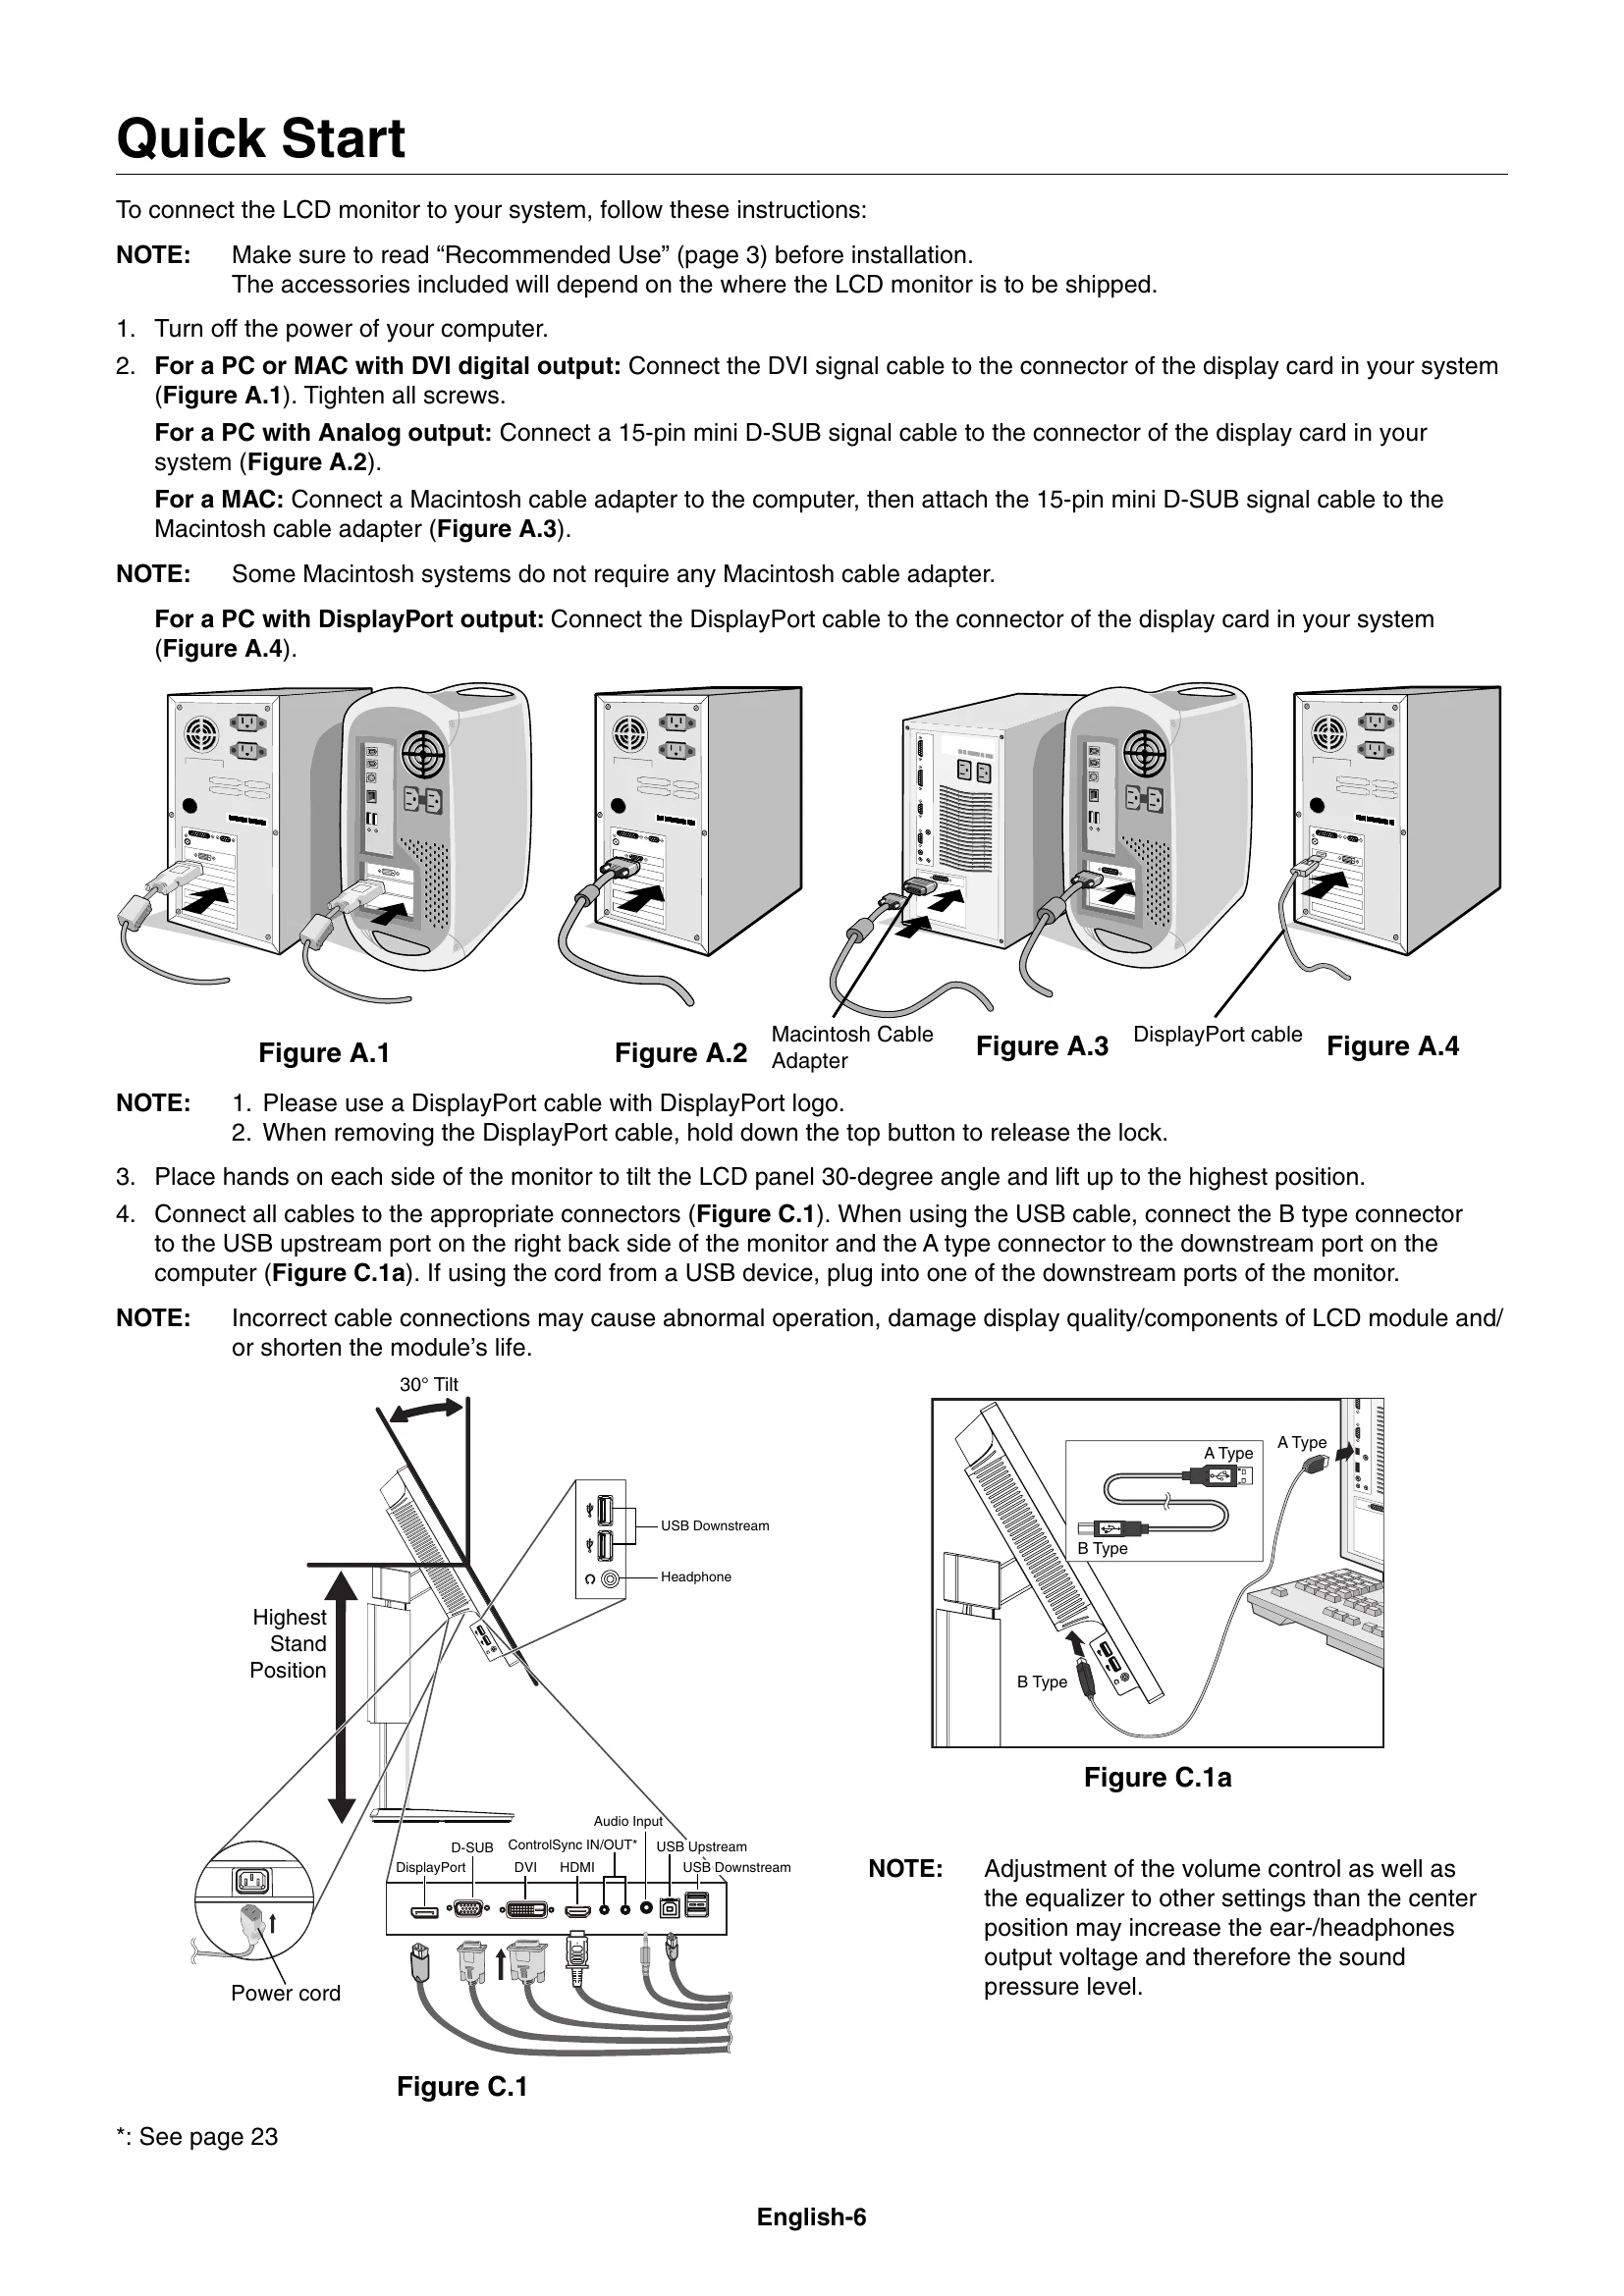
To connect the LCD monitor to your system, follow these instructions:

  1. Turn off the power of your computer.
  2. Connect the appropriate video signal cable (DVI, VGA, DisplayPort, or HDMI) to your PC or MAC and the monitor.
  3. Connect all other cables, including USB and ControlSync cables, to their respective ports.
  4. Organize cables using the built-in cable management system.
  5. Connect the power cord to the monitor and a power outlet.
  6. Turn on the computer, then turn on the monitor.
  7. The monitor will automatically adjust to optimal settings. Further adjustments can be made using the OSD controls.

Raise and Lower Monitor Screen

Place a hand on each side of the monitor and lift or lower to the desired height.

Screen Rotation

Before rotating, disconnect power and cables. Raise the screen to the highest level and tilt. Then, place a hand on each side and turn clockwise or counter-clockwise.

Tilt and Swivel

Grasp the top and bottom sides of the monitor screen and adjust the tilt and swivel as desired.

Flexible Arm Installation

Follow the instructions provided by the manufacturer of the display mount.

Troubleshooting and error codes

ProblemPossible Cause/Solution
No picture
  • Signal cable not fully connected.
  • Display card not fully seated.
  • Monitor does not support DisplayPort converter signal.
  • Power switches are off.
  • Unsupported mode selected on display card.
  • Compatibility issues between monitor and display card.
  • Bent or pushed-in pins on signal cable connector.
  • Incorrect signal input selected (DVI-D, DisplayPort, HDMI, D-SUB).
  • OFF MODE SETTING or HUMAN SENSOR issue (LED dark blue).
  • Change "OVER SCAN" when using HDMI input.
Power Key does not respond
  • Unplug and replug the monitor's power cord.
  • Obstruction on the bezel.
Image Persistence
  • Image persistence is a residual image. Unlike CRT, it's not permanent. Avoid displaying static images for long periods.
  • To alleviate: Turn off the monitor for as long as the image was displayed. Use a screen saver or turn off when not in use.
"OUT OF RANGE" message
  • Signal clock or resolution too high. Choose a supported mode.
  • Signal frequency out of range. Choose a supported mode.
Image is unstable, unfocused, or swimming
  • Signal cable not fully attached.
  • Use OSD Image Adjust controls (fine adjustment).
  • Readjust settings if display mode is changed.
  • Check compatibility and signal timings with display card.
  • Change video mode to non-interlace and use 60Hz refresh rate if text is garbled.
LED on monitor is not lit
  • Power Switch is ON and power cord is connected.
  • Increase LED BRIGHTNESS adjustment.
Picture is not as bright
  • Ensure ECO MODE and AUTO BRIGHTNESS are OFF.
  • Ensure AUTO BRIGHTNESS is OFF if brightness fluctuates.
  • Signal cable should be completely attached.
  • LCD brightness degradation (long-term use or cold conditions).
  • Change "VIDEO LEVEL" when using HDMI.
  • Set DV MODE to STANDARD if brightness fluctuates.
Display image is not sized properly
  • Use OSD Image Adjust controls (coarse adjustment).
  • Ensure a supported mode is selected on the display card.
  • Change "OVER SCAN" when using HDMI.
No Video
  • Turn the Power Key off and on.
  • Ensure computer is not in power-saving mode.
  • Some video cards may not output signal when monitor is turned OFF/ON or disconnected/connected from AC power under low resolution with DisplayPort.
  • Change "OVER SCAN" when using HDMI input.
No Sound
  • Ensure speaker cable is connected.
  • Check if mute is activated.
  • Check VOLUME in OSD menu.
  • Check "SOUND INPUT" in OSD Tools.
Brightness variations over time
  • Change AUTO BRIGHTNESS to OFF and adjust brightness.
  • Change DV MODE to STANDARD and adjust brightness.
USB Hub does not operate
  • Ensure USB cord is properly connected.
Human sensor does not work
  • Check SENSOR SETTING (HUMAN SENSING).
  • Ensure no object is in front of the Human sensor.
  • Ensure no equipment radiating infrared rays is in front of the monitor.
ControlSync does not work
  • Ensure ControlSync cable is connected correctly and not in a loop.
  • Master monitor must be connected to OUT connector only.
  • Use provided ControlSync cable.
Privacy Policy