Brand: Panasonic
Category: Camcorder
Document Type: Manual
Language: EN
Brand: Panasonic
Category: Camcorder
Document Type: Manual
Language: EN
Uploaded: Aug. 10, 2025, 12:42 a.m.
| Issue | Possible Cause/Solution | Page |
|---|---|---|
| Power supply | ||
| There's no power. | Make sure the battery and AC adaptor are connected properly. Check the connections. | Page 26 of Vol.1 |
| Power shuts off for no apparent reason. | To prevent the battery from running down needlessly, the camera-recorder automatically turns off when left in recording pause mode for more than 5 minutes. Check OTHER FUNCTIONS screen, POWER SAVE settings. | Page 111 |
| Power goes off as soon as it is turned on. | The battery may have run out. Recharge or replace the battery. | Page 25 of Vol.1 |
| Battery | ||
| The battery runs down quickly. | Ensure the battery is fully charged. Check ambient temperature; low temperatures reduce operating time. Battery may have reached end of service life. | Page 24 of Vol.1 |
| The battery cannot be charged. | Ensure the DC cable is not connected while charging. | Page 24 of Vol.1 |
| The remaining battery capacity is not displayed correctly. | Use the battery completely from a fully-charged state before charging again. Capacity display is a guideline. | Page 24 of Vol.1 |
| Shooting | ||
| Cannot start shooting. | Make sure the POWER switch is ON. | Page 30 of Vol.1 |
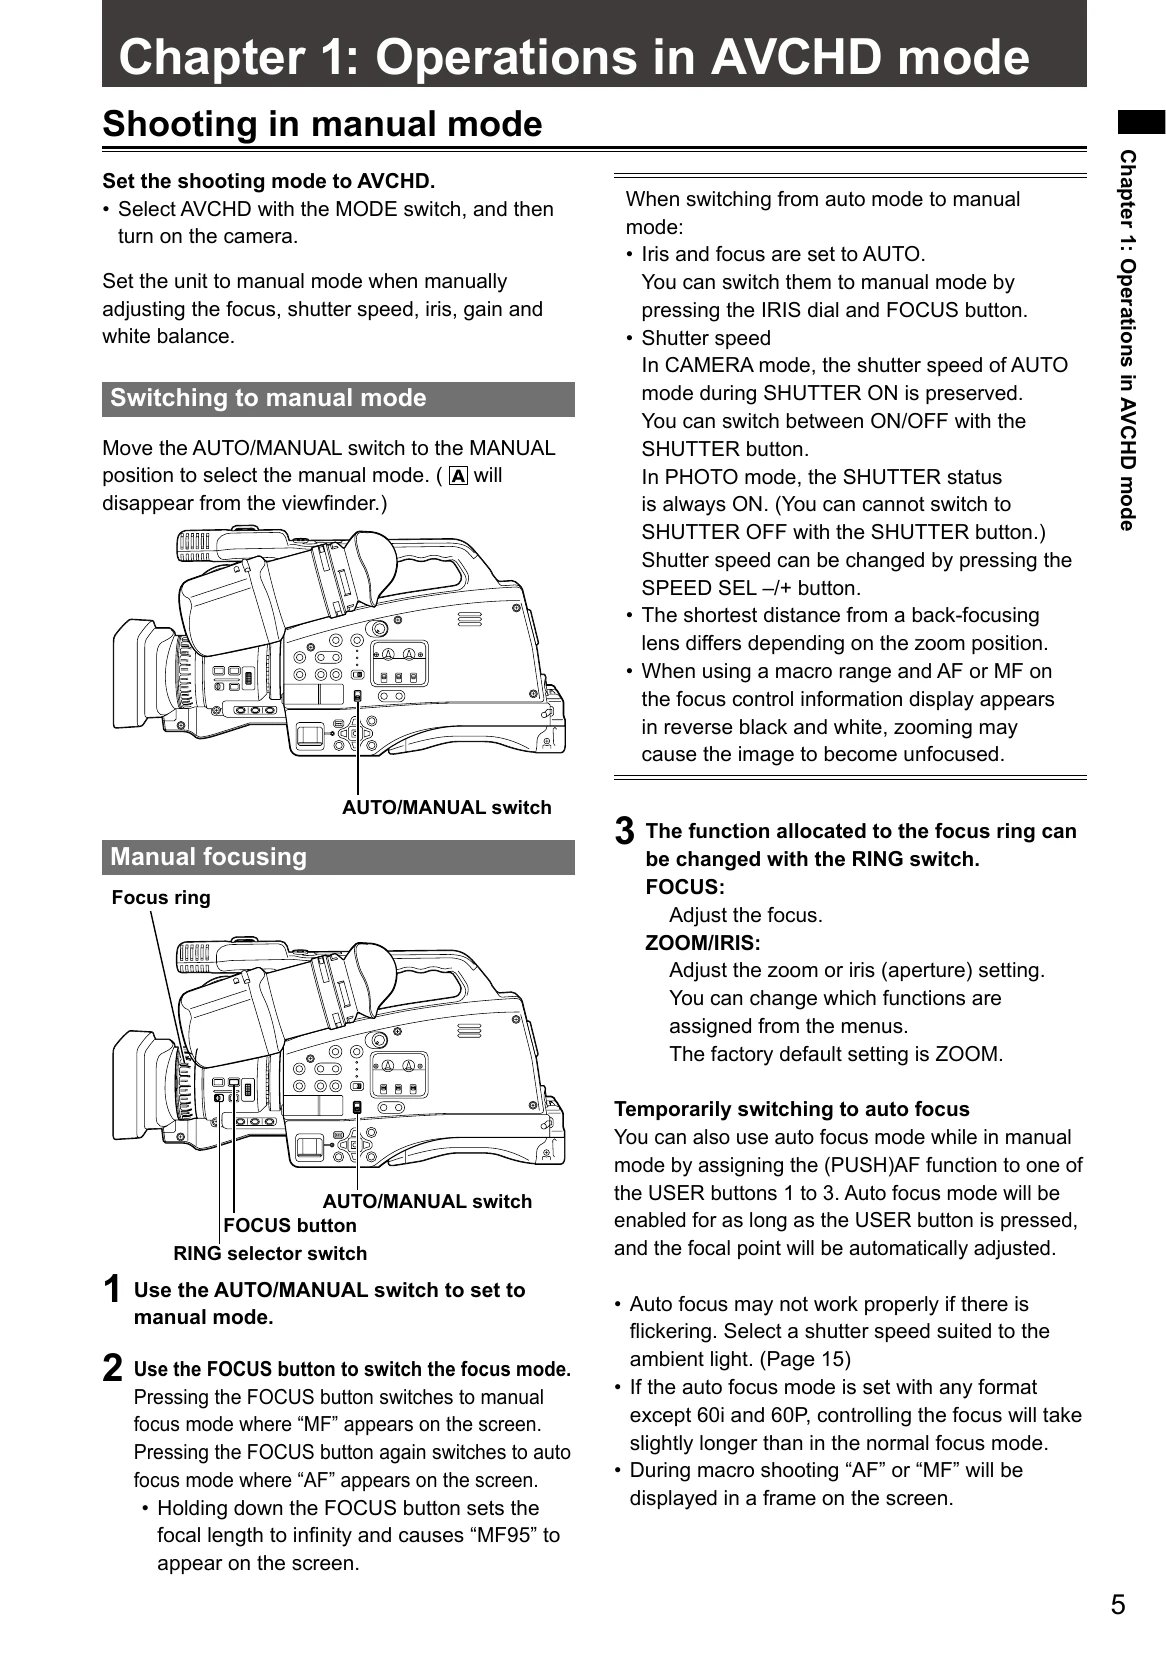
| Cannot focus automatically. | Ensure the camera is in auto focus mode. If shooting a scene difficult for AF, use manual focus mode. Focus may be difficult when shooting subjects at varying distances, through dirty windows, in dark places, with shiny objects, moving subjects, or scenes with minimal contrast. | Pages 5, 54 |
| Images do not focus when zooming. | When using macro range, zooming may cause unfocused images. | Page 94 |
| Recording | ||
| Cannot record even through the SD Memory Card is inserted correctly. | Check write-protect switch. Ensure sufficient memory is available. Format the card. Use compatible SD Memory Cards (8MB-16MB not supported for video). Ensure card class supports recording mode. | Pages 30, 78, 28, 76, Page 12 of Vol.1 |
| Recording stops by itself. | Ensure SD Memory Card is compatible with video recording. | Page 12 of Vol.1 |
| Editing | ||
| Cannot read the data on the SD Memory Card. | Make sure the SD Memory Card is formatted correctly. | Pages 28, 76 |
| Cannot perform nonlinear editing. | Check computer specifications and connecting cable. | Page 51 |
| Cannot dub onto an external device. | Make sure the external device is connected correctly. | Pages 51, 87 |
| Displays | ||
| Something is wrong with the time code display. | Time code may not register correctly in reverse slow mode. This is normal. | — |
| Playback | ||
| Cannot play even when I press the play button. | Ensure PB lamp is on. Switch to PB mode. Check if playback format matches recording format. | Pages 40, 84, 41, 81 |
| Mosaic-like noise appears when I cue or review a clip. | This noise is inherent to digital video technology. This is normal. | — |
| Images do not appear on the television even though I have connected the camera-recorder properly. | Set television input selector correctly. Check MODE switch (AVCHD vs DV). HDMI output not supported in DV mode. Check OUTPUT switch settings match connected terminals. Check cable connections and output priority (HDMI > COMPONENT > VIDEO). | Page 17 of Vol.1, Pages 52, 89 |
| PC connection | ||
| Computer does not recognize camera when USB connection cable is connected. | Ensure camera is in AVCHD mode. Try a different USB terminal. Restart camera and reconnect cable. Safely disconnect USB cable. | Page 51 |
| An error message appears on the computer when the USB connection cable is disconnected. | Follow on-screen instructions. | — |
| Other | ||
| The remote control does not work. | Check remote control battery. Check IR REMOTE setting in OTHER FUNCTIONS screen. | Page 29 of Vol.1 |
| There is a rattling sound when the camera-recorder is tilted back and forth. | This is the sound of the lens moving. Not a fault. | — |
| A clicking sound is heard when the power is turned on or when the PB mode is switched to the CAM mode. | This is an initialization operation at startup. Not indicative of trouble. | — |
| The SD Memory Card screen appears strange. | Data on the card could be corrupted by static electricity or electromagnetic waves. Save important data to a computer. | — |
| The SD Memory Card cannot be used even after formatting. | Fault with camera or SD Memory Card. Use only SD Memory Cards of 512MB-32GB. Consult place of purchase. | Pages 28, 76 |
| The camera does not recognize the SD Memory Card even though it is inserted correctly. | Ensure the SD Memory Card was formatted with this camera. Formatting erases all data. | Page 14 of Vol.1 |
| The SD Memory Card is not recognized when inserted into other devices. | Check device compatibility with the SD Memory Card. Consult device's operating instructions. |