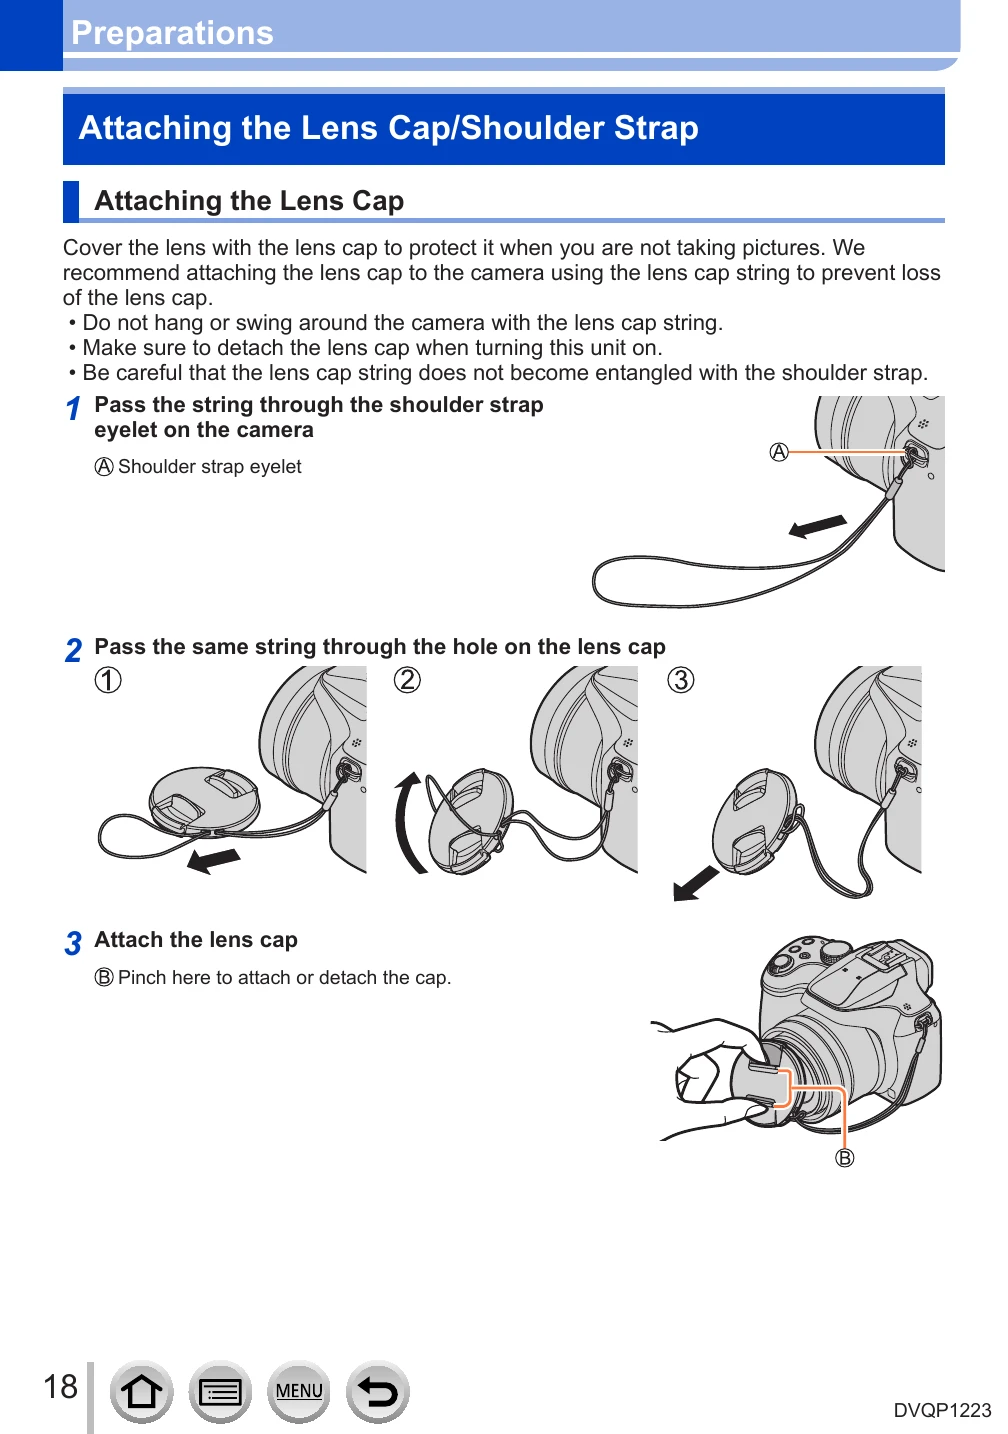
Manual for DC-FZ80

Manual for DC-FZ80

Brand: Panasonic

Category: Digital Camera

Document Type:

Language: EN

Uploaded: Aug. 9, 2025, 11:35 p.m.

Manual Publish Date: null

Warranty Information

null

\n

Recording Mode Icons

\n

In Recording modes that show icons in black, you can select and execute indicated menus and functions.

\n

C has different functions depending on the recording mode that is registered.

\n

About the symbols in the text

\n
    \n
  • MENU Indicates that the menu can be set by pressing [MENU/SET] button.
  • \n
  • Wi-Fi Indicates that the Wi-Fi setting can be made by pressing [Wi-Fi] button.
  • \n
  • Tips for skillful use and points for recording.
  • \n
  • (→00) Indicates the reference page. Click to go to the corresponding page.
  • \n
  • Click to view the description on the next page.
  • \n
\n

In this Owner's Manual, steps for setting a menu item are described as follows:

\n

Example: To change the [Quality] setting from [*] to [+] in the [Rec] menu

\n

MENU → [Rec] → [Quality] → [..]

\n

Dial and lever operations

\n
    \n
  • Rotate the rear dial
  • \n
  • Press the rear dial
  • \n
  • Rotate the zoom lever
  • \n
\n

Navigation Icons

\n
    \n
  • Click this icon to jump to “Finding the information you need”.
  • \n
  • Click this icon to jump to “Contents”.
  • \n
  • Click this icon to jump to “Menu list”.
  • \n
  • Click this icon to return to the previously displayed page.
  • \n
\n

Troubleshooting and error codes

Problem Solution
It cannot connect to the wireless LAN. Radio waves get disconnected. Wireless access point is not displayed.
  • Use within the communication range of the wireless LAN network.
  • Is any device, such as microwave oven, cordless phone, etc., that uses 2.4 GHz frequency operated nearby? → Radio waves may get interrupted when used simultaneously. Use them sufficiently away from the device.
  • When the battery indicator is flashing red, the connection with other equipment may not start or the connection may be disrupted. (A message such as [Communication error] is displayed.)
  • When this unit is placed on a metal table or shelf, the connection may not be established easily. Use the camera away from metal surfaces.
  • Check if the wireless access point to connect is in operating state.
  • Check the radio wave condition of the wireless access point. → Perform the connection closer to the wireless access point. → Move the location or change the angle of the wireless access point.
  • It may not display even if the radio waves exist depending on the setting of the wireless access point. → Turn off the wireless access point and then turn it back on.
  • Is the network SSID of the wireless access point set not to broadcast? → It may not be detected when it is set not to broadcast. Enter and set the network SSID. (→261) Alternatively, set the network SSID of the wireless access point to broadcast.
This unit is not displayed in the Wi-Fi setting screen of the smartphone. • Try switching the ON/OFF of the Wi-Fi function in the Wi-Fi settings of the smartphone.
I am having a problem connecting to my Windows 8 PC. The user name and password are not recognized. • Depending on the OS version, on Windows 8, for example, there are two types of user account (local account/Microsoft account). → Be sure to set the local account and use the user name and password for the local account.
The camera cannot be connected to Mac computer/Windows PC via Wi-Fi connection.
  • By default, the Wi-Fi connection uses the default workgroup name of “WORKGROUP". If the name of the workgroup has been changed, it will not be recognized. → Select [PC Connection] then [Change Workgroup Name] in the [Wi-Fi Setup] to change the workgroup name to match that of your PC. (→266)
  • Please confirm login name and password are correctly typed.
  • When the system time of Mac computer or Windows PC connected to a camera differs severely from that of the camera, the camera cannot be connected to the computer or PC in some OSs. → Please confirm clock set and world time of the camera matches with time, date and time zone in Windows PC or Mac computer. When both settings do not match severely, please match them.
Images cannot be transmitted to the WEB service. • Confirm that the login information (login ID/user name/email address/password) is correct.
It takes time to transmit an image to the WEB service. Transmission of the image fails midway. There is an image that could not be transmitted.
  • Is the size of the image too large? → Transmit after dividing the motion picture with [Video Divide] (→221). → Reduce the image size at [Size] (→245), and then send.
  • It may take longer time to transmit when distance to the wireless access point is far. → Transmit closer to the wireless access point.
  • File format of the picture that can be sent differs depending on the destination. (243)
I have forgotten the password for the Wi-Fi. → Execute the [Reset Wi-Fi Settings] in the [Setup] menu. (→208) However, the information you have set on the [Wi-Fi Setup] will be reset.
TV, computer, printer: No image appears on TV. Image blurred or not colored.
  • Not connected correctly (→269).
  • The television has not been switched to auxiliary input.
VIERA Link (HDMI) is not working.
  • Is the camera's [VIERA Link] setting set to [ON]? (→206) → Check the VIERA Link (HDMI) settings on the device you are connecting to. → Turn the camera off and on again.
Cannot communicate with the computer.
  • Set [USB Mode] to [PC] (→206, 275).
  • Turn the camera off and then on again.
Computer does not recognize card. (When using an SDXC Memory Card)
  • Check whether your computer is compatible with SDXC Memory Cards. http://panasonic.net/avc/sdcard/information/SDXC.html
  • A message prompting you to format the card may appear when you connect it. Do not format the card.
  • If the [Access] indicator on the screen does not go off, turn the camera off before disconnecting the USB connection cable.
Cannot print when connecting to printer.
  • Printer not compatible with PictBridge.
  • Set [USB Mode] to [PictBridge(PTP)] (→206, 278).
The edges of pictures are cut off when printing.
  • Release any trimming or edgeless printing settings on printer before printing.
  • The aspect ratio of pictures is different from that of paper used for printing. → If printing in shop, check if 16:9 sizes can be printed.
The lens makes a clicking noise.
  • When the camera is turned on or off, the lens is moved, or an aperture operation is performed, such a noise may be heard. This is not a malfunction.
  • When the brightness changes after a zooming operation or moving the camera, the lens may make a noise while adjusting the aperture. This is not a malfunction.
Zooming stops instantaneously. • When using the Extended optical zoom, the zooming action will stop temporarily. This is not a malfunction.
Red lamp illuminated when pressing shutter button halfway in dark locations. • [AF Assist Lamp] is set to [ON] (→193).
Camera is hot. • Camera may become a little warm during use, but this does not affect performance or quality.
Clock is incorrect.
  • If you do not use the camera for a long time, the clock may be reset. → Reset the clock (→31).
When using zoom, picture becomes slightly warped and the edges of the subject become colored. • Pictures may be slightly warped or colored around the edges, depending on the zoom ratio, but this is not a fault.
Privacy Policy