Manual for PWD 20 B2

Manual for PWD 20 B2

Brand: PARKSIDE

Category: Tools

Document Type: Manual

Language: EN

Uploaded: Nov. 21, 2025, 9:22 p.m.

Warranty Information

3-year warranty from the date of purchase for material or manufacturing defects.

Operation

Switching on and off

Preparation

  1. Fully unwind the suction hose (13) before commencing work.
  2. Prepare the appliance for the desired function.
  3. Insert the mains plug of the appliance into a wall socket.

Switching on

  1. Move the on/off switch (3) into position "I".

Switching off

  1. Move the on/off switch (3) into position "O".
  2. Pull the appliance's mains plug out of the wall socket if you are leaving the appliance unattended or if you have finished working.

Inserting the nozzles

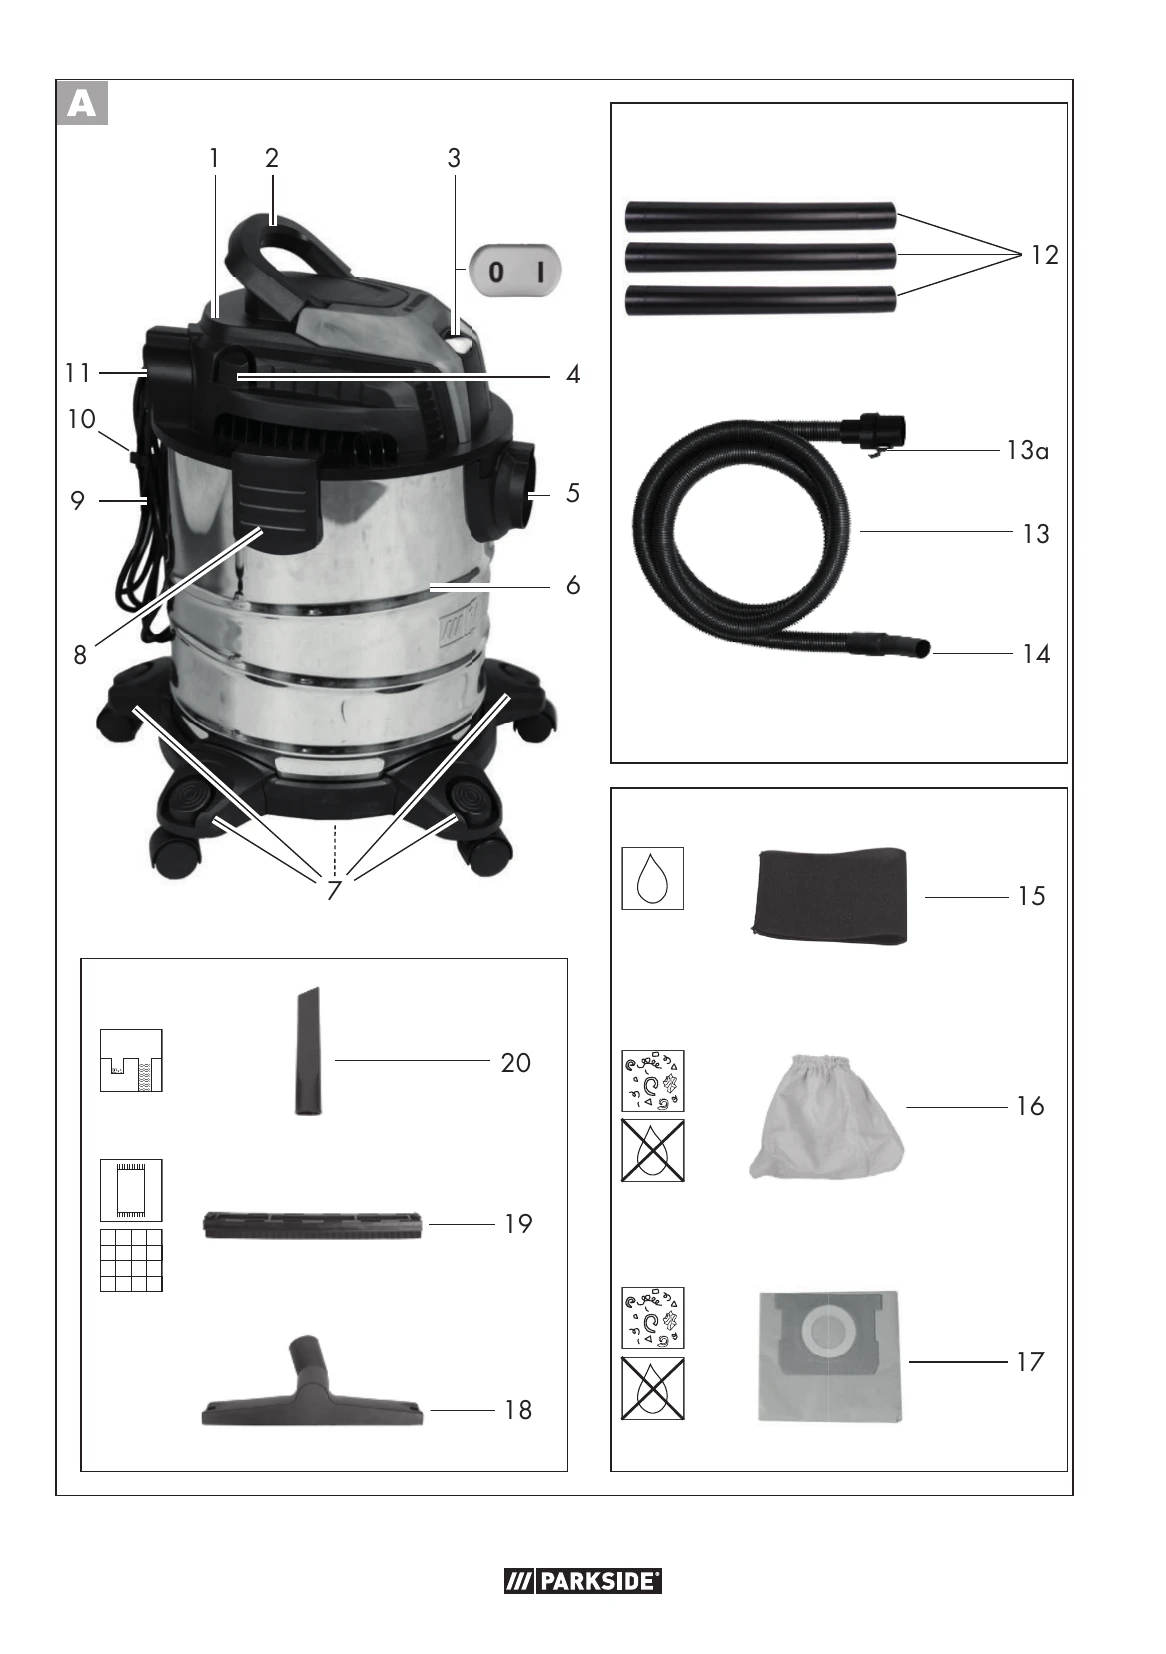
Floor nozzle (18) with insert attachment (19):

For wet and dry vacuuming of smooth surfaces and carpeted floors.

Floor nozzle (18) without insert attachment (19):

For wet and dry vacuuming of carpeted floors, for removing stubborn dirt.

Crevice nozzle (20):

For vacuuming joints, corners and radiators.

Wet suctioning

  1. Place the foam filter (15) onto the filter basket (21) on the motor head (1).
  2. To prevent the foam filter from tearing:
    • Only insert a dry filter;
    • Before inserting, twist the edge of the filter slightly and then roll it back.
  3. WARNING! Electric shock! Never reach into the water to be suctioned up.
  4. NOTE! Risk of damage! Turn off the appliance immediately if foam or liquid leaks out.
  5. Suctioning up (draining): place the suction hose (13) on the handgrip section (14) into the water tank and suction up the water.
  6. NOTE! If the dirt container is full, a float closes the suction opening and the suctioning process is stopped. Switch the appliance off and empty the dirt container.
  7. Empty the dirt container immediately after vacuuming as it is not designed to store liquids (see "Cleaning/Maintenance").

Dry suctioning

Suctioning using the textile filter bag

  1. Pull the textile filter bag (16) completely over the filter basket (21). See arrow and dotted line in Fig. D
  2. NOTE! We recommend also using the paper filter bag to ensure the textile filter bag does not become clogged too quickly.

Suctioning using the paper filter bag

  1. Ensure that the textile filter bag is inserted.
  2. Pull the paper filter bag (17) upwards and over the internal suction fitting (22) inside the direct container (A 6). The sealing ring (23) on the filter bag opening must fully surround the connector (24) on the suction fitting.

Vacuuming fine dust

Certain suction processes (e.g. sanding paints and varnishes, milling or drilling walls, grinding or drilling hard wood) can pose a risk due to hazardous dust.

We recommend using the following optional filter combination for fine dust. For filters not included in delivery, see "Spare parts/Accessories":

  • Folded filter instead of the textile filter bag (A 16) included in the scope of delivery.
  • Fine dust filter bag made of fleece instead of the paper filter bag (A 17) included in the scope of delivery.

Blowing function

Preparing the blowing function

  1. Remove all filters.
  2. Push the suction hose (13) into the blower connection (11) until it locks in place.

Restoring the suction function

  1. Press the catch (13a) and pull the suction hose (13) out.
  2. Push the suction hose (13) into the suction connection (A 5) until it locks in place.
  3. Insert a filter.

Troubleshooting and error codes

Problem Possible Cause Troubleshooting
Device does not start No mains voltage Check the socket, mains connection cable, line, plug, and fuse; if necessary, have it repaired by an electrician.
Defective on/off switch (3) Repair by Customer Service
Worn carbon brushes Repair by Customer Service
Defective motor Repair by Customer Service
Weak or no suction power Suction hose (13) or nozzles (18/20) blocked Remove blockages and obstructions.
Suction pipe (12) not assembled correctly Assemble the suction pipe correctly.
Dirt container (6) open Close the dirt container.
Dirt container (6) full Empty the container.
Filter (15/16/17) full or clogged Empty, clean, or replace the filter.
Float switches off the device Float in the filter basket (21) in incorrect position (e.g., due to jerky movements) Switch off the device to allow the ball to sink, then switch it on again.
Defective float in the filter basket (21) Repair by Customer Service
Float in the filter basket (21) does not move Free the float.
Defective float in the filter basket (21) Repair by Customer Service
Device blows out dust or dirt Filter (15/16/17) not fitted or not fitted correctly • Check the correct seating of the filter.
• Insert missing filter.
Privacy Policy