HOW TO READ THIS MANUAL
For first-time users
Please read this manual to familiarize yourself with your camera's operation.
To use the various camera features
The Instruction Manual that explains the features in detail can be obtained from our website (page 48).
To use additional features
Visit the Sanyo website to learn how to adjust the camera settings for various shooting scenes. There you'll also find information about the software for playing back data recorded with your camera and for burning (recording) DVDs.
You may find the answers to questions or problems concerning camera operation in the sections “COMMONLY ASKED QUESTIONS” (page 54).
Symbols used in this manual
HINT Points giving some extended instructions or special points to pay attention to.
CAUTION Points that require special attention.
(page xx) Refer to the page indicated for detailed information.
SHOOT, PLAY BACK AND SAVE
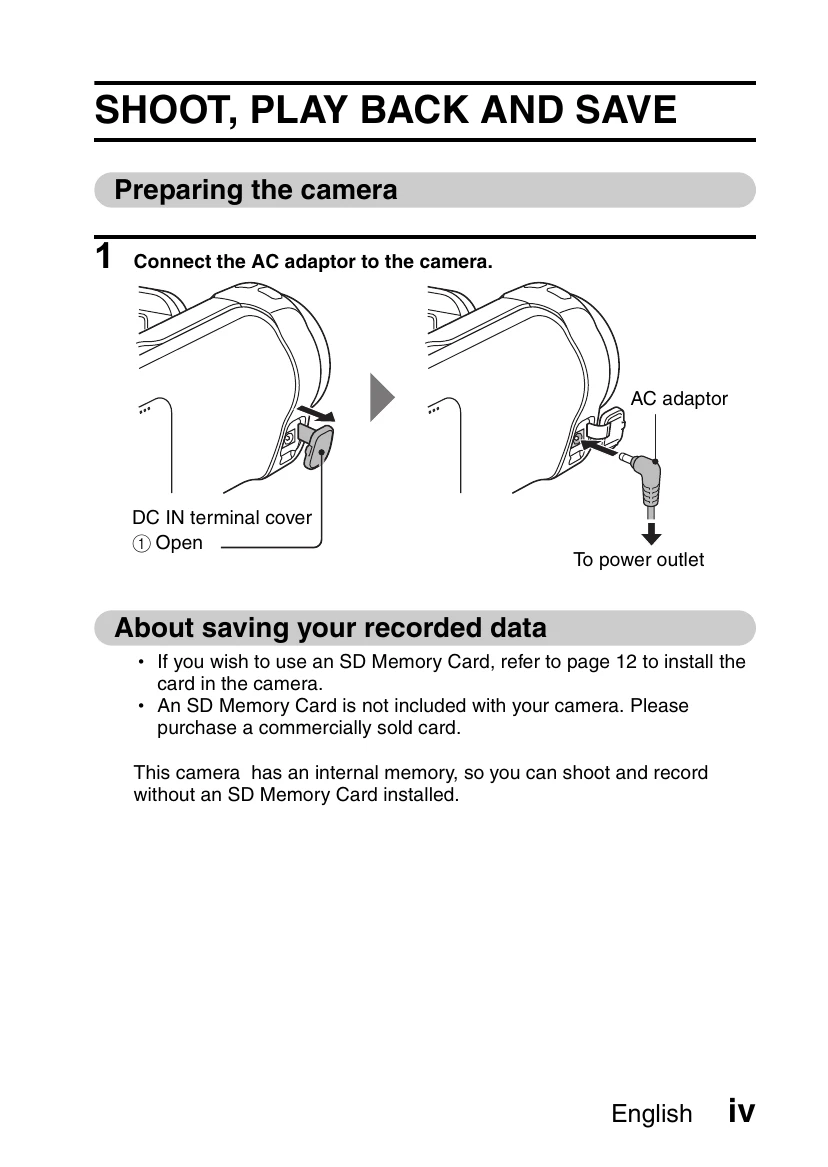
Preparing the camera
- Connect the AC adaptor to the camera.
About saving your recorded data
- If you wish to use an SD Memory Card, refer to page 12 to install the card in the camera.
- An SD Memory Card is not included with your camera. Please purchase a commercially sold card.
This camera has an internal memory, so you can shoot and record without an SD Memory Card installed.
Shooting
- Press the ON/OFF button for at least 1 second to turn the camera on.
- Record.
To record a video clip:
- Press the [] button to begin recording a video clip.
- Press the [] button again to end the recording.
To take a photo:
- Press the [] button.
- A still image is captured.
Playback
- Press the REC/PLAY button.
- The display changes to the Playback Screen.
- Select the image to play back.
- Toggle the SET button left, right, up or down to move the orange frame to the image you wish to play back.
- The image information for the framed image is shown in the bottom part of the monitor.
- Press the SET button.
- Press the REC/PLAY button.
Deleting files
- On the screen in step 2, move the orange frame to the file you wish to delete, and press the MENU button.
- Select "DELETE”, and press the SET button.
- Select "DELETE SINGLE”, and press the SET button.
- Select "DELETE", and press the SET button.
- If you toggle the SET button to the left or right, the screen to delete a different file will appear.
- When you are finished deleting files, press the MENU button.
- Pressing the MENU button 3 times will return you to the screen in step 2.
When you are finished using the camera...
Press the ON/OFF button for at least 1 second to turn the camera off.
To continue to the next operation...
Please confirm that your computer is connected to the Internet.
Burn your recorded video clips onto a DVD
Using the supplied CD-ROM (Xacti Software CD), you can store your captured images on a DVD.
Install application program
- Set the supplied CD-ROM in your computer's DVD drive.
- The installation window opens.
- Click on [TotalMedia Extreme for SANYO].
- After clicking on the application program, follow the instructions shown on the monitor to install the program.
- When the window appears requesting to restart your computer, click the [Finish] button to reboot.
- Remove the CD-ROM from the computer's DVD drive.
- When the installation window closes, a dialog box to connect to the website introducing Kodak's online service appears. Check the [No thanks!] option button, and then click on the [OK] button.
Connect your camera to a computer
Connect your camera to a computer, and copy the desired files to the computer.
- Use the supplied dedicated USB interface cable to connect your camera to the computer.
- Turn on the camera.
- The USB Connection Screen appears on the camera's monitor.