Brand: SilverCrest
Category: Home Appliances
Document Type: Manual
Language: EN
Brand: SilverCrest
Category: Home Appliances
Document Type: Manual
Language: EN
Uploaded: Nov. 21, 2025, 7:54 p.m.
This appliance comes with a 3-year warranty from the date of purchase.
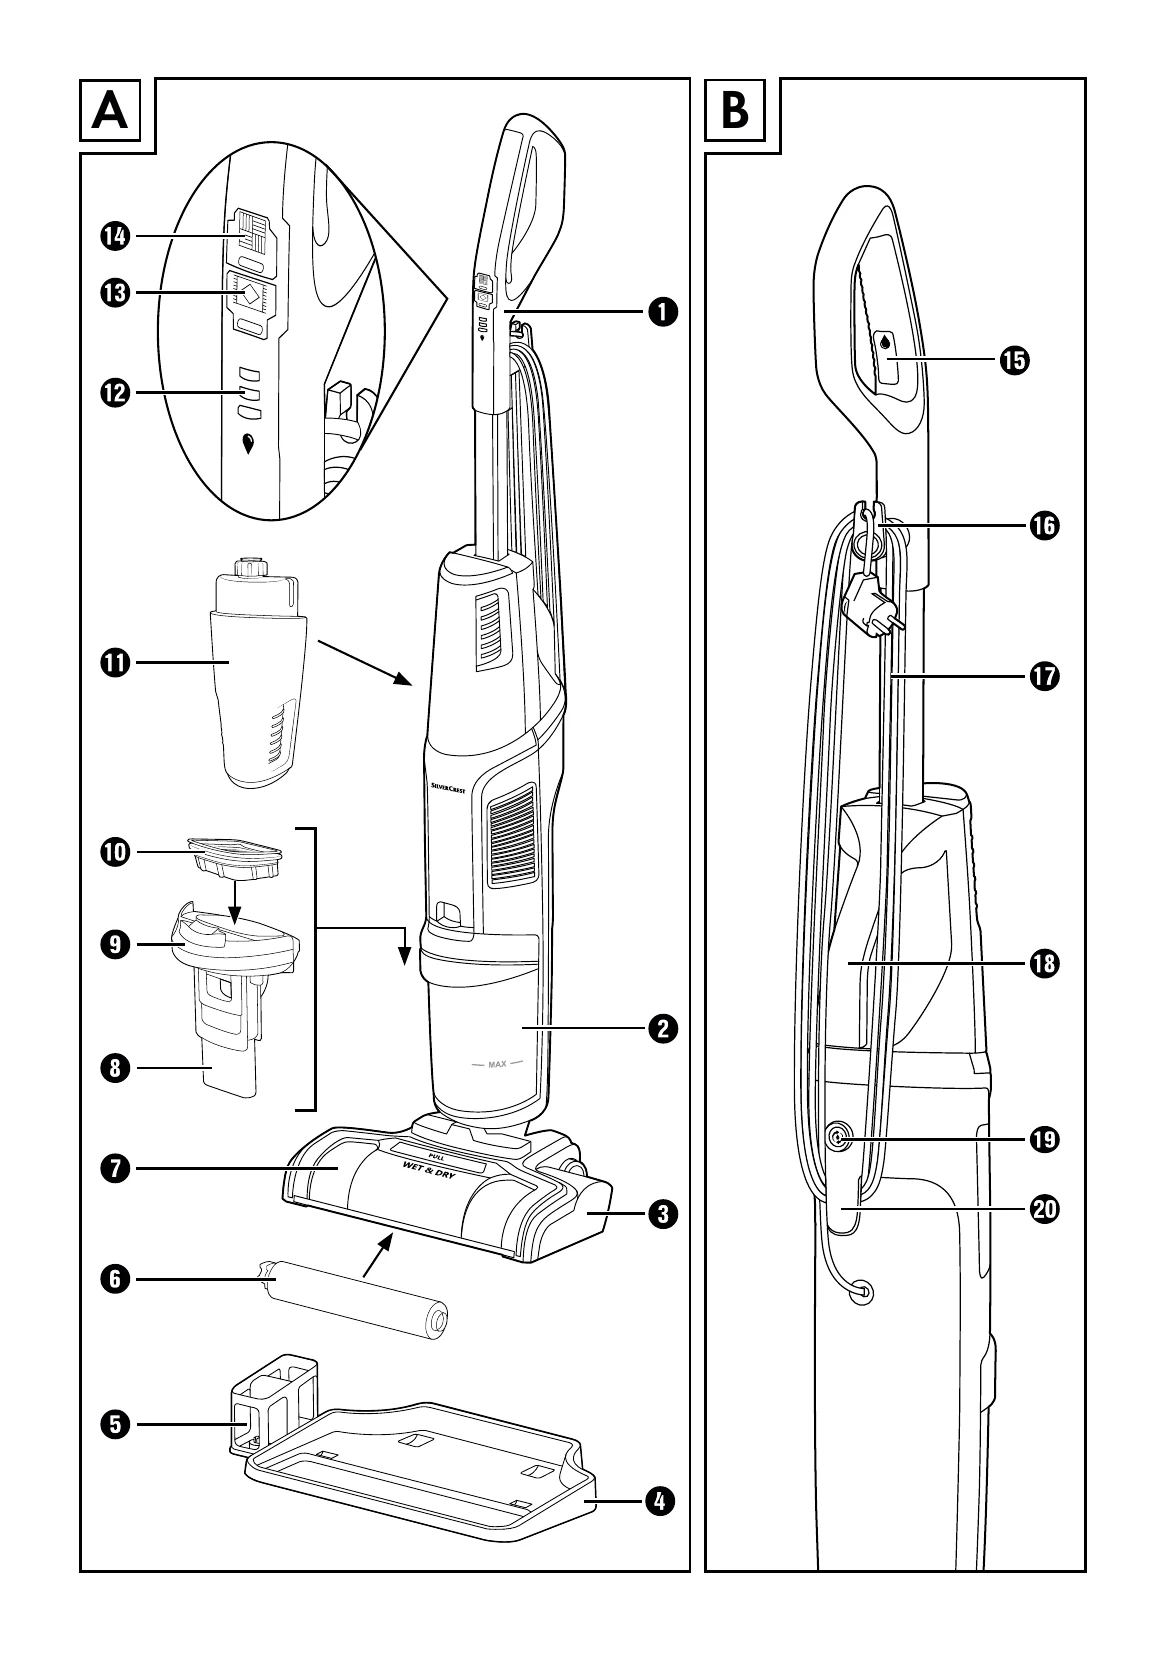
Assembling the Appliance: Slide the hand element into the opening on top of the appliance until it clicks into place. Wind the power cable around the upper and lower cable retainers. Assemble the parking and cleaning station by sliding the rotary brush holder into the storage tray until it engages.
Filling the Fresh Water Tank: Grasp the fresh water tank, pull it upwards, flip it over, and unscrew the lid. Fill with cold to warm tap water or distilled water up to the appropriate fill level marking depending on area size and whether using water or cleaning solution. Close the lid and slide the tank back into the appliance until it clicks.
Cleaning Hard Floors: Unwind the power cable. Plug into the mains power socket. Press the hard floor switch to turn on the appliance (LED lights up blue). Before each use, press and hold the cleaning solution switch for about 10 seconds to prime the rotary brush. Hold down the cleaning solution switch during cleaning movements. Press the hard floor switch again to turn off.
Cleaning Carpets: Follow similar steps to hard floor cleaning, but use the carpet switch. Test on an inconspicuous area first and check carpet manufacturer's label. When cleaning carpets, the cleaning solution switch applies twice the amount of solution compared to hard floor cleaning.
Cleaning and Maintenance: Empty the waste water tank after every use. Perform self-cleaning. Clean the appliance with a moist cloth. To empty the waste water tank, press the knob downwards, pull the tank forward, and lift the lid. Rinse the tank and clean the dirt filter, float, and lid. Allow parts to dry completely before reassembly.
Self-cleaning Function: Place the switched-off appliance on the storage tray. Press the self-cleaning switch. The appliance will automatically clean the rotary brush, brush chamber, and suction channel.
Manual Cleaning: For heavier soiling, unplug the appliance. Remove the splash guard and rotary brush. Clean them in hot running water. Wipe the brush chamber with a damp cloth. Allow parts to dry completely before reassembling.
Storage: Empty the fresh water tank if not using for a prolonged period. Store the appliance clean. Wind the power cable. Carry by the handle. Store on the parking and cleaning station in a dry, dust-free place away from direct sunlight.
| Error | Cause | Troubleshooting |
|---|---|---|
| The device cannot be switched on. | The device is not switched on. | Ensure the device is properly connected to the power supply. Press the Hard Floor switch (14) or the Carpet switch (13) to switch on the device. |
| The mains plug is not plugged in. | Plug the mains plug into the mains socket. | |
| The mains socket is not supplying power. | Check the household fuses. | |
| The device is defective. | Switch off the device and unplug the mains plug from the socket. Contact customer service (see Service section). | |
| The suction power is too weak. | The waste water tank (2) is full. | Empty the waste water tank (2) (see section Cleaning the waste water tank). |
| The tanks for fresh and waste water (1/2) are not attached correctly to the device. | Attach the tanks for fresh and waste water (1/2) correctly to the device (see sections Filling the fresh water tank and Cleaning the waste water tank). | |
| The waste water tank (2) is full. | Empty the waste water tank (2) (see section Cleaning the waste water tank). | |
| The splash guard (7) is not attached correctly. | Attach the splash guard (7) correctly to the foot section (3) (see section Manual cleaning). | |
| The suction channel is blocked. | Clean the suction channel and remove the blockage (see sections Self-cleaning function and Manual cleaning). | |
| The dirt filter (10) is blocked. | Remove and clean the dirt filter (10) (see section Cleaning the waste water tank). | |
| The device dispenses too little cleaning solution. | The fresh water tank (11) is empty. | Fill the fresh water tank (11) (see section Filling the fresh water tank). |
| The fresh water tank (11) is not closed properly. | Remove the fresh water tank (11) from the device and tighten the lid firmly (see section Filling the fresh water tank). | |
| The device is not yet fully ready for operation. | Before use, press and hold the cleaning solution switch (15) for 10 seconds to prepare the rotary brush (6) with cleaning solution. | |
| The cleaning solution switch (15) is not pressed continuously. | Press and hold the cleaning solution switch (15) to continuously dispense cleaning solution onto the rotary brush (6). | |
| The rotary brush (6) does not rotate. | The splash guard (7) is not attached correctly. | Attach the splash guard (7) correctly (see section Manual cleaning). |
| The rotary brush (6) is not mounted correctly. | Turn off the device and unplug the mains plug from the socket. Mount the rotary brush (6) correctly to the foot section (3) (see section Manual cleaning). | |
| The rotary brush (6) is blocked. | Unplug the mains plug from the socket. Remove the splash guard (7) and the rotary brush (6) to clear the blockage. Remount the rotary brush (6) and the splash guard (7) to the device (see section Manual cleaning). Plug in the mains plug and switch on the device. | |
| Water is leaking from the device. | The fresh water tank (11) is not closed properly. | Remove the fresh water tank (11) from the device and tighten the lid firmly (see section Filling the fresh water tank). |