Brand: SONY
Category: TV
Document Type: Parts/Service
Language: EN
Brand: SONY
Category: TV
Document Type: Parts/Service
Language: EN
Uploaded: Nov. 21, 2025, 7:39 p.m.
Manual Publish Date: 2007-01-01
No specific warranty period is detailed in the provided pages.
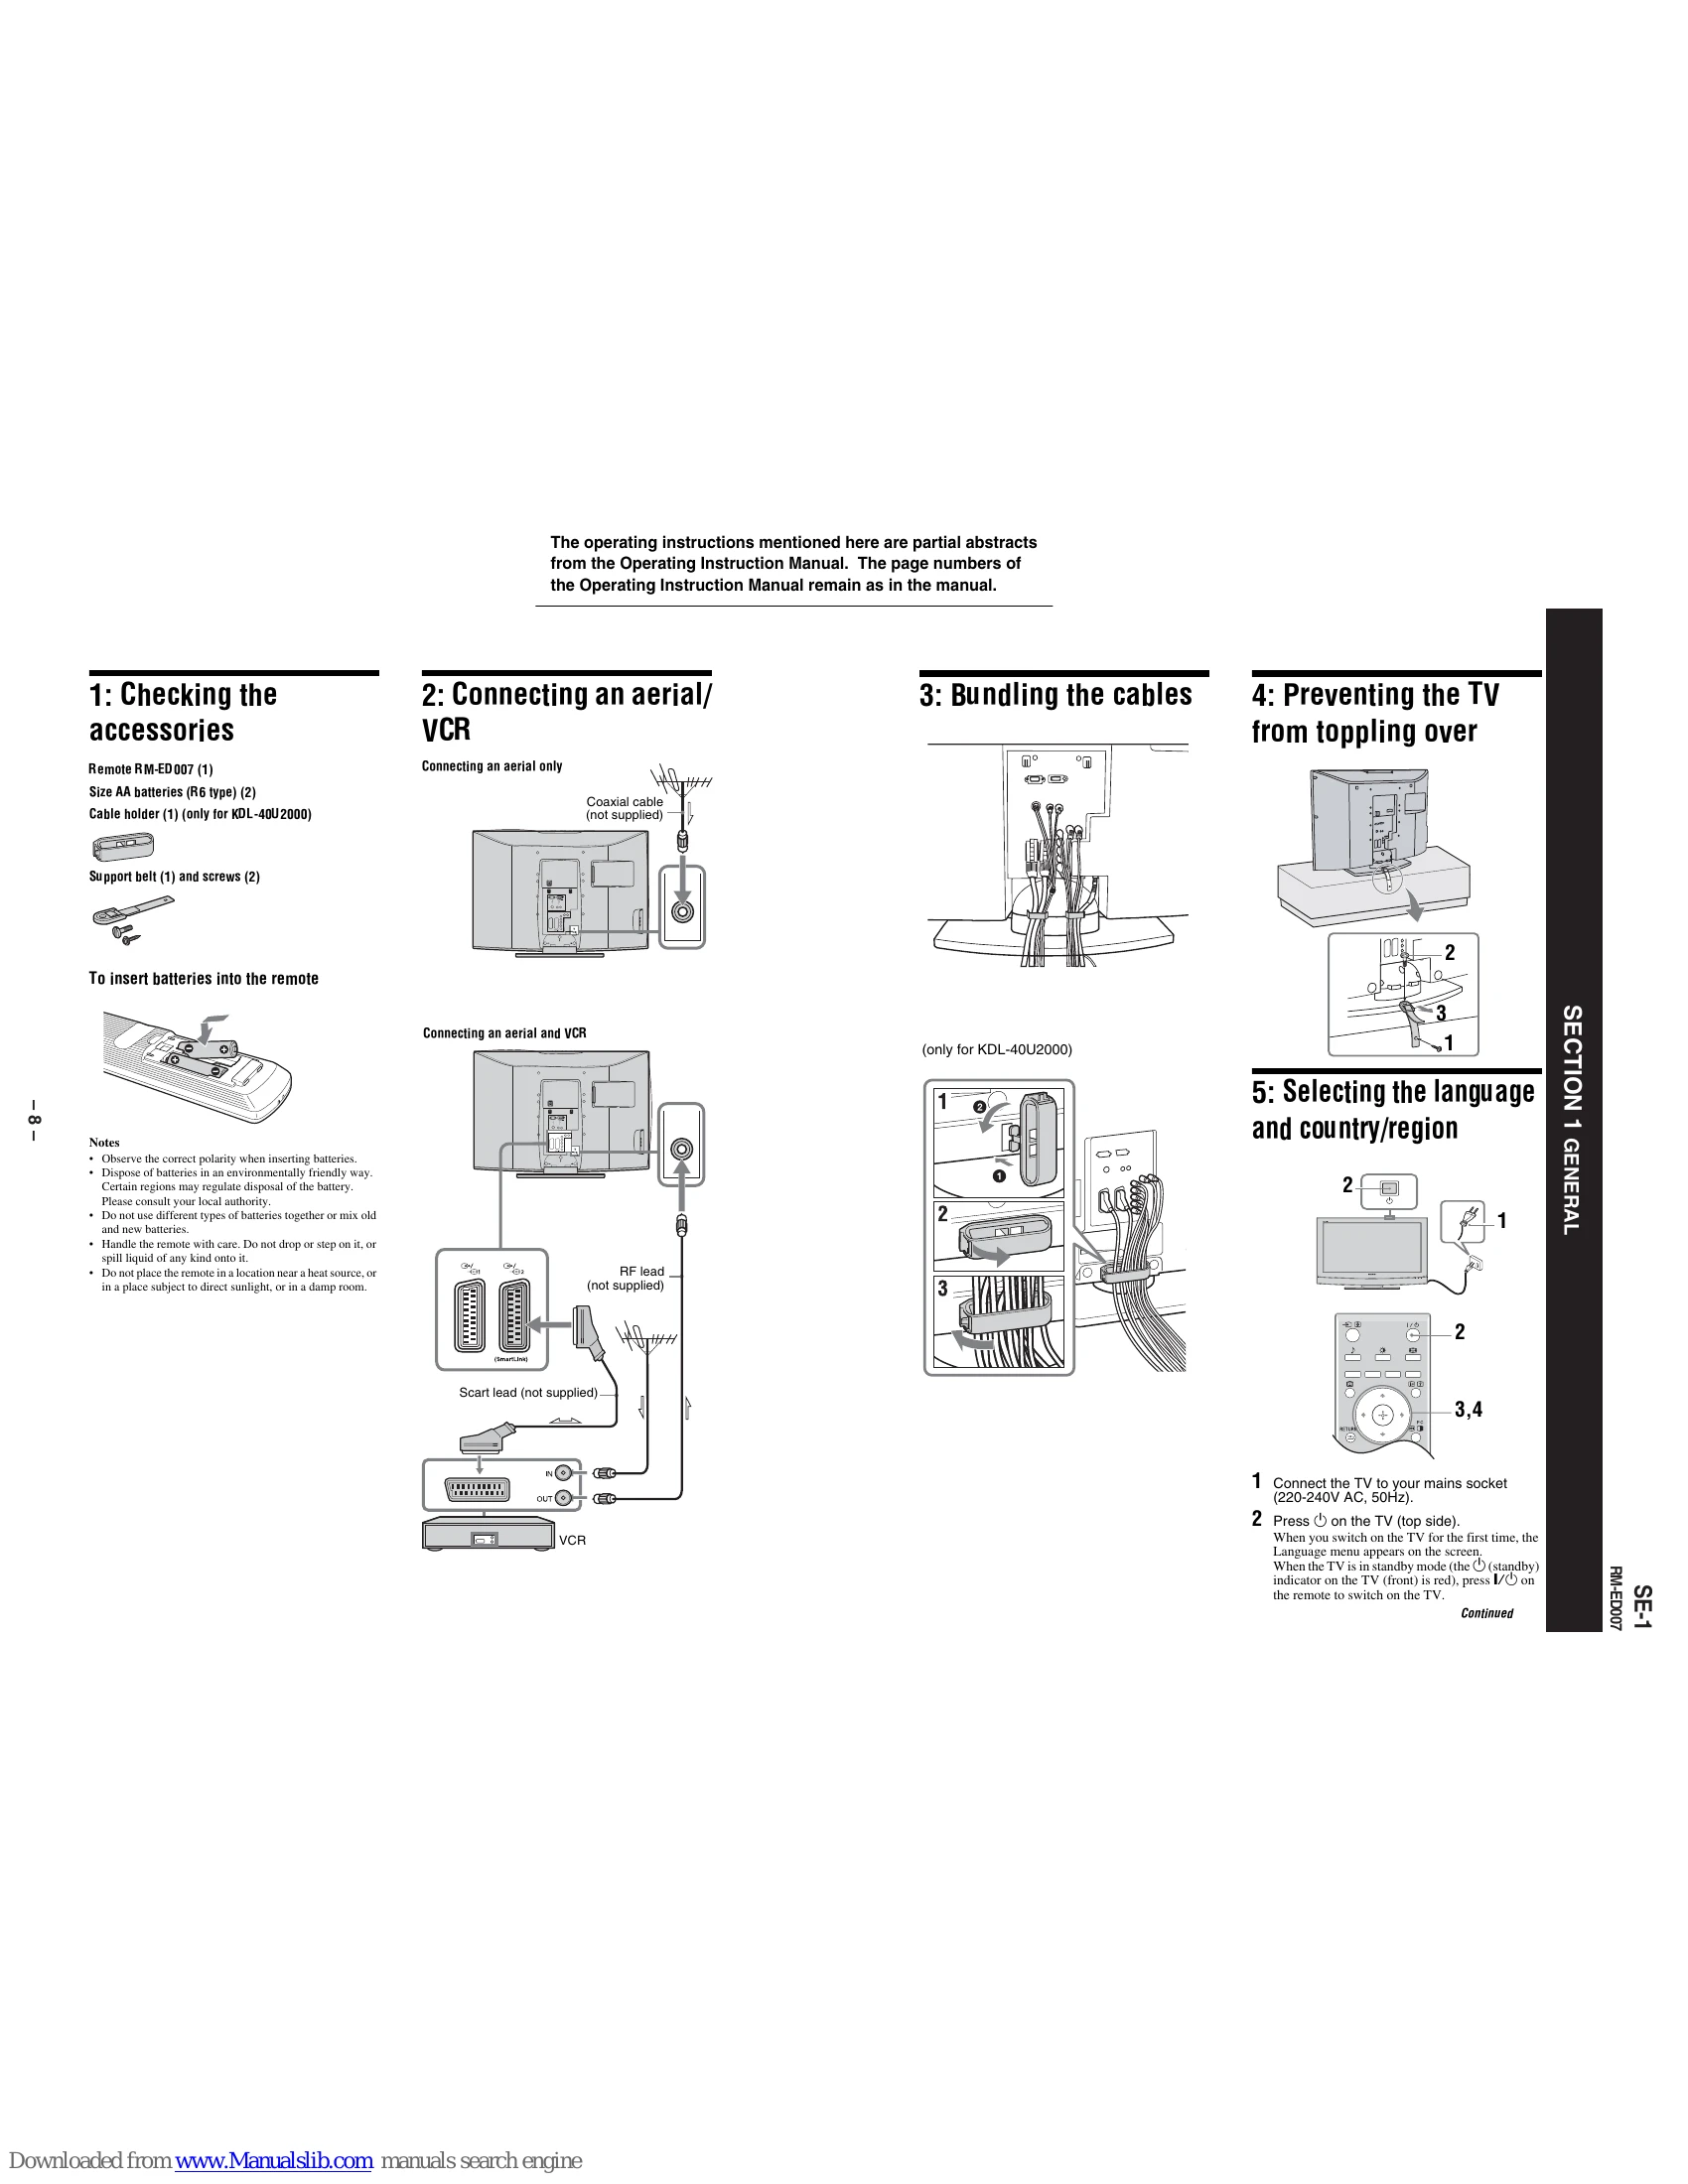
Verify the contents of the package, including the remote control, batteries, cable holder (for KDL-40U2000), support belt, and screws. Instructions are provided for inserting batteries into the remote.
Illustrates how to connect an aerial only, or an aerial and a VCR using coaxial and Scart leads. Notes on connecting with or without a VCR are provided.
Shows how to neatly bundle the cables connected to the TV.
Instructions for securing the TV to prevent it from toppling over, with a diagram showing the attachment points.
Steps for connecting the TV to the mains and selecting the initial language and country/region settings via the on-screen menu.
Details the process of auto-tuning for digital and analogue channels after initial setup. Includes information on checking aerial connections and programme sorting.
Instructions on how to switch the TV on, select between digital and analogue modes, change channels using number buttons or PROG +/-, and adjust volume. Includes information on the digital channel information banner and additional operations like Mute and Standby.
Explains how to display and navigate the EPG to view programme information and set timer recordings. Notes on SmartLink compatibility and age restrictions are included.
Guide on connecting and viewing content from external equipment such as VCRs, DVD players, and PCs. Details on using Scart sockets, HDMI, component inputs, and PC input are provided.
Instructions on how to access and use the TV's menu system to select channels, external inputs, and adjust settings. Explains the different menu options such as Digital Favourites, TV List, Analogue, Digital, Digital EPG, External Inputs, and Settings.
Details on adjusting picture settings like Picture Mode, Backlight, Contrast, Brightness, Colour, Hue, Sharpness, Colour Tone, Reset, and Noise Reduction.
Details on adjusting sound settings like Sound Effect, Treble, Bass, Balance, Reset, Dual Sound, and Auto Volume.
Details on adjusting features like Screen format, Power Saving, AV2 Output, and RGB Center.
Explains the various options within the Set-up menu, including Auto Start-Up, Language, Country, Auto Tuning, Programme Sorting, AV Preset, Sound Offset, Manual Programme Preset, and Digital Set-up.
Details on Digital Auto Tuning and Programme List Edit for managing digital channels, as well as Digital Manual Tuning.
Comprehensive guide on connecting various external devices to the TV, including CAM modules, camcorders, headphones, PCs, digital satellite receivers, DVD players, game equipment, and Hi-Fi audio equipment, using both side and rear connections.
Provides detailed technical specifications for the TV, including power requirements, screen size, display resolution, power consumption, dimensions, mass, panel system, TV system, colour/video system, aerial, channel coverage, terminals, supported formats, sound output, supplied accessories, PC input signal reference chart, and optional accessories.
A guide to identifying and resolving common problems, categorized by Picture, Sound, Channels, and General issues, with potential causes and remedies.
| Problem | Cause/Remedy |
|---|---|
| When it is flashing | |
| The self-diagnosis function is activated. | 1. Measure how long the (standby) indicator flashes and stops flashing. 2. Press on the TV (top side) to switch it off, disconnect the mains lead, and inform your dealer or Sony service centre of how the indicator flashes (duration and interval). |
| When it is not flashing | |
| 1. Check the items in the tables below. 2. If the problem still persists, have your TV serviced by qualified service personnel. |
|
| Picture | |
| No picture (screen is dark) and no sound | Check the aerial connection. Connect the TV to the mains, and press on the TV (top side). If the (standby) indicator lights up in red, press I/. Check that the optional equipment is on and press repeatedly until the correct input symbol is displayed on the screen. Check the connection between the optional equipment and the TV. |
| No picture or no menu information from equipment connected to the scarts or HDMI IN socket | Check aerial/cable connections. Check the aerial location and direction. Check if the aerial is broken or bent. Check if the aerial has reached the end of its serviceable life (three to five years in normal use, one to two years at the seaside). |
| Double images or ghosting | Check aerial/cable connections. Check the aerial location and direction. Check if the aerial is broken or bent. Check if the aerial has reached the end of its serviceable life (three to five years in normal use, one to two years at the seaside). |
| Only snow and noise appear on the screen | Check the aerial connection. Connect the TV to the mains, and press on the TV (top side). If the (standby) indicator lights up in red, press I/. Check that the optional equipment is on and press repeatedly until the correct input symbol is displayed on the screen. Check the connection between the optional equipment and the TV. |
| Distorted picture (dotted lines or stripes) | When connecting any equipment to the HDMI IN 6 socket or when changing the resolution, some dots can appear blinking on the screen for a few seconds. HDMI signal decoding is in progress and it does not indicate a malfunction. |
| Picture noise when viewing a TV channel | Make sure that the aerial is connected using the supplied coaxial cable. Keep the aerial cable away from other connecting cables. Select "Manual Programme Preset" in the "Set-Up" menu and adjust "AFT" (Automatic Fine Tuning) to obtain better picture reception (page 26). |
| Some tiny black points and/or bright points on the screen | The picture of a display unit is composed of pixels. Tiny black points and/or bright points (pixels) on the screen do not indicate a malfunction. |
| No colour on programmes | Select "Reset" in the "Picture Adjustment" menu to return to the factory settings (page 20). |
| No colour or irregular colour when viewing a signal from the Y, PB/CB, PR/CR jacks of 3 | Check the connection of the Y, PB/CB, PR/CR jacks of 3. Make sure that the Y, PB/CB, PR/CR jacks of 3 are firmly seated in their respective sockets. |
| Sound | |
| No sound, but good picture | Press +/- or (Mute). Check that "TV Speakers" is set to "On" in the "Sound Adjustment" menu (page 22). See the "Picture noise" causes/remedies on page 34. |
| Noisy sound | |
| Channels | |
| The desired channel cannot be selected | Switch between digital and analogue mode and select the desired digital/analogue channel. |
| Some channels are blank | Scrambled/Subscription only channel. Subscribe to the Pay Per View service. |
| Digital channel is not displayed | Check that the aerial is plugged directly into the TV (not through other equipment). Contact a local installer to find out if digital transmissions are provided in your area. Upgrade to a higher gain aerial. |
| General | |
| The TV turns off automatically (the TV enters standby mode) | Check if the "Sleep Timer" is activated, or confirm the setting of "Off Time" (page 24). If no signal is received and no operation is performed in the TV mode for 10 minutes, the TV automatically switches to standby mode. |
| The TV turns on automatically | Check if the "On Time" is activated (page 24). |
| Some input sources cannot be selected | Select "AV Preset" in the "Set-up" menu and cancel "Skip" of the input source (page 25). |
| The remote does not function | Replace the batteries. |