Brand:
Whirlpool
Category: Dishwasher
Document Type: Parts/Service
Language: EN
Brand:
Whirlpool
Category: Dishwasher
Document Type: Parts/Service
Language: EN
Uploaded: Nov. 21, 2025, 6:43 p.m.
null
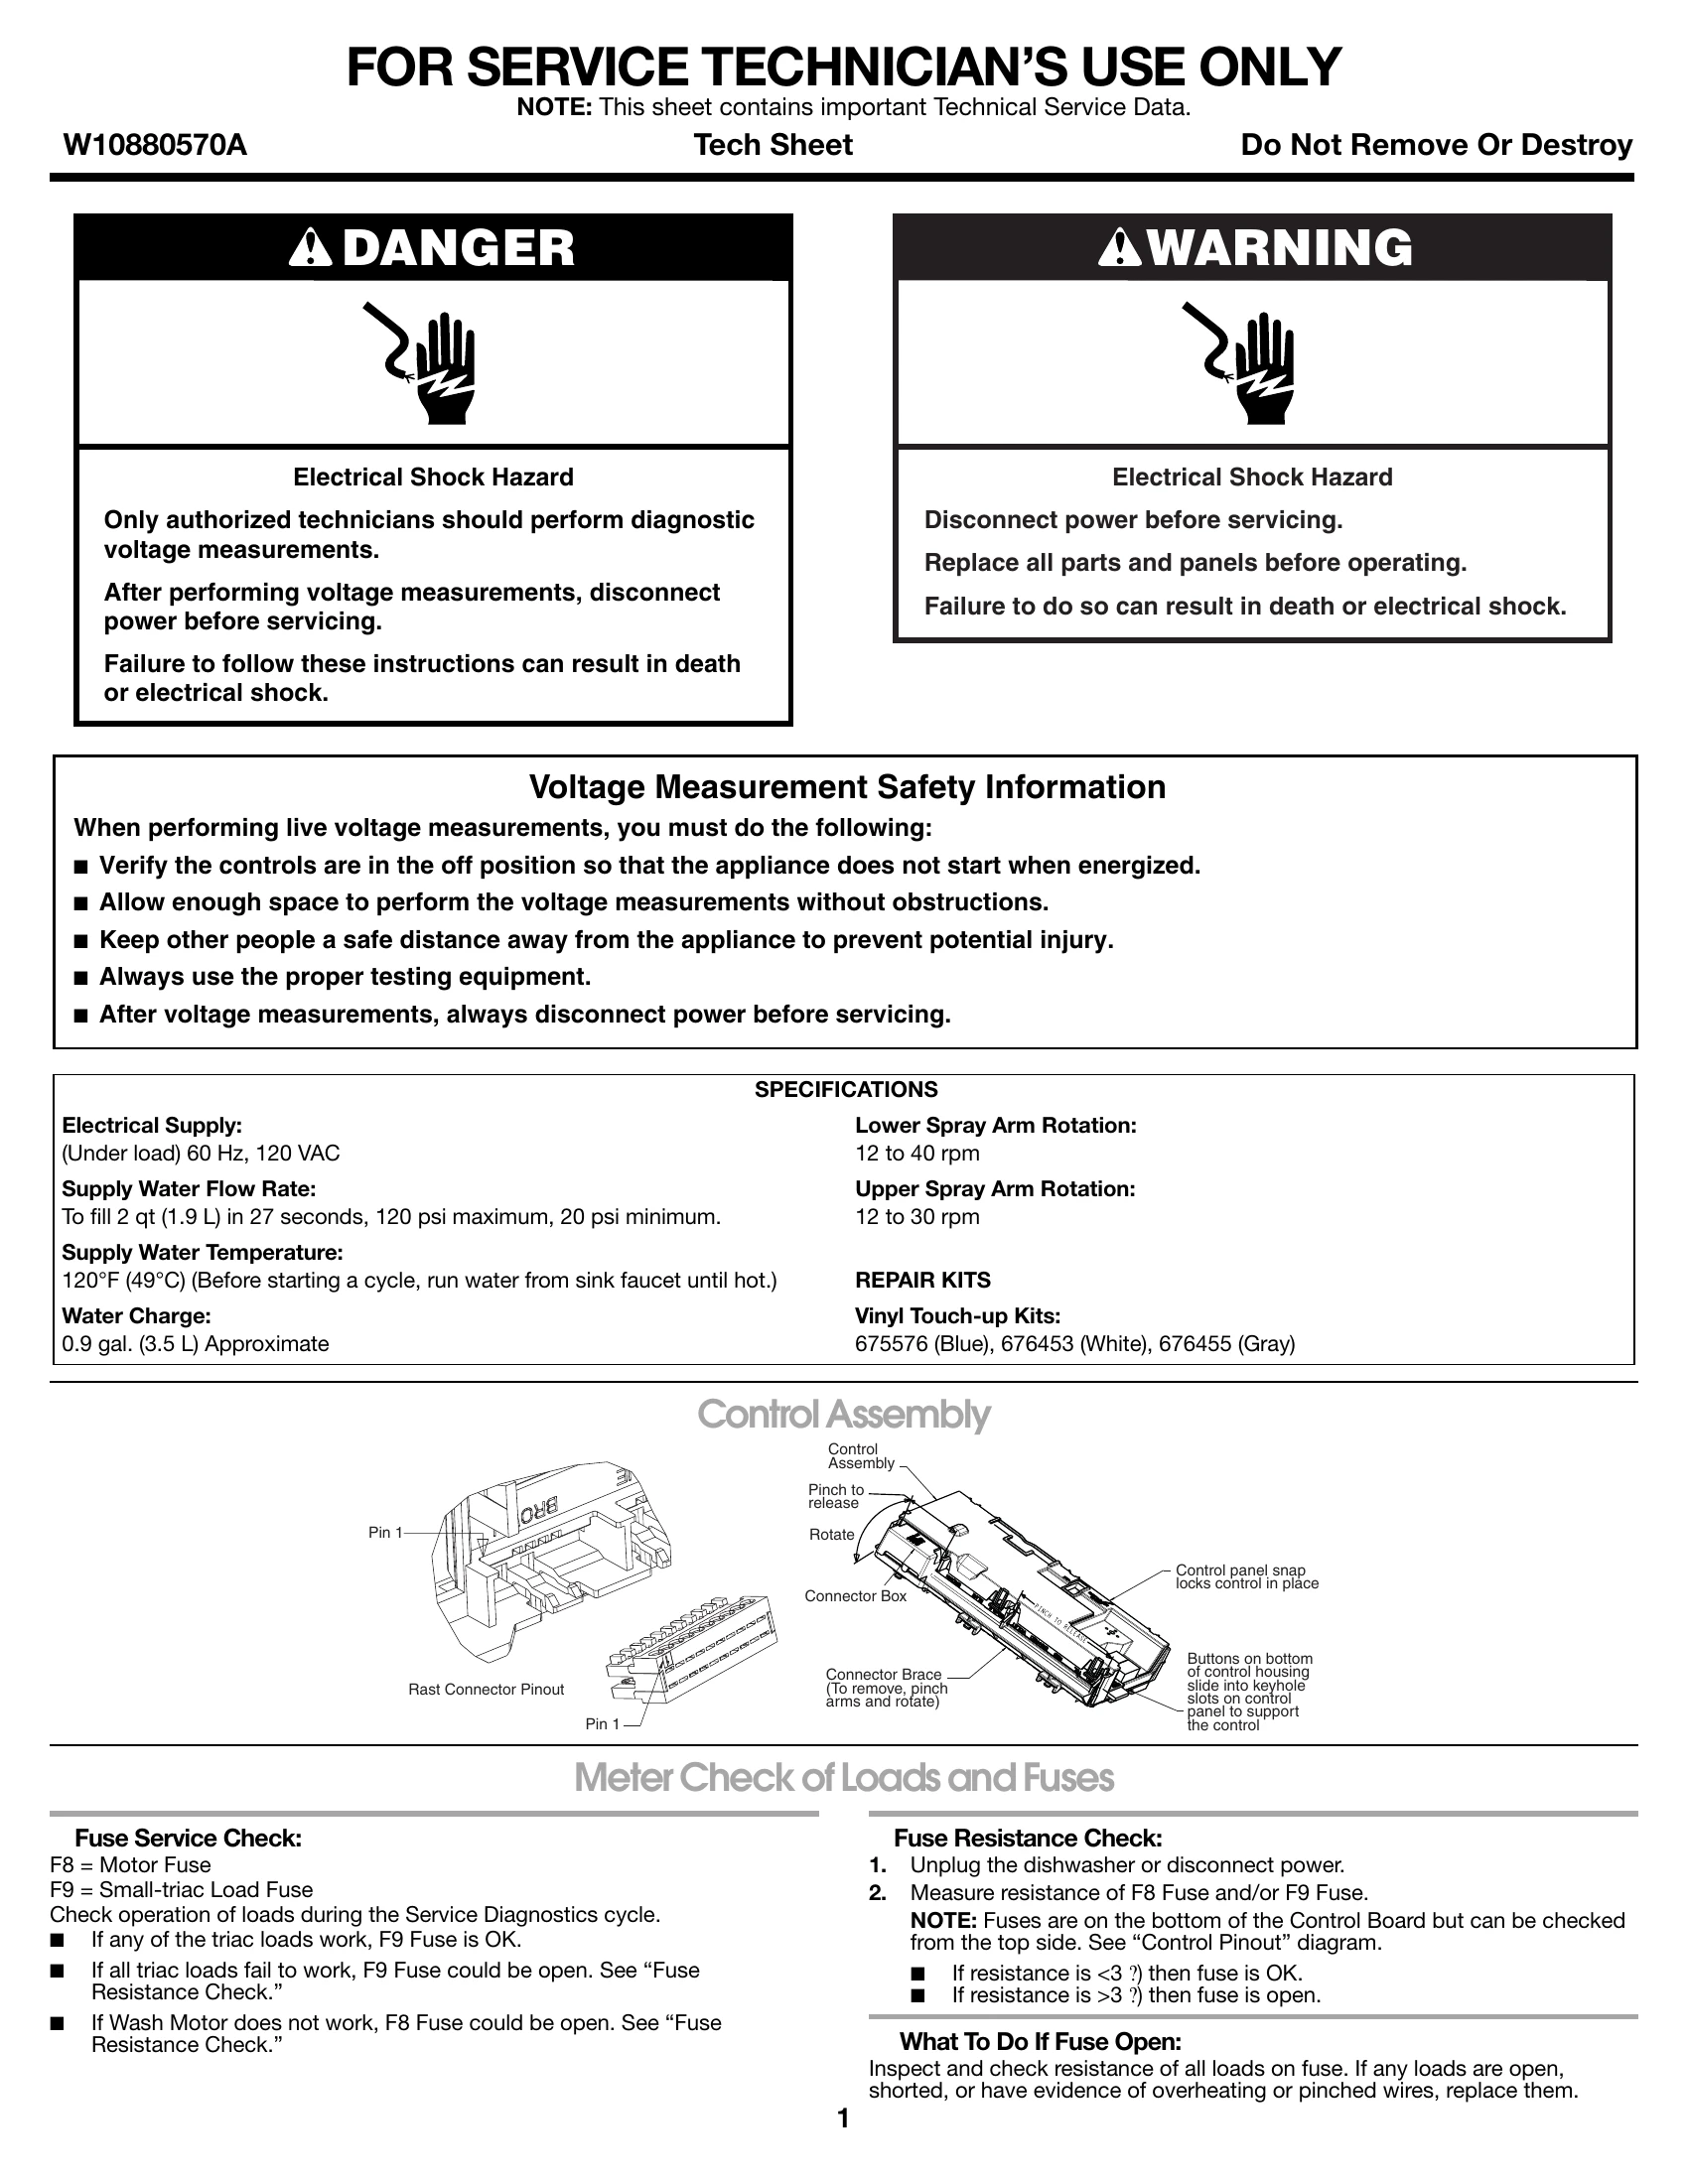
F8 = Motor Fuse, F9 = Small-triac Load Fuse.
\nCheck fuse resistance: < 3Ω is OK, > 3Ω is open.
\nIf a fuse is open, inspect all related loads for shorts or overheating.
\nTo invoke: Press 3 keys in the sequence 1-2-3-1-2-3-1-2-3. Door must be closed.
\nThe cycle tests loads and sensors. Press Start/Resume to advance intervals.
\nClears error history and restores defaults.
\nTests include:
\nEntry sequence for error codes: 1-2-3-1-2-3-1-2-3.
\nUse the "Service Error Codes" table to diagnose issues based on Function Code and Problem Code.
\n| Function Code | Problem Code | Causes | What to Check | Related Error Code |
|---|---|---|---|---|
| 1- Control | 1- Pilot Stuck On | Control detected K2 pilot relay stuck closed. | 1. Unplug dishwasher or disconnect power. 2. Check all loads on K2 pilot relay for shorts. 3. Replace control board. |
None |
| 2- Software / Control failure issue | Damaged or corrupted memory or control board. | 1. Unplug dishwasher or disconnect power. 2. Replace control board. |
None | |
| 2- User Interface (cont.) | 1- Stuck Key(s) | Control detected stuck key(s) in keypad or keypad connection. NOTE: If any keys are stuck, the stuck key(s) will be ignored and an error recorded to service history but no alert to customer.
1. Unplug dishwasher or disconnect power. 2. Check responsiveness of each key. 1. If some keys do not respond, then: - Unplug dishwasher or disconnect power. - Disassemble door and disconnect keypad connection from control or LCD display module. - Verify all other connections to control are made. - Reassemble door, but do not close door. - Plug in dishwasher or reconnect power. - Wait at least 7 seconds for control to power up completely. - Close dishwasher door and monitor control response: A. If control is OK (no longer sees stuck keys with keypad unplugged), it will respond by turning on the drain motor for 2 minutes. Replace keypad and console. B. If control is not OK (still sees stuck keys with keypad unplugged), it will not turn on drain motor. Wait for at least 10 seconds. If still no drain response, then replace control or LCD display module (whichever one the keypad was connected to). 2. If all keys appear OK or intermittent, and keypad is capacitive touch type, then: - Verify tub brackets are screwed to underside of countertop and not hanging over keys (if screw head too close, relocate screw to alternate hole). - Check for evidence of moisture or debris on the surface of the keys. If evident, clean and instruct customer about keeping surface clean. - Check error code history for Fan Error 10-3 as potential cause of condensation on user interface. - Verify presence of vent current if model has a vent wax motor. Refer to "Leaks or Drips On Cabinet or Floor" in the "Troubleshooting Guide" section. |
2-1 | |
| 2- No Response from UI | User interface cannot communicate with main control. Loose user interface connection. | 1. Unplug dishwasher or disconnect power.
2. Check the connection between the UI and the control P1C connector. If the connection(s) are loose or if wires are loose or damaged, reconnect, repair, or replace as needed. 3. Refer to "Service Error Codes" table for stuck key (2-1). Run the diagnostic check, item (1). - If drain motor turns on, replace the console. - If drain motor does not turn on, replace the control. |
2-2 | |
| 3- Thermistor Open /OWI | 1- Open connector or component in Temperature Sensing circuit.
2- Open or faulty temperature sensor. 3- Temperature sensor input on control. |
1. Check operation of temperature sensor in Service Diagnostics cycle.
2. Unplug dishwasher or disconnect power. 3. Check all components and connections in the Temperature Sensing circuit with meter. Fix/replace open connection/part. |
3-1, 3-2 | |
| 3- Thermistor Failed Calibration (cont.) | 2- Shorted - Incoming water temperature above 167°F (75°C). | 1. Check incoming water temperature above 167°F (75°C).
2. Check operation of temperature sensor in Service Diagnostics cycle. 3. Unplug dishwasher or disconnect power. 4. Check all components and connections in the Temperature Sensing circuit with meter. Fix/replace shorted connection/part. (See OWI Sensor strip circuit.) |
3-1 | |
| 3- Failed Calibration | 1- OWI failure. | 1. Run Service Diagnostics to check OWI operation. OWI should see low soil with clear water.
2. Check OWI lens surface. Clean if needed. 3. Unplug dishwasher or disconnect power. 4. Check all connections in the Soil Sensing circuit with meter. Fix/replace bad connection/part. NOTE: Run diagnostics after replacing new OWI to force calibration on next wash cycle. |
3-3 | |
| 2- Drain hose check valve not sealing. | Dirty water backs into dishwasher after draining. | 1. Disconnect drain hose at plumbing connection.
2. Elevate hose above dishwasher and fill with water. If water flows into dishwasher, replace entire drain loop. Install as high as possible and attach to underside of counter top if possible. |
None | |
| 4- Wash Motor | 3- Motor Not Running | 1. Loose connection in Motor circuit and/or faulty wash motor.
2. Control Motor Drive circuit or Sense circuit. |
1. Check operation of wash motor during diagnostics.
2. Unplug dishwasher or disconnect power. 3. Check resistances of connections in the Wash circuit. Check for loose connections or replace wash motor. |
None |
| 5- Door Switch | 1- Door Stuck Open | 1. Door was not latched within 4 seconds of pressing the Start/Resume key. | Instruct customer. Refer to Use and Care Guide. | None |
| 2- Door Stuck Closed | 2. Loose connections in Power-up circuit or between keypad(s) and control. | 1. Unplug dishwasher or disconnect power.
2. If meter check of Wash Motor circuit shows normal resistance and still not getting power to the wash motor, replace control. |
None | |
| 3- If none of the above. | Control programmed to not start if it suspects the door switch is stuck closed. Control looks for the door switch to open between cycles. Customer didn't open the door between cycles or door switch contacts stuck closed. | 1. Check strike plate and door connection in Door closure force. Verify door seal is seated properly. Check for interference between dish racks and door. Try bending strike plate down for better engagement.
2. Unplug dishwasher or disconnect power. 3. Check resistances of door switch contacts and all connections in the Door Switch circuit with meter while opening and closing the door latch. - If high resistance with door closed, check/fix loose connections. 4. Measure resistance of door switch contacts while checking mechanical operation of latch assembly. Check for broken plastic pieces on latch assembly. Replace latch if faulty. |
None | |
| 6- Inlet Water (Mechanical Problem) | 1- Low/No Water | 1. No water to dishwasher. | Verify water supply is turned on and supply line adequate. | None |
| 2. Bowls or pots loaded or flipped and captured wash water. | Instruct customer on loading. Refer to Use and Care Guide. | None | ||
| 3. Drain loop detached from tub drain connection. | Check for water siphoning out of unit:
1. Allow dishwasher to complete normal fill. 2. Drain for 5-10 seconds by pressing CANCEL/DRAIN. 3. Open door and confirm water does not siphon out of unit. If it does, confirm drain loop is attached to side of dishwasher and drain hose is connected to a drain at least 20" (50.8 cm) off the floor. |
None | ||
| 4. Water leaking from dishwasher. | Check for leaks under dishwasher. | None | ||
| 5. Fill valve or water line plugged with debris. | Turn off water supply to dishwasher, disconnect water line to inlet valve, inspect/clean the inlet screen of fill valve, and reconnect water. | None | ||
| 6. Overfill switch stuck in "Overfill" position and/or dishwasher not level. | Check other error codes to see if 6-4 also occurred. See 6-4 Error Code. | None | ||
| 6- Inlet Water (cont.) | 7. Fill valve electrical problem. | Check other error codes to see if 6-2 also occurred. See 6-2 Error Code. | None | None |
| 1- Loose connection in Fill Valve circuit and/or open fill valve solenoid. | Unplug dishwasher or disconnect power and check resistances of fill valve solenoid and all connections in the Fill circuit with meter.
- Fix/replace open connection/part. |
None | None | |
| 2- Open fuse on control to fill valve. | Refer to "Fuse Service Check" in "Meter Check of Loads and Fuses" section. | None | None | |
| 3- Fill Valve Drive circuit on control. | Unplug dishwasher or disconnect power and replace control. | None | None | |
| 6- Inlet Water (cont.) | 1- Too many suds. | 1. Allow unit to fill and wash for 1 minute. Open door and check for excessive sudsing.
2. Confirm using proper dishwasher detergent, not hand detergent. 3. Check for excessive rinse aid leakage. |
None | None |
| 2- Bowls or pots loaded or flipped and captured wash water. | Instruct customer on loading. Refer to Use and Care Guide. | None | None | |
| 3- Water leaking from dishwasher. | Check for leaks under dishwasher. | None | None | |
| 4- Diverter disk in sump is missing. | Remove lower spray arm, turbo zone assembly, rear feed tube, and outlet cover and verify whether the red diverter disk is installed. | None | None | |
| 6- Inlet Water (cont.) | 1- Overfill switch stuck in "Overfill" position and/or dishwasher not level. | Remove any items stuck under the float. Verify that the float moves freely and you hear the "click" of the switch contacts. Check/adjust level of the dishwasher. | None | None |
| 2- Drain hose check valve not sealing. | Water backs into dishwasher after draining and elevates water level.
1. Disconnect drain hose at plumbing connection. 2. Elevate hose above dishwasher and fill with water. If water flows into dishwasher, replace entire drain loop. Install as high as possible and attach to underside of countertop if possible. |
None | None | |
| 6- Inlet Water (cont.) | 3- Fill valve triac on control shorted. | If still filling while door is open, fill valve is mechanically stuck open (see below). If not filling with the door open, check operation in Service Diagnostics Test Cycle. Advance Service Cycle until detergent dispenser opens. Fill valve should be off. Listen to see if dishwasher is still filling. If still filling, unplug dishwasher or disconnect power and replace control. | None | None |
| 6- Inlet Water (cont.) | 4- Fill valve mechanically stuck open. | Confirm dishwasher fills while the door is open. If yes, unplug dishwasher or disconnect power, turn off water to dishwasher, replace fill valve, and turn water back on. | None | None |
| 5- Too many suds. | 1. Allow unit to fill and wash for 1 minute. Open door and check for excessive sudsing.
2. Instruct customer if using improper dishwasher detergent (hand detergent). 3. Disconnect power and replace dispenser if see excessive rinse aid leakage. |
None | None | |
| 6- Open fuse F9 to fill valve and other triac loads. | Refer to "Fuse Service Check" in "Meter Check of Loads and Fuses" section. | None | None | |
| 7- Flowmeter | Disconnected or damaged flowmeter. | 1. Disconnect power or unplug unit.
2. Check connections at salt level sensor and at flowmeter. 3. Use meter to check for flowmeter switch closed. Use meter to check salt level sensor. Switch is open when salt reservoir is filled and closed when salt reservoir is low/ empty. 4. Disconnect flowmeter and leave salt level sensor connected. Apply a magnet to side of the salt tank near the sensor connection to force the switch closed. 5. With the magnet in place, run the complete Service Diagnostics cycle. If the sanitized LED turns on in interval 3, the control is good; replace the flowmeter assembly. If the sanitized LED does not turn on, the control input has failed; replace the control. |
None | None |
| 8- Regen Valve | 1- Loose connection in Regen valve circuit and/or open Regen valve solenoid. | Unplug dishwasher or disconnect power and check resistances of Regen valve solenoid and all connections in the Regen Valve circuit. Fix/replace open connection/part. | None | None |
| 2- Open fuse on control to Regen valve. | Refer to "Fuse Service Check" in "Meter Check of Loads and Fuses" section. | None | None | |
| 3- Regen valve drive circuit on the control. | Unplug dishwasher or disconnect power and replace control. | None | None | |
| 7- Heating | 1- No Heat | 1. Control programmed to disable heater, but continue running cycles if it detects a water heating problem. | Running diagnostics clears the control and allows the heater to turn on again. Water heating problem must be corrected, or the control will disable the heater again. See Heater circuit problem below. | None |
| 2- Heater circuit problem: Open in heater. Open connection or component in heater circuit. | 1. Unplug dishwasher or disconnect power.
2. Measure resistance of heater and all components and connections in the Water Heating circuit/Heat Dry circuit. Fix/replace open connection/part. |
None | None | |
| 3- Heater Drive circuit on the control. | Unplug dishwasher or disconnect power and replace control. | None | None | |
| 8- Draining | 2- Drain Motor Electrical Problem | 1. Loose connection in Drain Motor circuit and/or open Drain Motor winding. | Unplug dishwasher or disconnect power and check resistances of drain motor winding and all connections in the drain motor circuit. Fix/replace open connection/part. | None |
| 2- Debris stuck in Drain Motor impeller. | 1. Unplug dishwasher or disconnect power.
2. Remove drain motor and dislodge debris from impeller. |
None | ||
| 3- Open fuse on control to drain motor. | Refer to "Fuse Service Check" in "Meter Check of Loads and Fuses" section. | None | ||
| 4- Drain Motor Drive circuit on the control. | Unplug dishwasher or disconnect power and replace control. | None | None | |
| 8- Draining (cont.) | 3- Drain Stuck On | Drain Motor Drive circuit on the control. | 1. Unplug dishwasher or disconnect power.
2. Inspect drain motor and connections for overheating/shorting. If evidence of overheating/shorting exists, replace. |
None |
| None | ||||
| 9- Diverter | 1- Can't Find Position | 1. Corroded or loose connection in diverter sensor/motor circuit or open/shorted sensor/motor.
2. Mechanical binding of diverter shaft/disc. 3. Open fuse on control to diverter motor. 4. Diverter Motor Drive circuit on the control. |
1. Check operation in Service Diagnostics Cycle. Listen for cam clicking as it rotates or inspect shaft with mirror to see if rotating during diverter interval. If rotating, it is likely the sensor circuit.
2. Unplug dishwasher or disconnect power and check connections in Diverter Sensor and Motor circuit with meter. Fix/replace open connections/parts. 3. Inspect diverter sensor for evidence of water or contaminants. If yes, replace. Check operation of diverter motor during diagnostics. Inspect diverter shaft with mirror. If motor appears to be on (vibrates, hums), but you see limited rotation, replace diverter land seal. |
None |
| 2- Stuck On | Diverter Drive Circuit on the control. | 1. Unplug dishwasher or disconnect power and replace control.
2. Inspect diverter motor and connections for overheating/shorting. If evidence of overheating/shorting exists, replace. |
None | |
| 3- Disk Missing | Control detected diverter disk in sump is missing. | Remove lower spray arm, turbo zone assembly, rear feed tube, and outlet cover. Verify the round diverter disk is installed. | None | |
| Diverter Drive Circuit on the control. | Unplug dishwasher or disconnect power and replace control. | None | None | |
| 10- Other Dispenser | 1- Loose connection in Dispenser circuit and/or open dispenser solenoid. | Unplug dishwasher or disconnect power and check resistances of dispenser solenoid and all connections in the Dispenser circuit. Fix/replace open connection/part. | None | None |
| 2- Open fuse on control to dispenser. | Refer to "Fuse Service Check" in "Meter Check of Loads and Fuses" section. | None | None | |
| 3- Dispenser Drive circuit on the control. | Unplug dishwasher or disconnect power and replace control. | None | None | |
| 10- Other Drying Fan Error | 1- Loose connection in fan circuit, and/or open fan motor. | Unplug dishwasher or disconnect power and check resistances of fan motor and all connections in the fan circuit. Fix/replace open connections or fan. | None | None |
| 2- Fan drive circuit on the control. | Unplug dishwasher or disconnect power and replace control. | None | None |