Brand: Wiko
Category: Mobile Phone
Document Type:
Language: EN
Brand: Wiko
Category: Mobile Phone
Document Type:
Language: EN
Uploaded: Aug. 10, 2025, 12:13 a.m.
Manual Publish Date: 2014-01-01
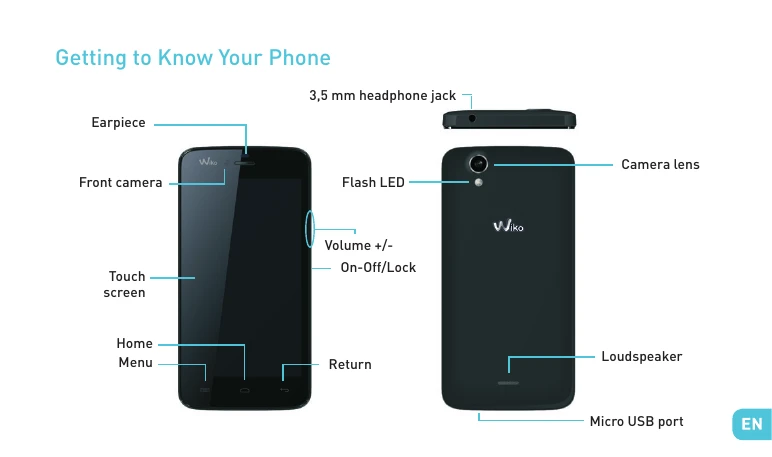
This manual provides safety information, operating guidelines, and basic functions for the Wiko Birdy phone.
Inserting the SIM card: You will need to insert your SIM card before you can use your phone. There is a small notch on the side of the phone to open the back cover. Insert the SIM card following the diagram.
Installing the Battery: Put the battery into its slot by aligning the phone and battery contacts, then press lightly on the battery to fit it into place.
Charging the Battery: Connect the charger to a power outlet and the micro USB connector to the phone's USB port. The phone's status indicator changes to red while charging and turns green when fully charged. A flashing red light indicates a very low battery level.
Turning the Phone On and Off: Press and hold the ON/OFF button to turn the phone on or off. You may need to enter a PIN code if your SIM card is locked.
Network Connection: When the phone is turned on for the first time or after changing SIM cards, the Access point settings menu will appear. Select your operator's access point. If your operator is not listed, you may need to configure the APN manually.
Enabling Data Connection: Navigate to Settings > Wireless & Networks > Mobile networks > Access point names, then enable the access point. Alternatively, you can drag down the notifications panel to enable data connection.
Status Bar Icons: Various icons appear on the status bar to indicate signal strength, Wi-Fi connection, Bluetooth, GPS, call status, new messages, alarms, and more.
Notifications Panel: Drag the status bar downwards to view all notifications. You can clear notifications by tapping an icon or swiping them left or right.